Showing posts with label without. Show all posts
Showing posts with label without. Show all posts
Thursday, January 4, 2018
How to Increase Touch Screen Sensitivity Of Android Smartphone Without Rooting
How to Increase Touch Screen Sensitivity Of Android Smartphone Without Rooting
How To Make Android Touch Screen Smooth Without Root
There are Thousands of ways to increase touch screen sensitivity Of android mobile For rooted users But You will not find any way to Increase Touch screen sensitivity for non rooted users , Thats why i planned to make a post for Non Rooted Android users . By following our guide You will surely Feel Improved Touch screen sensitivity on your non rooted android smartphone. Obviously today we are going to use apps to increase touchscreen responsiveness because editing build.prop and implementing tweaks is not possible without rooting android
.jpg "How to Make android touchscreen smooth without root") |
| Having issues regarding android screen ?? | How to make android touchscreen smooth without root |
I got many mails asking
- Is there any way To make android touchscreen smooth and more sensitive without rooting my phone ??
Ans - Yes !! if you are a non rooted user and want to increase android touchscreen sensitivity without rooting your phone , you are at right place .
- Are there any Apps For Non Rooted users To increase android touch screen sensitivity and make them smooth ??
Ans - Yes !! There are tons of apps With which you can make your android screen smooth and sensitive . But !!!!!! Wrong use of those apps can make your screen malfunction . and at last to get rid of malfunction you will have to perform a hard reset of your android Smartphone .
Dont Miss :- How To Increase Internet Speed In Android Smartphone
Many low budget smartphones start having issues in the sensitivity
of Touchscreen .
So i wondered to find a way to Boost touchscreen and increase screen sensitivity and make it super smooth for non rooted users
Samsung Smartphones already have a option to increase touchscreen sensitivity known as screen calibration. But what about Android Smartphones That dont have a option to calibrate their touch screen and increase performance of their android screen
Before This article i have already covered How To Make Android Touch Screen Smooth For rooted Users .
How to make android touchscreen super smooth without rooting - Guide
This trick will work for every OS i.e gingerbread , ice cream sandwich , jellybean , kitkat so dont hesitate and give a try :)
There are many apps which claim to make your android screen smooth and sensitive but they actually are fake .
Today in this post we will tell you about the most resulting and trusted app .
Lets start with the app which i like the most :- Touch Recalibration
** The only thing which makes it admin choice is its size which is only 30 KB
.png "How to make android touchscreen smooth without rooting") |
| touchscreen booster | How to increase touch screen sensitivity of android smartphone without rooting |
How to use touch screen booster app to make android screen smooth
** Launch The app Screen calibration From your androids App Drawer
** Click On the Re calibration box Shown in the image
 |
| Recalibration | How to increase android touch screen performance without root |
.png "How to make android touchscreen smooth without rooting") |
| Touch screen boosting app | How to increase sensitivity of android screen without root |
** After clicking Ok wait for a while and let the app complete its work and dont touch screen meanwhile
.png "How to make android touchscreen smooth without rooting") |
| android screen calibration | increase android screen performance sensitivity and make smooth without root |
Download Link Here :- DOWNLOAD
Dont miss :- How To Make Android Gingerbread 2.3 Look Like Jelly Bean Without Rooting
Now Second App This app also Shows Good results You Can see In the first Screenshot that i use both app . If you want good gaming performance screen wise then i will recommend this app to you .
This app is basically made for Samsung galaxy S but it works for everyone . tested personally by me
** Launch the App from Drawer
.png "How to make android touch screen smooth without rooting") |
| SGS touchscreen booster | Increase Touchscreen performance of your android smartphone without rooting |
** Set Sensitivity To - 80
** Duration To register Touch - 0
** Minimum Motion - 0
** Motion Filter - 70
** Multi Touch points - 2
** Start service on boot
** click on Apply changes
** You can try various combinations with it and chose the one that suits you best.
Download sgs screen booster from playstore its free :)
Hope Our Guide On How to make android touchscreen smooth without rooting helped you in increasing touch screen sensitivity of your android smartphone
.png "How to make android touchscreen smooth without rooting") |
| Screen booster | How to increase android touchscreen responsiveness and scrolling without rooting |
Download sgs screen booster from playstore its free :)
Hope Our Guide On How to make android touchscreen smooth without rooting helped you in increasing touch screen sensitivity of your android smartphone
How to Transfer Data to Any Android Mobile Without Using Data Cable
How to Transfer Data to Any Android Mobile Without Using Data Cable
How to Transfer Data to Any Android Mobile Without Using Data Cable?
So here we provide one unique and useful solution to transfer data from pc to android mobile without using any data cable.
How to Transfer Data to Any Android Mobile without Data Cable?
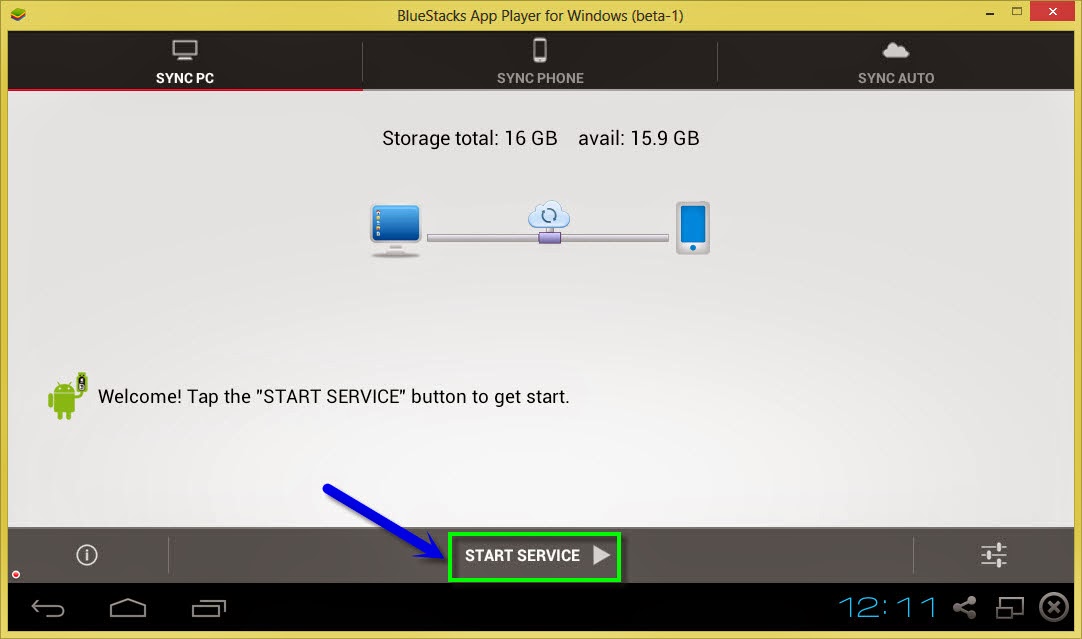
To overcome this problem there is one excellent application which allows you to send and receive files from pc to android mobile. That is Software Data Cable (Pro), by using this application not only transfer from pc to android mobile but also transfer from other devices.1. To work with this application first you need to download Software Data Cable (Pro) application from Google play Store and install it on your android mobile.
Download Software Data Cable (Pro)
2. After installing this application just connect to same Wi-Fi network which is already connected to your pc or mac.
3. Now open application and click on �start service� button and it will display an ip address. Note that ip address and paste it on windows explorer.
4. Once you enter this ip address then press enter to see all your mobile folders in your pc.
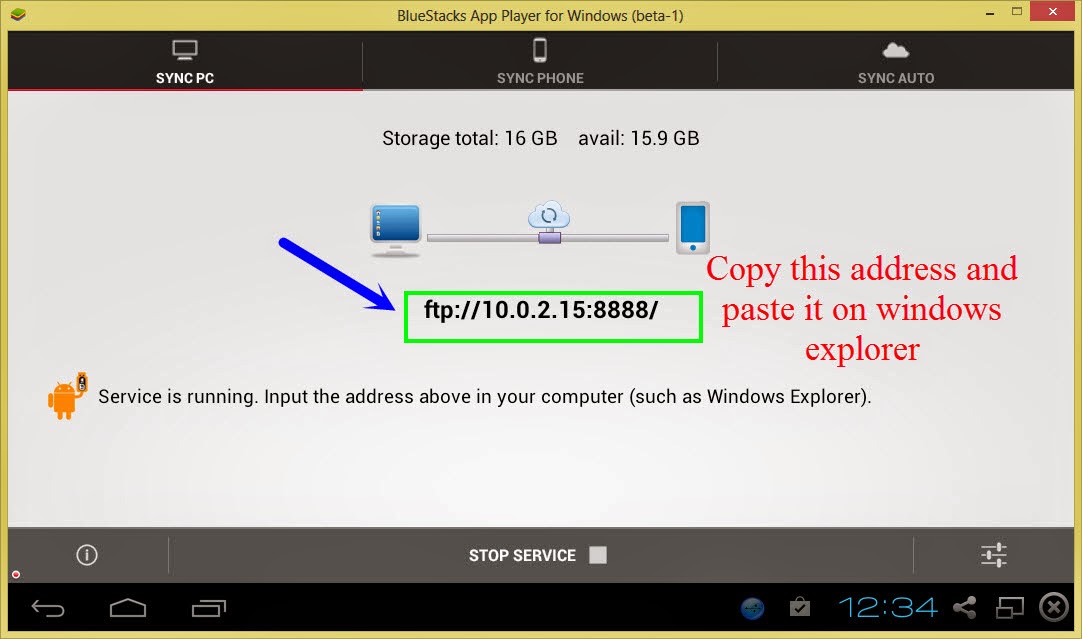
6. That�s it, in this way we can transfer any file/folder from pc to android mobile but make sure you have Wi-Fi connection.
7. You can also change settings of this application as per your requirements.
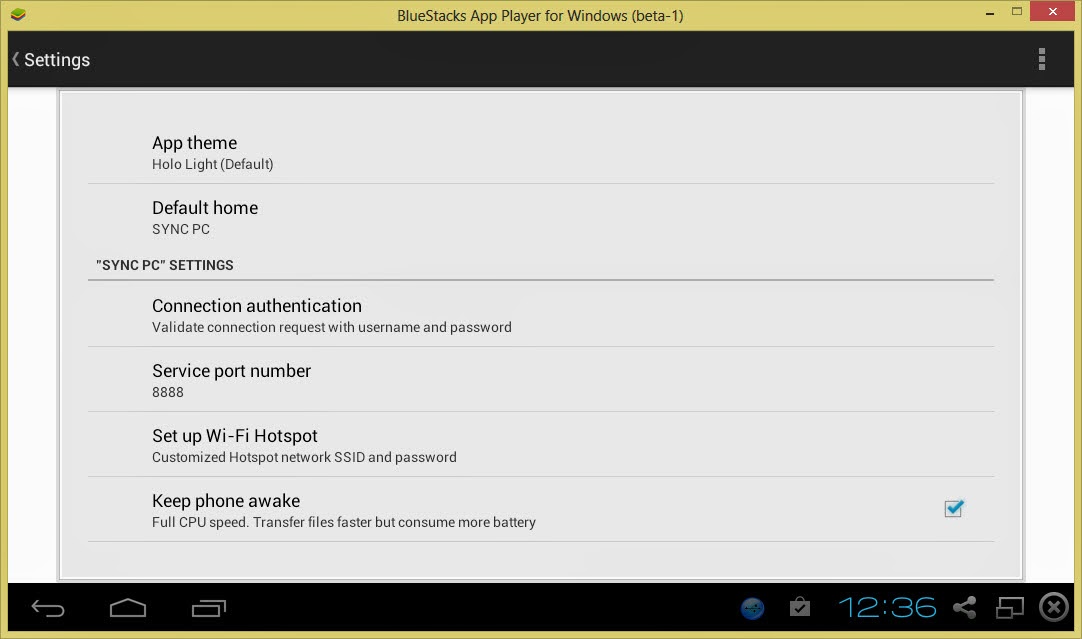
Features of Software Data Cable (Pro):
- There is no need to download and install drivers to work with this application.
- Send photos, videos, apps, music and other files to other mobiles, tablets etc.
- You can also auto sync all important data to computer or any cloud storage on daily, weekly basis.
- Transferring speed is too fast with 54Mb/s
- Sync all your important data to cloud storage networks like Microsoft one drive and baidu etc. You can also sync folders and files to laptop, pc or any other file server.
- This is also compatible with windows explorer and other FTP clients like Filezilla.
Wednesday, January 3, 2018
How to Screenshot HTC Desire 828 dual sim without any App
How to Screenshot HTC Desire 828 dual sim without any App
This is one of these occasions where it would be incredibly useful if you knew how to do a screen dump or Screenshot of your mobiles screen. Taking a screenshot on the HTC Desire 828 dual sim is quite simple and doesnt need any 3rd party apps to accomplish that. Simply follow the steps below and you will have your screen captured.
First step is to go to screen which you want to capture.
You can slide down the notification shade, and view the image. Or you can press on share to share it with any application of your choosing. If it doesnt work, make sure youre pressing the home key and power key at exactly the same time.

Screen is 5.5 inches supporting 1080 x 1920 pixels plus corning protected which is great advantage. The Viewing angles are pretty good as well. There are not tweaks to the Android operating system which works well with default HTC Touch sense. With up to 200 GB of memory available to the user and the ability to add a microSD card, there is no complaining about the storage here. 16 GB of internal space is sufficient for a normal Android User.
Phone comes with 13MP camera with LED flash packed on the rear and a 4MP fixed focus camera on the front. This Smartphone is capable of shooting great videos at 1080p@30fps. Backing up the HTC Desire 828 dual sim is a 2800 mAh battery.
At $250, this is a good looking phone that promises decent all round performance. Overall, there�s little to complain about the HTC Desire 828 dual sim from the perspective of a basic Android user.
Take a Screenshot HTC Desire 828 (dual sim)
Steps to capture a screenshot on Desire 828 dual simFirst step is to go to screen which you want to capture.
Default Android Method
- Press Power and Volume down keys together
- Make sure you hold both keys for 2 seconds
- A Polaroid animation is displayed and shutter sound will come which means screenshot has been taken
HTC Method
- Another method is to press Power button and Home Key
- Follow similar instructions given previous method
- If screenshot is not taken, try to repeat steps again
You can slide down the notification shade, and view the image. Or you can press on share to share it with any application of your choosing. If it doesnt work, make sure youre pressing the home key and power key at exactly the same time.
Where the pictures are stored?
The image is saved in the Screenshots album in Gallery.Screen is 5.5 inches supporting 1080 x 1920 pixels plus corning protected which is great advantage. The Viewing angles are pretty good as well. There are not tweaks to the Android operating system which works well with default HTC Touch sense. With up to 200 GB of memory available to the user and the ability to add a microSD card, there is no complaining about the storage here. 16 GB of internal space is sufficient for a normal Android User.
Phone comes with 13MP camera with LED flash packed on the rear and a 4MP fixed focus camera on the front. This Smartphone is capable of shooting great videos at 1080p@30fps. Backing up the HTC Desire 828 dual sim is a 2800 mAh battery.
At $250, this is a good looking phone that promises decent all round performance. Overall, there�s little to complain about the HTC Desire 828 dual sim from the perspective of a basic Android user.
HUAWEI E1550 UNLOKING SOLUTION WITHOUT ANY TOOL
HUAWEI E1550 UNLOKING SOLUTION WITHOUT ANY TOOL
huawei e1550 unlocking without any tool

here is the flasher with inbuild flash file.
download here
now u need flash code for it.
download here
first u have to calculate flash code by imei in huawei tab after that flash it by the firmware.
ur modem will be unlock successfully any version.
earn online money without any investment
Make A Free Website
Free Hosting. Free Design Tools
Easy To Use. Everything You Need
WebStarts.com
Tuesday, January 2, 2018
How to move apps on SD card Without Root hindi stock rom go to rompure com
How to move apps on SD card Without Root hindi stock rom go to rompure com
How to move apps on SD card Without Root. (hindi)
Did you know How to move apps on SD card Without Root??
Many people ask me how to move apps to sd card on android. So today I am going to show how to move apps to sd card. So this video is all about how to move apps to sd card on android marshmallow also. So guys watch this video till the end then you learn move apps to sd card in simple ways. So guys watch this video and know about move apps to sd card without root, or move apps to sd card marshmallow. So guys if you find this video helpful for you then please like and share this video and dont forget to subscribe our YouTube channel Mahesh Technicals.
Step by step tutorial :
1. Download Apk file of app you want to move to sd card put it on phone storage/save/download on phone
2. Download and install Apk Editor From Play Store Google Playstore
3. Open Apk Editor and choose Select an apk file
4. Now navigate the file you downloaded in step 1
5. Now choose common edit
6. Now main point tap on "Prefer External Storage" option and tap on Save button
7. After That install app and now you can see you can move app to the SD CARD WITHOUT ROOT .
NOTE :- THIS IS ONLY FOR APK APPLICATION FOR NON ROOT USERS IF YOU WANT TO MOVE DATA/OBB AND DEFAULT STORAGE ON SD CARD YOU HAVE TO ROOT UR DEVICE |
How to move non movable apps to SD card WITHOUT ROOT
DOWNLOAD APK EDITOR :
LINK - 1:

LINK - 2:

Did you know How to move apps on SD card Without Root??
Many people ask me how to move apps to sd card on android. So today I am going to show how to move apps to sd card. So this video is all about how to move apps to sd card on android marshmallow also. So guys watch this video till the end then you learn move apps to sd card in simple ways. So guys watch this video and know about move apps to sd card without root, or move apps to sd card marshmallow. So guys if you find this video helpful for you then please like and share this video and dont forget to subscribe our YouTube channel Mahesh Technicals.
Step by step tutorial :
1. Download Apk file of app you want to move to sd card put it on phone storage/save/download on phone
2. Download and install Apk Editor From Play Store Google Playstore
3. Open Apk Editor and choose Select an apk file
4. Now navigate the file you downloaded in step 1
5. Now choose common edit
6. Now main point tap on "Prefer External Storage" option and tap on Save button
7. After That install app and now you can see you can move app to the SD CARD WITHOUT ROOT .
NOTE :- THIS IS ONLY FOR APK APPLICATION FOR NON ROOT USERS IF YOU WANT TO MOVE DATA/OBB AND DEFAULT STORAGE ON SD CARD YOU HAVE TO ROOT UR DEVICE |
How to move non movable apps to SD card WITHOUT ROOT
DOWNLOAD APK EDITOR :
LINK - 1:
LINK - 2:
How To View PSD Image Files Without Installing Photoshop
How To View PSD Image Files Without Installing Photoshop
Yesterday, I requested my friend to send me the snapshot of the PSD file of the Wordpress design. But he claimed that his Photoshop CS2 has expired. He thought of going to his friend and copying the snapshot and again sending back to me. Photoshop Document itself was large size, therefore I asked for the snapshot. If I was going to accept his idea, then I would have to wait whole day for just a snapshot.
Rather I suggested him certain idea to view PSD files without the need of Photoshop. And that is what I want to share with my visitors as well.With IrfanView, a 1.3 MB image viewing freeware utility, you can open almost all the images without need of any high level software. Here is a list of image files that I can open.

IrfanView is a freeware utility, licensed under End User License Agreement (EULA).
It is not only a viewer; rather you can edit the pictures there. Basically it supports cropping, cut, paste, copy, drawing tools, eraser tools etc. IrfanView is plug-in enabled, that means they have plug-in to make it more accessible and useful.

Click here to download IrfanView
Monday, January 1, 2018
How to increase apps storage in Micromax Unite 2 without PC
How to increase apps storage in Micromax Unite 2 without PC
Repartition How to increase apps storage in Micromax Unite 2 without PC
Micromax Unite 2 comes with 0.89 GB of phone storage for apps installation. 0.89 GB is not enough for apps. We can increase this memory by data repartition.
You need:
1. CWM recovery (Flashing guide)
2. EBRs (Download any one zip file from below link, also download stock partition file)
a) For Jellybean 4 GB ROM (Download)
b) For Kitkat 4 GB ROM (Download)
c) For Jellybean 8 GB ROM (Download)
d) For Kitkat 8 GB ROM (Download)
Alternate download link (if above links not worked)
3. Micromax Unite 2 / Myphone Rio Lite
Note:
Internal memory = Total ROM - ( 1.44 GB + apps memory)
If ROM is 8 GB and phone memory is 2.5 GB then internal memory will be 4 GB.
Make Backups before flashing:
1. Nandroid backup (Guide)
NOTE: You dont need a rooted phone for repartition. Factory reset is required after flashing EBRs so please make recovery backup or titanium backup if you want to restore data. Install App Backup and Restore from play store to backup apks. Move all data like pictures, videos and other files from internal sd card to external sd card or pen drive.
To repartition phone storage follow these steps:
Step 1: Flash custom recovery. Click HERE for guide (If you dont want to root your phone then follow PC METHOD to flash recovery).
Step 2: Put downloaded zip file in external SD card.

Step 3: Switch off phone and press vol up + vol down + power button to reboot to recovery. Press vol down to select install zip from sdcard then press power button.

Step 4: Select choose zip from sdcard then press power button.

Step 5: Press link download
Read more »
How To Install Uninstall Play Store From Nokia X X XL Without Rooting In Simple Easy Way
How To Install Uninstall Play Store From Nokia X X XL Without Rooting In Simple Easy Way

Earlier I have posted the tutorial to root Nokia X, X+ & XL with play store .In this thread I am going to show you how to install Google Play store without rooting your Nokia X, X+ AND XL.
Before installing Play Store on Nokia X, X+ and Nokia XL you need to do following things:
- Enable USB Debugging mode
- Launch device settings.
- Tap Developer options
- Enable USB debugging in the Debugging section (Make sure USB debugging is checked)
After doing all the above procedures download Nokia X Tool Kit with Nokia X Manager here.
After downloading the the above file extract them on your pc using winrar and you will have a folder like below picture in your pc.
.png)
Open the folder and inside it you will see two files like below picture
.png)
Now run Setup_NokiaXMgr_v1.1.0.0 to install it on your computer.
.png)
After installing NokiaX Manager on your PC open it up on your pc and it should be look like a below picture
.png)
Now connect your Nokia X, X+ & XL with you pc until Nokia X Manager detects your phone and it should be look like a below picture (All the grey fields in Nokia X Manager will go black . If incase it doesnt detect your phone than this means you have not enabled a Usb Debugging mode or else drivers are not installed.
.png)
Now in the above picture you can see that we have install GApps option press it and you will see a window like below picture
.png)
Now press ok and you will see another window like a below picture
.png)
Now this is File Explorer of your pc which have opened up to locate Google Play files which we have already downloaded in our PC (Nokia Tool Kit With Nokia X Manager). Locate the file like a below picture
.png)
Inside the above folder we have one files like a below picture follow caption instruction
.png)
.png)
At the moment we are installing Gapps on our phone so we will choose Install Gapps from a below picture. Note: If we will choose Uninstalling Gapps option from Nokia X Manager then we will obviously choose Uninstalling G Apps option from below picture
.png)
After following all the above screenshot instructions you will have window like below picture on you Nokia X Manager. Due to any circumstances if nokia x manager give you error not responding dont get panic let it finish its work and your phone will be temporarily rebooted to TWRP to install Gapps in your phone as msg given by Nokia X manager in a below picture.
.png)
Now all the things goes to phone it self follow below screen caption

Now your phone is TWRP temporarily and here you have to press Mount like above picture

Now you have to press Mount Usb Storage like a above picture. Make sure after pressing Mount Usb Storage you will take out a usb cable from your phone

Now press back key like a above picture

Now press Install like a above picture

Now here drag below and search for NokiaX_Gapps_Package Zip file like above picture

Now on above picture swipe to confirm flash. TWRP install Gapps on your phone then press reboot. Please note if by any chance your phone get stuck in rebooting take out a battery of your phone insert it back and turn on your phone. Your phone will have playstore installed in it. If it doesnt have it follow all the procedures again.
PLEASE NOTE:
In some cases Nokia X, X+ & XL dont show Playstore when you restart them, but there is a trick to make it visible
WHAT YOU HAVE TO DO IF PLAYSTORE IS STILL NOT VISIBLE AFTER INSTALLING IT.
Download the front line commando 2 apk and extract it using winrar on you pc and transfer it to your phone. Install it on your phone (make sure unknown sources is checked in your phone to install a apk) and open it with Wifi enabled on your phone it will ask you to update the game press update and you will see two options select update from play store and you will shortly see a play store on your phone. This trick seems weird but this is how sometimes things work.
IF STILL YOU ARE NOT GETTING PLAY STORE WATCH OUT A BELOW LINK:
http://lionking853.blogspot.co.uk/2014/06/how-to-root-nokia-x-nokia-x-nokia-xl.html
Sunday, December 31, 2017
How To Unlock File Manager Without Password If File Manager Is Lock Open Lock Without Password stock rom go to rompure com
How To Unlock File Manager Without Password If File Manager Is Lock Open Lock Without Password stock rom go to rompure com
How To Unlock File Manager Without Password If File Manager Is Lock - Open Lock Without Password.
Did you know How To Unlock File Manager Without Password If File Manager Is Lock??
Many people ask me How To Unlock File Manager Without Password If File Manager Is Lock - Open Lock Without Password. So today I am going to show you how to unlock file manager without password. Do guys this video for you. In this video i am going to show how to unlock someones file manager or internal storage,files, photos, music, videos, etc. You can access everything in his phone without password. This video all about unlock files on any Android Phone without password. So watch the video till the end then you properly understand, how to unlock sdcard without password. If you find this video is helpful so please like and share this video and
DONT FORGET TO SUBSCRIBE OUR YOUTUBE CHANNEL
MAHESH TECHNICALS.!!!!
(1) Open chrome browser.
(2) type address - file:///sdcard
(3) enjoy your every file will unlocked. So now you can access all internal memory essyly.
Thank you so much.
How To Unlock File Manager Without Password If File Manager Is Lock - Open Lock Without Password
How to play Gameloft games without lag and Disable CPU throtling without root on Lenovo K3 Note k50t5 k50a40
How to play Gameloft games without lag and Disable CPU throtling without root on Lenovo K3 Note k50t5 k50a40
The Lenovo K3 Note is an amazing budget phablet that does pretty much everything right. But users complained that games lagged after playing for about 5-10 minutes in K3 Note whereas the Meizu M2 Note which has the same CPU as the Lenovo K3 Note handled all the games very smoothly.
So what do you think what might be the problem here?
Lenovo has enabled CPU throttling to prevent CPU temperatures from going above 50 degree celsius.
So, whenever you play game on K3 Note after a few minutes the CPU temp hits 50 degree celsius mark which activates the thermal throttling mechanism. When thermal throttling gets activated you can see a sudden frame drop while playing games like Asphalt 8 and Modern Combat 5.
Here I will show you how to disable thermal throttling in Lenovo K3 Note without rooting your phone!
PROCEDURE TO DISABLE CPU THROTTLING ON LENOVO K3 NOTE :
1. Flash TWRP recovery using SP Flash Tools by following tutorial from this link here : http://yoyovirus.blogspot.in/2015/08/how-to-flash-custom-recovery-to-lenovo.html
2. After you successfully flash TWRP recovery, boot your phone into the recovery mode by presssing Volume UP + Volume DOWN + Power buttons together at the same time.
3. Once you boot into TWRP recovery you will see some options like shown in the below image.
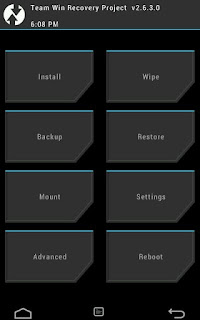
4. Now select Mount Option and then put a cross on "System" option to Mount the System as hown in below image.
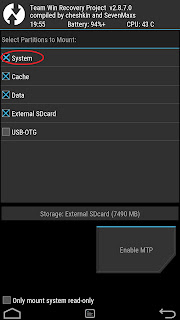
5. Then press the back button to return to the main screen of TWRP
recovery.
6. Now, select Advanced option and then select File Manager option.
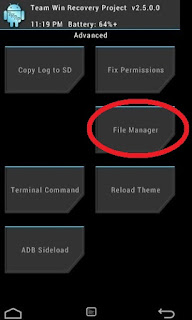
7. Here browse goto root path and then browse to System/etc/.tp path.
8. Here you will see three files . Select the file with name "thermal.conf".
9. Rename this file by giving any extension like "thermal.conf.xxx".
10. Congrats you have successfully disabled CPU throttling from Lenovo K3 Note.
11. Go back to main screen of your TWRP recovery and power off your phone by selecting Restart and then Turn off option.
12.Now Flash "Stock Recovery" using SP Flash Tools in similar way you flashe TWRP recovery.
13.Power On your phone and now you can play all the Gameloft games like Asphalt 8 and Modern Combat 5 and other HD games with no lags and frame drops.
Note :
1.Only for Vibe UI ROW Stock ROM.
2.You can also disable CPU throttling on a rooted K3 Note by renaming "thermal.conf" to "thermal.conf.xxx" file in "System/etc/.tp" directory using ES File Explorer. But by rooting your k3 Note you can not update your phone via OTA updates.So, I suggest the above procedure.
FB GROUP : LENOVO K3 NOTE OFFICIAL GROUP [INDIA]
https://www.facebook.com/groups/Lenovo.K3.Note.Official.Group.India/
Saturday, December 30, 2017
How To Take Screenshot on Moto G4 Plus Without Using Apps
How To Take Screenshot on Moto G4 Plus Without Using Apps
Generally, what we do is we take a screenshot or snapshot and share using WhatsApp, Hike, Telegram, etc. So, taking a screenshot on Moto G4 Plus is much easier using a special key combination. To take a snapshot on Moto G4 Plus, you don�t need to have an extra app which eats up your device valuable storage.

you can take screenshot at any time such as in between playing games, watching videos, listening music or while loading web pages. It�s much easier to take a snapshot on Moto G4 Plus without closing any of the running apps. In fact, there are many apps available in the market which can easily take a screenshot on Moto G4 Plus, but the problem is they requires root access and this is the reason, to avoid the apps. So, in this article we will be helping to take a snapshot on Moto G4 Plus without any hassle.
you can take screenshot at any time such as in between playing games, watching videos, listening music or while loading web pages. It�s much easier to take a snapshot on Moto G4 Plus without closing any of the running apps. In fact, there are many apps available in the market which can easily take a screenshot on Moto G4 Plus, but the problem is they requires root access and this is the reason, to avoid the apps. So, in this article we will be helping to take a snapshot on Moto G4 Plus without any hassle.
How To Take Screenshot on Moto G4 Plus Without Using Apps
- Get your screen ready of which you want to take a screenshot / snapshot of!
- Now, simultaneously hold Power Button and Volume Down button for 2 � 3 seconds.
- Immediately, you will have a preview of a screenshot and a new notification will be seen in your status bar.
- In the notification, it will say that the �Screenshot Captured�.
So, this is how you can take screenshot on Moto G4 Plus without using apps. In order to view the captured screenshot, pull down from the status bar and tap on notification. If you have cleared the notification, then go to Gallery and see the Screenshots folder to find all your captured screenshots in your device.
Subscribe to:
Posts (Atom)