Thursday, January 4, 2018
How to Transfer Data to Any Android Mobile Without Using Data Cable
How to Transfer Data to Any Android Mobile Without Using Data Cable
How to Transfer Data to Any Android Mobile Without Using Data Cable?
So here we provide one unique and useful solution to transfer data from pc to android mobile without using any data cable.
How to Transfer Data to Any Android Mobile without Data Cable?
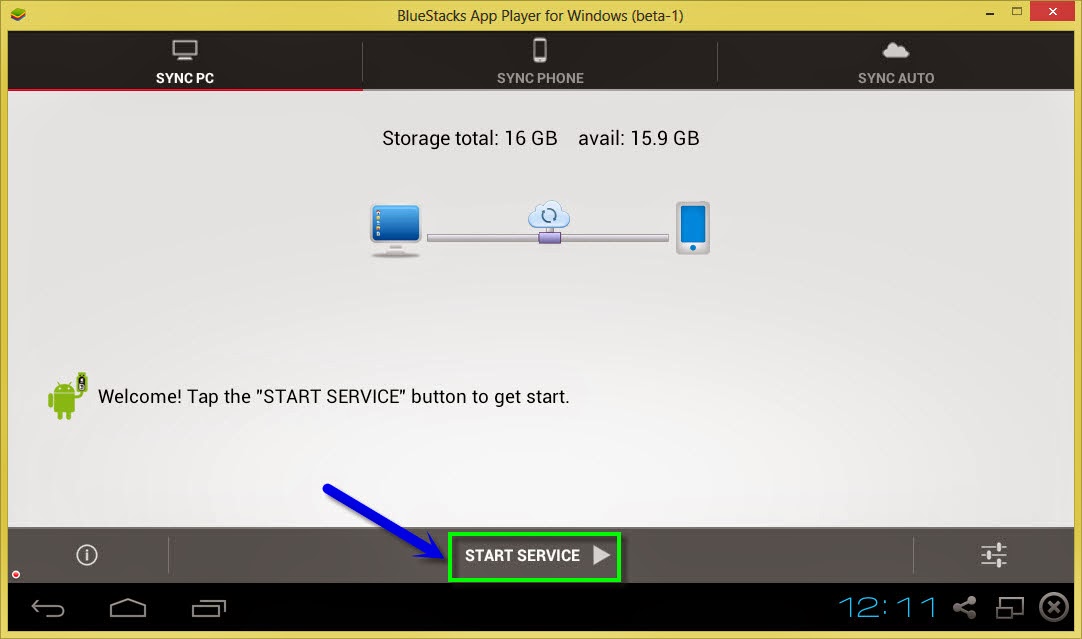
To overcome this problem there is one excellent application which allows you to send and receive files from pc to android mobile. That is Software Data Cable (Pro), by using this application not only transfer from pc to android mobile but also transfer from other devices.1. To work with this application first you need to download Software Data Cable (Pro) application from Google play Store and install it on your android mobile.
Download Software Data Cable (Pro)
2. After installing this application just connect to same Wi-Fi network which is already connected to your pc or mac.
3. Now open application and click on �start service� button and it will display an ip address. Note that ip address and paste it on windows explorer.
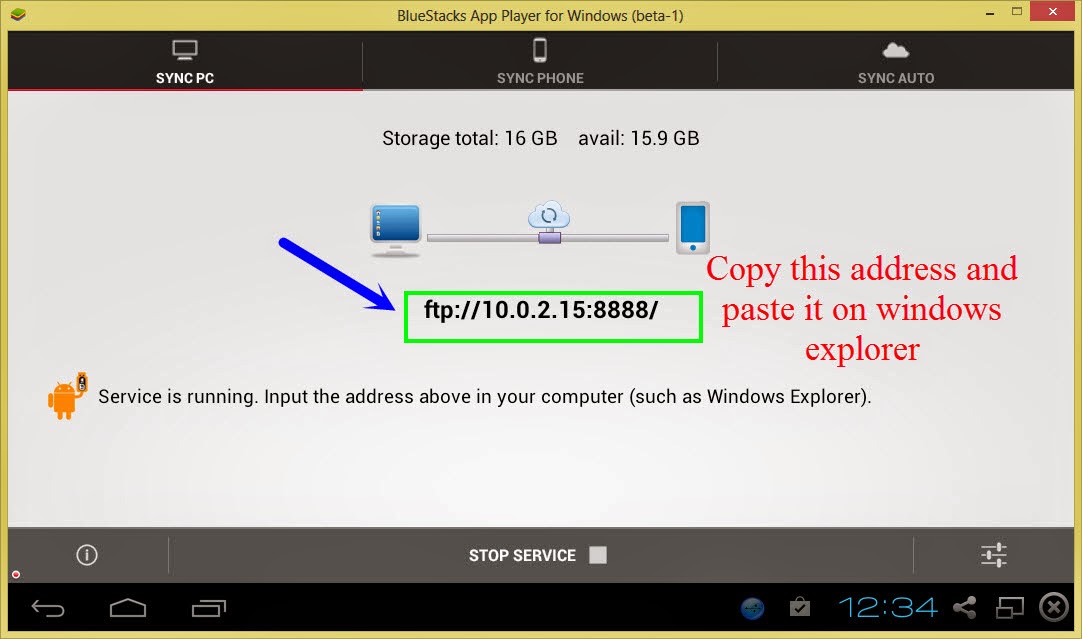
6. That�s it, in this way we can transfer any file/folder from pc to android mobile but make sure you have Wi-Fi connection.
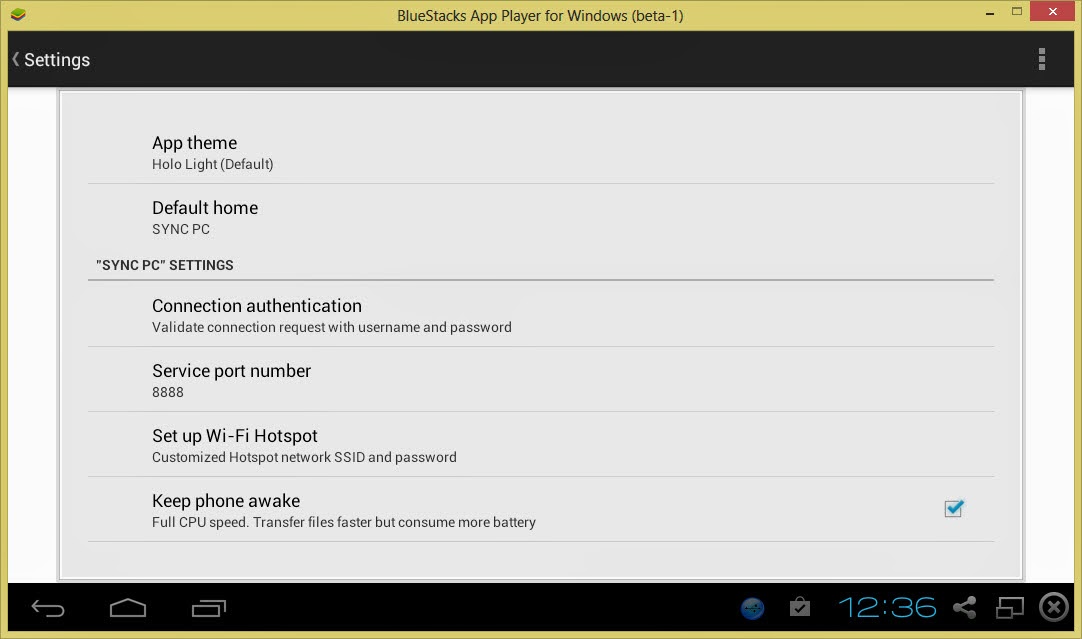
7. You can also change settings of this application as per your requirements.
Features of Software Data Cable (Pro):
- There is no need to download and install drivers to work with this application.
- Send photos, videos, apps, music and other files to other mobiles, tablets etc.
- You can also auto sync all important data to computer or any cloud storage on daily, weekly basis.
- Transferring speed is too fast with 54Mb/s
- Sync all your important data to cloud storage networks like Microsoft one drive and baidu etc. You can also sync folders and files to laptop, pc or any other file server.
- This is also compatible with windows explorer and other FTP clients like Filezilla.
Wednesday, January 3, 2018
How To Update Samsung Galaxy S3 LTE GT I9305 Firmware Version Using Odin Flasher
How To Update Samsung Galaxy S3 LTE GT I9305 Firmware Version Using Odin Flasher
Mostly the new Firmware version is released to fix some bugs or to add some new functions, And sometimes it is released to fix some security threats.
What we should do before performing the update:
- First of all you should know your current device firmware version, Write it down so in case something goes wrong it will help you to fix your device.
- Check that you got the suitable firmware package for your device, And make sure to get it from trusted sources only.
- Check your devices battery level to be at least at 90%, Otherwise charge it before starting the update process.
- Make sure to backup any saved data into your device, Like contacts, messages...etc.
Needed Downloads For Updating Samsung I9305 GS3 LTE Firmware:
- Samsung I9305 GS3 LTE Stock Firmware Package.
- Odin Flasher.
- Samsung I9305 GS3 LTE USB Drivers.
Needed Tools For Updating Samsung I9305 GS3 LTE Firmware:
- Suitable USB cable.
- A stable computer running Windows OS.
Important Notice: We provide this guide for help purpose only, And we hold no responsibility at all, So keep in mind that your are doing this at your own RISK.
Preparation:
After downloading the needed files you should extract the zipped ones, And install the USB drivers (Restart your PC after installing).
Samsung GT-I9305 GS3 LTE Firmware Update Steps:
- Turn off the device, And take out its battery, SIM and memory cards.
Click PDA button to select: CODE_I9305xxxxxx_746327_REV00_user_low_ship.tar.md5
Click Phone button to select: MODEM_I9305xxxxxx_REV05_CL1213990.tar.md5
Click CSC button to select: CSC_xx_I9305Oxxxxxx_1065030_REV00_user_low_ship.tar.md5
- Entering the Download Mode:
Put the battery back into your device, Press and Hold Volume Down key + Power, After you get the warning message release all keys and press Volume Up key.
- Use the USB cable to connect your device to the computer, Dont use any USB-HUB for connecting, And use only main USB slots.
Notice: When you get one big file inside the firmware package, Then it should be selected as aPDA file only, And do not check Re-Partition option or use PIT file at all.
How to use CrashPlan but not suffer from using so much RAM memory
How to use CrashPlan but not suffer from using so much RAM memory
I use CrashPlan to backup my data as mentioned in a previous article � it�s free for local backups and for sharing HDD space using multiple friends� HDD space. I have noticed that the RAM usage goes up in proportion to the number of files that you have selected to backup � even during the time when the backups are disabled. 
The settings to limit the time that CrashPlan does the backups can be found in the CrashPlan Desktop interface under �Settings->Backup->Between Specified Times�. I have selected From 18:00 to 08:00 and ticked each day � so that backups only happen at night daily. 
I noticed that even when the backup was disabled, the CrashPlanService was using a lot of RAM memory (over 500MB) � and I found my PC swapping to disc all the time � which was slowing my PC down � a bit of a waste! So, I found a way to create a schedule that stopped the CrashPlanService just after 08h00 and start it again just before 18h00.
Creating a scheduled task to kill the service:
Open the �Control Panel->Administrative Tools-> Task Scheduler�
Click into �Microsoft->Windows�: 


and under �Add arguments� enter: /IM CrashPlanService.exe /F 
Creating a scheduled task to start the service:
Click on �Create Task�: 
and under �Add arguments� enter: start CrashPlanService

Your tasks list should look like this:

You can test the tasks by right clicking the task and selecting �Run�:

With thanks to Scott Granneman for his blog that describes the steps to do this in Linux.
How to recharge mobile using ICICI via SMS
How to recharge mobile using ICICI via SMS
Want to know how to recharge your number via text using ICICI account. Go through this article to get to know the process.
ICICI bank providing an option to recharge your mobile number(airtel, aircel, tata docomo..etc) via text. You dont need internet access at all to recharge your phone.
Steps to Recharge Phone by SMS
Send a message from the registered mobile number as shown in tje below format.
SMS MTOPUP <Mobile no> <Operator> <Amt> <Last 6digits of ICICI Bank Acct no> to 09222208888
You will get an OTP to your registered mobile, submit it and enjoy.
Make sure the entered mobile number and the amount is correct before sending, once the process done, it cant be stopped.
Tags : recharge by sms, currency via sms icici, steps to recharge via text sms.
Tuesday, January 2, 2018
How to Make Bootable USB Pendrive Install Windows 7 and 8 Using USB
How to Make Bootable USB Pendrive Install Windows 7 and 8 Using USB
 Make Bootable USB / Pendrive Using ISO image and Windows Software:
Let have a Look to Windows 8 First because it is Latest one.
Steps and Requirement are as Follow for Making Windows 8 or 8.1 Bootable:
- You will Require Windows 8 or 8.1 ISO image file. (Download it from here)
- You will Require Windows Bootable Maker Software for Writing ISO image to USB or DVD. (Download it from here)
- Now Select ISO image file you Downloaded of Windows 8.
- Now in Select USB option select the Letter of USB drive showing.
- Tick the Format Drive Option and Click on Create.
- Now leave the Software to work and have a Tea or Coffee as It gonna take a Long time. :p


Steps and Requirement are as Follow for Making Windows 7 Bootable:
- Download Windows 7 ISO image.
- Download Windows 7 Boot Maker Software.
- Now Install the Windows 7 Boot Maker Software. Just like Next,Next,Install and Finish.
- Now Run the Windows Boot Maker Software.
-

- Now Select Where you want to Create a Bootable USB or DVD.

- Now if you Choose USB then,


- And If you Choose DVD then,


- Now you are Done. Your Bootable USB or DVD is now Ready.Huuu..!!

- Download Windows 8 ISO image
- Download Windows 8 USB boot Maker Software
- Download Windows 7 ISO image
- Download Windows 7 USB boot Maker Software
Monday, January 1, 2018
How To Hack Android Games Using Game Guardian APK
How To Hack Android Games Using Game Guardian APK
Hello Visitors! You would have already read tonnes of articles about how android Games can be hacked? Today, I shall try my best to explain briefly the method of hacking android Games. Hopefully, this article will truly make you enable to hack any android video Games. It is mandatory for you to read this article very carefully so that you could understand each and every word.
In spite of doing my best to explain, I cant claim that my this topic will make you a programmer, but I sure that by using some of the applications you will fulfill your job of hacking any video game.In addition, this article would be helpful for those geeks or tricklers who want to tamper the game score, game coins and game steps, this post will not for those who want to hack online games, this will be for those who are conscious about hacking of offline games.

How to hack a game using game Guardian Application
Now, come to the point and lets start the real job. You are in about to hack offline games, especially those games which involve single player. In case, if, it is difficult for you to earn coins, to complete the game or you are not skipping the step to cross the game, then it is very important for you to stick in here to read the next few lines.
What do you do??
- As, mentioned earlier in above paragraphs, this application can not be used for hacking of online games, like, clash of clans and Tekken. The offline games can easily be conquered via using the application, you need to download.
- First of all, you are required to root your device. For this purpose, you can pick up any of the best rooting application and, instead, you can find one from the website your are reading.
- Download Game Guardian APK from the linke shared below. You can tap on the download link button to get the file.
- You should check the unknown source button, as you are downloading the application from the link shared below, the google play store would not allow you to install the application on android operating system, so check the unknown source button, then install the Game Guardian APK on your device.
- It would take some time to download, so wait and allow the application to install.
- Now, after installing this application on your device, leave the application there and open the game which you want to hack.
- Play some game and earn some scores, like in initial stage, try to make scores which should not be complete digits like 456.
- Open the screen of Game Guardian APK, a search bar will be appear over there, tap on the search bar and insert the number or score you have recently made, or what you want to change.
- Insert those numbers there, and tap the search button, and carefully observe the results, if the results are more than one, you should play the game again, earn some different digits of the score and then press the search button, insert that number, and search, the result should be one.
- Now, if you found the only one digit, the scores what you have made now, then change the digits to your desired digits or numbers.
- You will see, after this on your game screen, the digits or scores or coins have changed already.
- Enjoy the limitless coins and scores, you can have snaps of those scores you made, an unbelievable number to show your friends.
This Game Guardian APK is a wonderful and powerful application, which can make you to change the scores of your game. You can download this magic application from the official link shared below. You can tap the download button and get the download link. The official link shared below is trustable and well working and also this link is free of dangerous viruses. However if the link, by any reason, is not working or if face any error during downloading, you should comment down in comment section so that our team fix the issue as soon as possible.
Download Game Guardian APK
Saturday, December 30, 2017
How to Save Message and Missed call to Gmail account using auto forwarding Method
How to Save Message and Missed call to Gmail account using auto forwarding Method

How To Take Screenshot on Moto G4 Plus Without Using Apps
How To Take Screenshot on Moto G4 Plus Without Using Apps

you can take screenshot at any time such as in between playing games, watching videos, listening music or while loading web pages. It�s much easier to take a snapshot on Moto G4 Plus without closing any of the running apps. In fact, there are many apps available in the market which can easily take a screenshot on Moto G4 Plus, but the problem is they requires root access and this is the reason, to avoid the apps. So, in this article we will be helping to take a snapshot on Moto G4 Plus without any hassle.
How To Take Screenshot on Moto G4 Plus Without Using Apps
- Get your screen ready of which you want to take a screenshot / snapshot of!
- Now, simultaneously hold Power Button and Volume Down button for 2 � 3 seconds.
- Immediately, you will have a preview of a screenshot and a new notification will be seen in your status bar.
- In the notification, it will say that the �Screenshot Captured�.
How to Increase JPEG JPG File Size Using Photoshop
How to Increase JPEG JPG File Size Using Photoshop
Increase JPEG/JPG File Size Using of Photoshop
For this method, you want to download and Install Photoshop in your Computer, Laptop. Now I am sharing some steps which are help on increase JPEG/JPG File Size.
1. Open Photoshop
2. Now click on File>> Open
3. After that open that file which you want to increasing size of Image
4. Now just click on "SAVE AS" option which are help on File Menu
5. After that Type Name of File and Select Format of File
6. After that you get new dialog box and they ask for some Image Setting like Quality of image etc

7. Now you will select Quality of File and make your file Size Large
8. After that press OK and your File is saved and File Size is increased.
Related Posts
Convert GIF to PNG, Convert PNG to GIF
Convert JPEG to PNG, Convert JPG to PNG
Convert PNG to BMP, Convert BMP to PNG
Convert PNG to JPEG, Convert PNG to JPG
Convert PNG to TIFF, Convert TIFF to PNG
Friday, December 29, 2017
How to root using Kingo Android ROOT
How to root using Kingo Android ROOT
Faster performance
Preserve battery life
Access root-only apps
Remove carrier bloatware
Customizable appearance
Attain admin level permission
Its support all android phone
Download link download link
FOR DAILY UPDATES LIKE OUR PAGE
FOR Nokia X device
https://fb.com/NokiaXServices
For tricks and offers
https://fb.com/earthreading
https://earthreading.blogspot.com
Thursday, December 28, 2017
How To Hard Reset Samsung P5100 Galaxy Tab 2 10 1 Using Its Hardware Keys
How To Hard Reset Samsung P5100 Galaxy Tab 2 10 1 Using Its Hardware Keys
What to do before performing the Hard Reset?
Samsung P5100 Galaxy Tab 2 10.1 Hard Reset Steps:
- Make sure that your Galaxy Tab 2 10.1 is Off.
Notice: The hard reset operation will delete anything that are saved in your phones internal memory, So make a backup of your data in case you can access them.

How to run 2 WhatsApp numbers in one unrooted Android Mobile using OGWhatsApp
How to run 2 WhatsApp numbers in one unrooted Android Mobile using OGWhatsApp
HOW TO ROOT Micromax Funbook Talk P350 Tablet using stock rom
HOW TO ROOT Micromax Funbook Talk P350 Tablet using stock rom
 HOW TO ROOT Micromax Funbook Talk P350 Tablet using stock rom HOW TO ROOT Micromax Funbook Talk P350 Tablet using stock rom Micromax Funbook Talk P350 Tablet  Packaged Included: Firmware V2_061112 Download Tool IMEI Writing Tool P350_Download procedure http://www.4shared.com/rar/UjN_ZG6z/Micromax_P350.html |