Thursday, January 4, 2018
How to Install TWRP 3 1 1 1 and Root Huawei Honor 8 Pro Success 100 Tested
How to Install TWRP 3 1 1 1 and Root Huawei Honor 8 Pro Success 100 Tested
How to Install TWRP 3.1.1-1 and Root Huawei Honor 8 Pro Success 100% Tested.
Prerequisite.
- As the main requirement to root your Huawei Honor 8, you need to unlock the bootloader. If you dont know how to do it, you can read the following guide - How to unlock the bootloader on any Huawei phone.
- Enable USB debugging on your phone.
- D0wnl0ad ADB and fastboot from Here
- Downl0ad PHH Superuser from Here
- Downl04d TWRP recovery root from this link.
- Once TWRP successfully downloaded, now put this TWRP into a platform-tools folder.
- Rename it to twrp.img
Install TWRP 3.1.1-1 Honor 8 Pro | Guide.
- Extract platform-tools-latest-windows.zip file.
- Go to extracted folder
- Then, Open platform-tools folder.
- Now, connect your Huawei Honor 8 Pro to the computer via USB cable.
- Then, from the ADB fastboot folder right click and hold the shift button, and click open command window here.

open command in adb fastboot - Once command prompt windows come up, now you need to check your Huawei Honor 8 Pro successfully connected or not using the following command and press enter.
- adb device.
- If your device is successfully connected to the computer, then the result will return like this.
- list of devices attached ...

- Once your Huawei Honor 8 Pro successfully connected to the computer. Now, reboot your device into bootloader using this command and press enter
- adb reboot bootloader
- Just wait a minute, your device will reboot into fastboot and rescue mode.
- Once your device in the fastboot and rescue mode, its time to flash TWRP recovery to your device. Therefore you need to type this command at prompt and then press enter button
- fastboot flash recovery twrp.img
- Just wait for 2 or 3 seconds for the complete flashing process.
Boot Honor 8 Pro into Recovery.
- Power off your Honor 8 Pro.
- Now, press and hold three buttons simultaneously located at the side phone body
- Volume UP + Volume Down + Power Button
- Release all button if you see a Honor logo comes up on your screen.
- Now, you will see that honor 8 Pro has been unlocked status on screen.

Honor 8 pro recovery mode - And now your device will boot into TWRP recovery.

- Tap Wipe - Format Data - type Yes - Ok
- Tap Back - Reboot - Recovery - Dont install
- Now your device will reboot into TWRP recovery.again. To root your Honor 8 Pro read the next step below.
Root Honor 8 Pro.
- You need to copy Superuser-r310-beta (download link available at prerequisite) to the internal storage of Huawei Honor 8 Pro
- Continued from step no. 8 above. or, make sure your device in TWRP recovery mode.
- From TWRP main menu, tap Install.
- Then, tap Superuser-r310-beta.zip from internal storage.
- Now, Swap to confirm flash.
- Once Zip file successfully flashed, you just need to click on reboot.system.
- Now, your Huawei Honor 8 Pro will reboot into the system.
Wednesday, January 3, 2018
How to Root Android Oreo 8 0 OPR6
How to Root Android Oreo 8 0 OPR6

- First, download the latest SuperSU file from the above link.
- Now transfer the downloaded file to the internal storage of your device.
- Now folllow the guide to flash SuperSu via TWRP recovery and root your device >
- Download and transfer the SuperSU to your device internal memory. (download section)
- Now Boot your device into TWRP recovery.Guide How To to Boot Into Recovery Mode On Android (Various Ways)
- Then Just Select Install and flash the SuperSUfile that you transferred in the Previous step
- Once flashing is done. Reboot your device.
- Done!!! Your Android device is now rooted
- For confirmation, install Root Checker from Google Play Store and confirm the root privileges in your smartphone.
- First, download the latest Magisk Module Zip file and the Magisk installer APK file from the above links.
- Now transfer the downloaded files to the internal storage of your device.
- Now you have to boot into the TWRP recovery mode. To do that, switch off your phone and then hold the power and volume down buttons together for a few seconds until you boot into the TWRP mode.
- Once you are in TWRP, select install from the main screen.
- Now, browse for the downloaded Magisk file and then select it.
- Swipe to install the file.
- Once the installation is completed, wipe the Dalvik and Cache and then reboot your phone.
- Your device running Android 8.0 will now be rooted. Now, install the Magisk APK file you previously downloaded and open it to check for root.
How to Upgrade Huawei P8Lite to GZOSP Android Oreo 8 0
How to Upgrade Huawei P8Lite to GZOSP Android Oreo 8 0
How to Upgrade Huawei P8Lite to GZOSP Android Oreo 8.0.
- Touchscreen - Working
- GPS - Working
- WiFi - Working
- adb & mtp connectivity -working
- Audio & Video playback - working
- Internal & External Storage - working
- Lights - working
- Bluetooth - not working
- NFC Connectivity - not working
- Radio Interface Layer - not working
- Camera - not working
- Sensor - not working

Huawei P8Lite Android Oreo
Prerequisite.
- Downl0ad Gzosp-alice-8.0.Beta.zip Here
- md5 : 114e72d50148c24a991f4e2209603ad3
- TWRP must be installed on your Huawei P8lite. See this guide how to install TWRP on Huawei P8Lite.
- The Bootloader is Unlocked. See this guide to unlock bootloader Huawei phone.
- Your device must be updated to EMUI 4.1
Installation.
- Make sure your battery is fully charged, or at least have half of full battery capacity.
- Boot your device into TWRP recovery.
- If your device didnt come from AOSPA/RROS Android N, you need to format data into TWRP.
- Now, perform a factory reset on your P8Lite.
- Then, install GZOSP ROM via TWRP recovery.
- At last, reboot your device into the system.
- Enjoy it.
Hungry Shark Evolution Apk 3 0 8 Mod Download
Hungry Shark Evolution Apk 3 0 8 Mod Download

+ Fully Console quality 3D graphics
+ 10 Shark varieties to be able to open
+ An enormous free-roaming globe to be able to terrorise
+ Intuitive effect as well as tilt regulates
+ 15 sunken pieces to get
+ More than 60 missions to perform
+ Equip your current sharks with exclusive cool gadgets along with items
+ Unlock Newborn Sharks to further improve your current predatory powers
+ Appliance signup bonuses along with Fantastic Run to be able to overcome your current hi-score
+ Google Play Games & Facebook social features
Hungry Shark Progress can be on a regular basis updated with fresh functions, content material along with challenges to help keep an individual re-occurring with regard to a lot more!
Whats New
Bug Fixes
Performance improvements for high specification devices


Install
copy the "com.fgol.HungrySharkEvolution" Folder to SD Card/android/obb
launch the Game
Tuesday, January 2, 2018
Ilko Tsenov MyExplorer v1 8 1 SIGNED for NOKIA N8
Ilko Tsenov MyExplorer v1 8 1 SIGNED for NOKIA N8

myExplorer is an advanced network (LAN) file manager. Major features:
1. Wi-Fi file transfer. You can open, copy or move files between the phone and a PC (XP, Vista, Windows 7, Mac OS X or Linux). There is no need to install any software on the computer.
2. Password-protected folder for private information.
3. Advanced text viewer with custom encoding (including Cyrillic), font size and color, and smart reflow.
4. Open, view and extract files from Zip, Rar, 7z, Tar, Gz and Bz2 archives.
Changelog:
- Fixed critical bug causing crash when trying to connect.�
HOW TO ROOT GALAXY NOTE 8 0 N5100 ON 4 4 2 KITKAT
HOW TO ROOT GALAXY NOTE 8 0 N5100 ON 4 4 2 KITKAT
Guidelines and Requirements:
- Samsung Galaxy Note 8.0 GT-N5100
- CF-Root package: CF-Auto-Root-kona3g-kona3gxx-gtn5100.zip
- Odin3 tool is required but that is included in the cf-auto-root package.
- Install Samsung Kies or USB drivers on your PC.
- Go to Settings > Developers Options and enable USB debugging.
- Charge your tablet battery to at least 50%.
- Last but not the least, Carefully read and follow the instructions to safely and successfully root your tablet.
How to Root Samsung Galaxy Note 8.0 on Android 4.4.2 KitKat

- Turn Off.
- Press and Hold down the Volume Down+Home+Power buttons at the same time till you see a warning on your screen.
- Further hit the Volume Up button to continue.

How to Make Bootable USB Pendrive Install Windows 7 and 8 Using USB
How to Make Bootable USB Pendrive Install Windows 7 and 8 Using USB
 Make Bootable USB / Pendrive Using ISO image and Windows Software:
Let have a Look to Windows 8 First because it is Latest one.
Steps and Requirement are as Follow for Making Windows 8 or 8.1 Bootable:
- You will Require Windows 8 or 8.1 ISO image file. (Download it from here)
- You will Require Windows Bootable Maker Software for Writing ISO image to USB or DVD. (Download it from here)
- Now Select ISO image file you Downloaded of Windows 8.
- Now in Select USB option select the Letter of USB drive showing.
- Tick the Format Drive Option and Click on Create.
- Now leave the Software to work and have a Tea or Coffee as It gonna take a Long time. :p


Steps and Requirement are as Follow for Making Windows 7 Bootable:
- Download Windows 7 ISO image.
- Download Windows 7 Boot Maker Software.
- Now Install the Windows 7 Boot Maker Software. Just like Next,Next,Install and Finish.
- Now Run the Windows Boot Maker Software.
-

- Now Select Where you want to Create a Bootable USB or DVD.

- Now if you Choose USB then,


- And If you Choose DVD then,


- Now you are Done. Your Bootable USB or DVD is now Ready.Huuu..!!

- Download Windows 8 ISO image
- Download Windows 8 USB boot Maker Software
- Download Windows 7 ISO image
- Download Windows 7 USB boot Maker Software
Monday, January 1, 2018
Imo free video calls 5 1 8
Imo free video calls 5 1 8
Call free on your Android phone using this app
----
imo free video calls and chat 5.1.8
// Go AndroidDrawer For More
Message and video call your family and friends for FREE no matter what device they are on!- Avoid SMS and phone charges � unlimited messages, video chat, and audio calls over your 3G, 4G or Wi-Fi connection - High-quality video chat and voice calls - Group chat with friends, family, roommates and others - Share... Read more �
----
Shared via my feedly reader


How to make a Windows 8 startup message
How to make a Windows 8 startup message
Here�s how to create a custom screen message before entering Windows.
VB Scripting
Go to the folder below
C:Users[Username]AppDataRoamingMicrosoftWindowsStart MenuProgramsStartup
Create a text file with extension .vbs e.g. msg.vbs

Once created, open the file in notepad and write the following command: msg �your message�
| msg �Hi, don�t forget all the things that you need to submit�� |
Restart your computer to see the results�

That�s it!
Using Windows Registry
Open your registry editor by pressing Win+R and type �regedit�.

Once the editor is open, go to the following folder
HKEY_LOCAL_MACHINESOFTWAREMicrosoftWindowsCurrentVersionPoliciesSystem
or
HKEY_LOCAL_MACHINESOFTWAREMicrosoftWindows NTCurrentVersionWinlogon
Find the two registry names or create them by using New �> String Value Menu at any vacant space of the tool.
LegalNoticeCaption
This is where the Title or Caption of the message located upon entering the Welcome Screen e.g. Disclaimer Notice
LegalNoticeText
This is where your message is being inputted.
Using a tweakui tool

WinBubbles-lite is a small program to access windows 7 and above customizations. You�ll be able to apply the tweak easily by entering the caption and message then afterwards press Alt-A. To see the results, see your message by clicking the View Button.
Thanks for reading the article!
Sunday, December 31, 2017
Hua Box Update V2 8 4 Released
Hua Box Update V2 8 4 Released
Hua Box Update V2.8.4 you can very easy Download any moment. Do you know thisHua Box Update V2.8.4 helps your all mobile device. This latestHua Box Update V2.8.4 is most important for your all device. Now you can very easy Download Software and Apps. This Box you can very simple Update any time. If you want any Software and Apps any moment Download any time. You can Free Download thisHua Box Update V2.8.4. Your necessary important Software and Apps then you can very easy any Software and any Apps Download or Update any time.

How to Download this Latest Hua Box Update V2.8.4 :
At first you open you PC or Android mobile phone.
Then you can connected your net connected.
Now you can Go to you net Browser.
You can Go to a new page.
Now you can Download thisHua Box Update V2.8.4.
You wait sometimes.
Then you Done this Download.
Now your Download completed.
How to Install or Update this Hua Box Update V2.8.4 :
At first you open you PC or Android mobile phone.
Then you can connected your net connected.
Now you can Go to you net Browser.
You write you personal website then you flow a new page.
Now you can this Hua Box Update V2.8.4 very simple Download.
Now you can very easy Update or Install without Passwoard.
Download Link
How to Restore iPhone 8 from iCloud Backup
How to Restore iPhone 8 from iCloud Backup
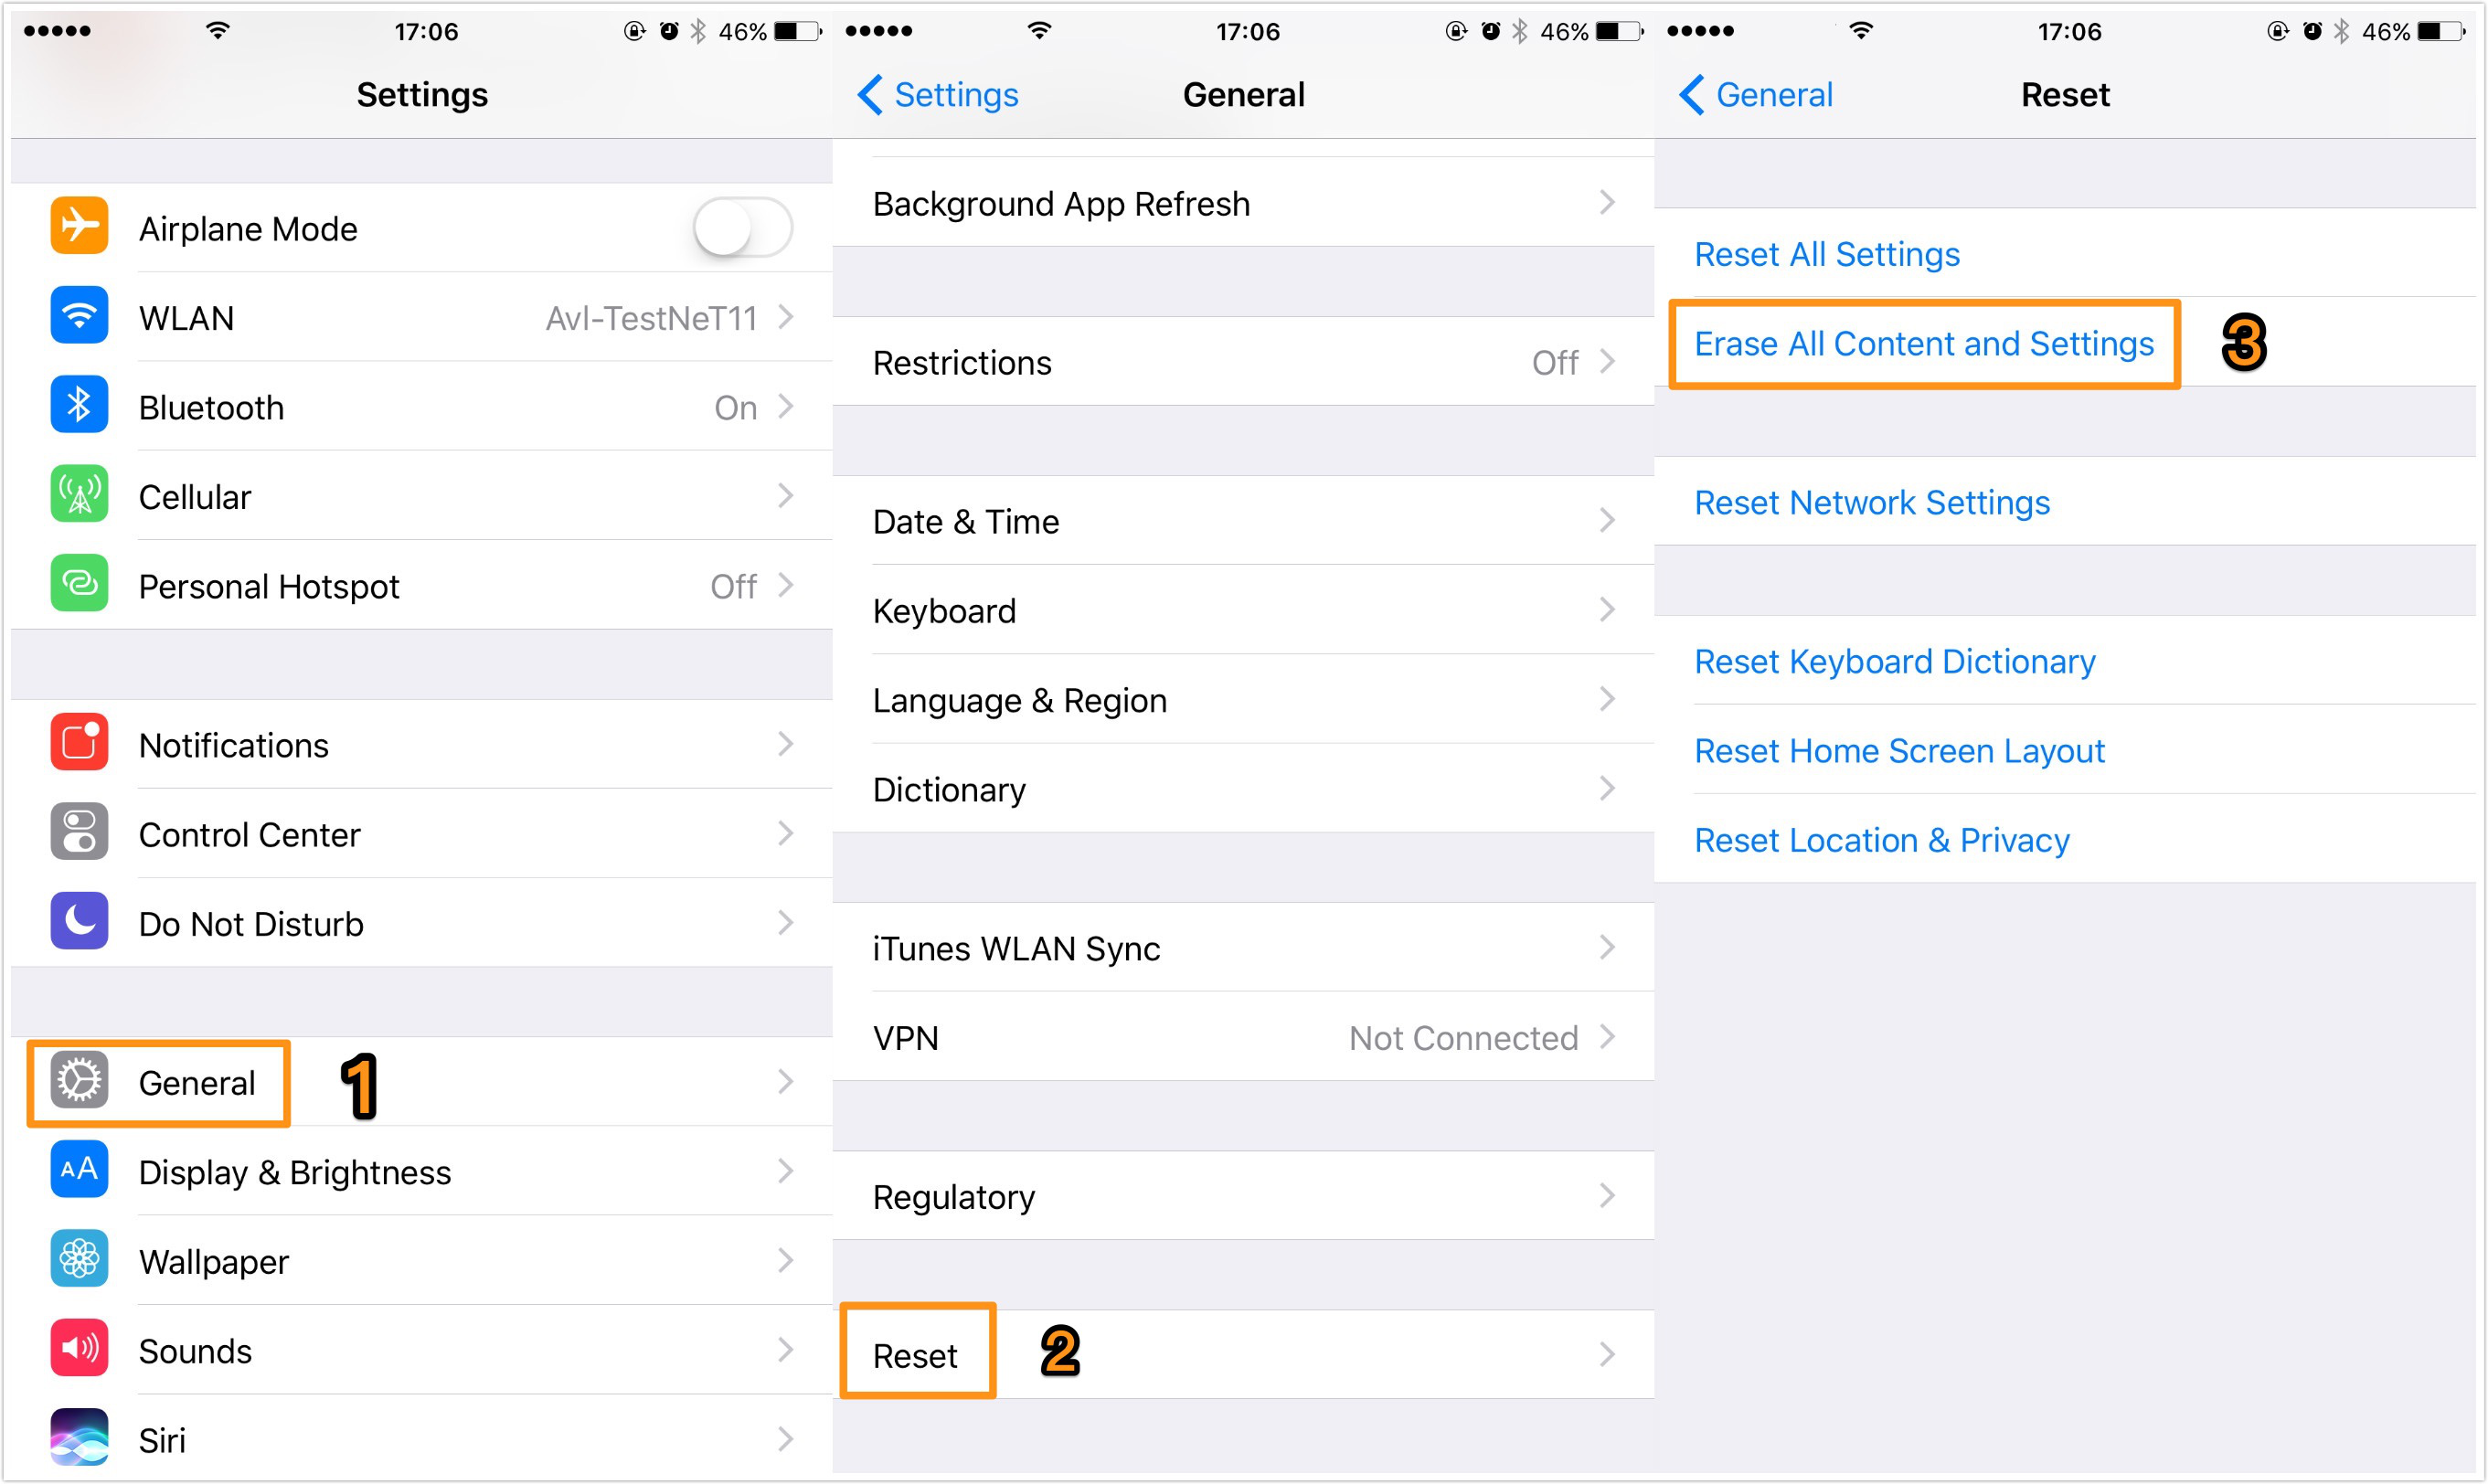
Step 1. Firstly you need to make sure that you have an iCloud backup to restore from. Go to Settings > iCloud > Storage > Manage Storage > tap a device from the backup list.
Step 2. Then go to Settings > General > Reset > Erase all Content and Settings. Here you need to type your iPhone passcode.
Step 3. Tap Restore from iCloud backup and sign in your iCloud account. Then choose an iCloud backup from a list and wait for the process to complete.
 How to Restore iCloud Backup to iPhone 8 Directly
Saturday, December 30, 2017
How to Get Used to Windows 8
How to Get Used to Windows 8
STEP 1.
STEP 2.
STEP 3.
Friday, December 29, 2017
How to switch on off wireless connectivity in Windows 8
How to switch on off wireless connectivity in Windows 8

In top side you can find on/off button.
Thursday, December 28, 2017
Image Cartoonizer Premium 1 8 1 Incl Keygen
Image Cartoonizer Premium 1 8 1 Incl Keygen
Download Image Cartoonizer Premium 1.8.1 Full Register Key - The application is designed with some tools and techniques that you might want while you are converting picture into cartoons. simple photo to cartoon tool for converting your photos to cartoons. The application not only cartoonize your snaps but also add some amazing effects to your cartoon images like face morphing.

How to Install Android 8 0 Oreo on Lenovo P2
How to Install Android 8 0 Oreo on Lenovo P2

Lenovo P2 smartphone was launched in September 2016. It came out of the box with Android 6.0 Marshmallow and later upgraded to Android 7.0 Nougat. Looking For Android Oreo Update for Lenovo P2? Then you are the right place. Finally, we have the first Custom AOSP Android 8.0 Oreo for Lenovo P2 (P2a42). A few days back, Google unwrapped the latest Android O known as Android 8.0 Oreo. We have already listed the supported device to receive the Android 8.0 Oreo. After the release of Android Oreo AOSP Source code, we always expect some developer in the community to develop the unofficial build to our release before the manufacturer does. Download Android 8.0 Oreo for Lenovo P2 (AOSP Custom ROM)
Today I will share the link to download the Android 8.0 Oreo for Lenovo P2 (P2a42). This ROM is an unofficial version of Android 8.0 Oreo built from the scratch by XDA Recognized Developer, FireLord. Full Credits to him for developing Android Oreo for Storm. This ROM is under development. So in case if you find any bugs you can report to the source. You can use this has a daily driver. You can just try this ROM on your Storm by following the below guide.
Bugs �
CM-14.1 bugs
NFC
VoLTE
Download AOSP 8.0 ROM for Lenovo P2
Download AospExtended 8.0 ROM for Lenovo P2 � Download (Development Page)
Android 8.0 Oreo Gapps For Lenovo P2 � Download
Magisk for Lenovo P2 � Download
How to Install Android 8.0 Oreo on Lenovo P2
First, download and install a custom recovery. If you already had a custom recovery installed on your device then skip this step.
Download Andriod 8.0 ROM and Gapps from above and save it on your device.
Now Boot your device into Recovery mode.
Now in TWRP, create a Nandroid backup (Recommended) of your device for safer side, if anything goes wrong.
Now do a Factory Reset by Goto Wipe>Advanced Wipe>Select Wipe cache, Dalvik cache, System, and data and swipe to confirm it.
Now, Go to Install and locate the ROM zip file & swipe to Install the ROM file. After the process completes, Flash the GApps zip file.
Now wipe cache & Dalvik cache again and Reboot your device.
Done!
This is the complete guide to Download and Install Android 8.0 Oreo on Lenovo P2. Let us know how�s your experience with AOSP 8.0 update for Lenovo P2 by comments below.
Wednesday, December 27, 2017
idm for windows 8 download full version
idm for windows 8 download full version

Internet Download Manager is a Windows under very fast and stable download tool, before the kid has been in use.
However, the version of Internet Download Manager is not supported due before the latest Windows 8 system is, indeed, the kid feel pity. Today, however, is the perfect guy to share support Windows 8 of Internet Download Manager.
HP Pavilion Laptop G6 2270dx All Drivers For Windows 8 Windows 8 1 Windows 10 64Bit
HP Pavilion Laptop G6 2270dx All Drivers For Windows 8 Windows 8 1 Windows 10 64Bit

HP Pavilion Laptop G6-2270 All Drivers For Windows 8, Win8.1, Win10 (64Bit) |
Download HP Pavilion Laptop G6-2270 All Drivers |
Related Posts :- https://alllapdc.blogspot.in/2017/05/Hppaviliong4laptopdrivers.html