Showing posts with label lenovo. Show all posts
Showing posts with label lenovo. Show all posts
Wednesday, January 3, 2018
How to install Theme pack for Lenovo K3 Note
How to install Theme pack for Lenovo K3 Note

Instructions :
- Download file Theme pack from links given below.
- Save file .zip (dont extract or unzip) in storage0.
- Go to Theme Center.
- Click Button ��� in top right corner.
- Import theme.
- Choose theme.
- Wait the process to complete.
Links to download theme :
- https://www.dropbox.com/s/cdymhebs1nj23ir/265.zip?dl=
- https://www.dropbox.com/s/29m5z9flu6iduif/280.zip?dl=
- https://www.dropbox.com/s/4e63izn09yjdk63/302.zip?dl=
- https://www.dropbox.com/s/rdc8ndzdk4yb1bn/306.zip?dl=
- https://www.dropbox.com/s/nfp9lx6elje8c18/360.zip?dl=
- https://www.dropbox.com/s/crzno93vpoefkzp/473.zip?dl=
- https://www.dropbox.com/s/5m6h4mtzbbjn6em/540.zip?dl=
- https://www.dropbox.com/s/wn8jtgvckfycxv7/566.zip?dl=0
- https://docs.google.com/uc?id=0B9nEOPekbIRRaWxHVTdJaTJBdDA (New Themes)
FB Group : Lenovo K3 Note Official Group [India] https://www.facebook.com/groups/Lenovo.K3.Note.Official.Group.India/
FB Group : Lenovo K3 Note Official Group [India]
https://www.facebook.com/groups/Lenovo.K3.Note.Official.Group.India/
Monday, January 1, 2018
How to Update Lenovo K5 K5 Plus to Android 7 0 Nougat CM14 ROM for sock rom go to rompure com
How to Update Lenovo K5 K5 Plus to Android 7 0 Nougat CM14 ROM for sock rom go to rompure com
Update Lenovo Vibe K5, Vibe K5 Plus to Android N 7.0 Nougat Using Cyanogenmod 14 .
Do you want to update Lenovo vibe K5 and K5 plus to android n 7.0 nougat ? If yes then you are right place . Today we are here with the Guide to Update Lenovo K5 Vibe and Lenovo K5 Plus to Android N by using Cyangongenmod 14 custom rom .
Lenovo Vibe K5 and K5 plus are new smartphones and also they are one of the very first smartphone of lenovo which got CM14 rom . Both Lenovo vibe K5 and K5 plus share same screen, Camera, Battery and the only difference we noticed was the Processor . Vibe K5 comes with Snapdragon 415 and the K5 plus comes with Snapdragon 617 processor , Both the devices come with android Lollipop 5.0 android version out of the box . So today we are here with the Guide on How to Update Lenovo vibe K5 and Lenovo vibe K5 Plus to android 7.0 Nougat .

Lenovo Vibe K5 and K5 plus are new smartphones and also they are one of the very first smartphone of lenovo which got CM14 rom . Both Lenovo vibe K5 and K5 plus share same screen, Camera, Battery and the only difference we noticed was the Processor . Vibe K5 comes with Snapdragon 415 and the K5 plus comes with Snapdragon 617 processor , Both the devices come with android Lollipop 5.0 android version out of the box . So today we are here with the Guide on How to Update Lenovo vibe K5 and Lenovo vibe K5 Plus to android 7.0 Nougat .
Install Android N 7.0 Nougat CM14 in Lenovo Vibe K5 / K5 Plus .
So to Update Lenovo Vibe K5 and K5 plus we will use CM14 custom rom . Cm14 is a Nougat 7.0 based custom rom which comes with all features of the android n 7.0 . Some of the main features of the CM14 custom rom for Lenovo Vibe K5/ K5 Plus are :-
- Based on Android n 7.0 nougat .
- Cyanogenmod theme support .
- Android 7.0 ringtones .
- Android 7.0 Wallpapers .
- Gravity box support
- The rom is Already rooted .
- Smooth
- No lag
- No hang problems while playing games
- Better battery backup compared to the stock rom
Related : How to Update Lenovo ZUK Z1 to Android N 7.0 Nougat .
Whats Working in the rom ?
- Audio
- Sim
- 4G
- Wifi
- RIL
Pre requiremnets you have to follow before flashing the Nougat 7.0 update on Lenovo K5, K5 plus :-
- This custom rom is only for Lenovo K5/K5 plus , Make sure you dont flash it on any other device because it may brick your device .
- There should be more then 70% battery in the device .
- TWRP recovery is required to flash the update .
- Make Sure there is more then 4Gb of space in your smartphone .
You may also Like :- How to Enable Otg Support on Any Android Device .
How to Update Lenovo Vibe K5 to Android N 7.0 Nougat .
- First of all Download CM14 for Lenovo K5 . ( Scritch007 )
- Make sure you download the Rom in your Laptop or Computer .
- Now connect you Vibe K5 to Pc .
- After connecting Copy the CM14 rom and place it in the root of sd card .
- Now disconnect the smartphone .
- Now rename the CM14.zip to Update.zip .
- Now you have to Boot Your Lenovo K5 to Recovery mode .
- To boot In recovery mode you Have to Press volume up + power button together .

- Dont release the keys until the smartphone boots in recovery mode .
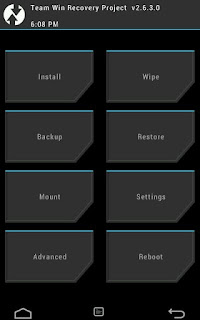
- After entering in recovery mode you will see many options on the screen .

- First of all you have to Tap on Wipe .
- Now choose wipe Data / factory reset .
- Wipe Cache partition .
- Wipe Dalvik cache .
- Now press the back button .
- Now You have to make a backup of the current system and files .
- The backup process will take some time , However it is always recommended to make backup .
- Now tap on Install .
- Now choose the Update.zip file .

- As soon as you choose Nougat 7.0 Update.zip file for Lenovo K5 the recovery will ask to confirm installation .
- Just tap on yes install Now .
- The updating procedure will take around 5 minutes to complete and as soon as the process gets completed you will get a notification saying " CM14 flashed successfully " .
For Lenvo K5 Plus :-
To update the K5 plus you have to follow the same procedure . All you need to take care is that you follow each and every step carefully .
Screenshots of CM14 nougat 7.0 Update on Lenovo K5/ K5 Plus :-


Screenshots of CM14 nougat 7.0 Update on Lenovo K5/ K5 Plus :-
So this was our guide on How to Update Lenovo K5/K5 plus to android 7.0 Nougat .
Sunday, December 31, 2017
How to play Gameloft games without lag and Disable CPU throtling without root on Lenovo K3 Note k50t5 k50a40
How to play Gameloft games without lag and Disable CPU throtling without root on Lenovo K3 Note k50t5 k50a40

The Lenovo K3 Note is an amazing budget phablet that does pretty much everything right. But users complained that games lagged after playing for about 5-10 minutes in K3 Note whereas the Meizu M2 Note which has the same CPU as the Lenovo K3 Note handled all the games very smoothly.
So what do you think what might be the problem here?
Lenovo has enabled CPU throttling to prevent CPU temperatures from going above 50 degree celsius.
So, whenever you play game on K3 Note after a few minutes the CPU temp hits 50 degree celsius mark which activates the thermal throttling mechanism. When thermal throttling gets activated you can see a sudden frame drop while playing games like Asphalt 8 and Modern Combat 5.
Here I will show you how to disable thermal throttling in Lenovo K3 Note without rooting your phone!
PROCEDURE TO DISABLE CPU THROTTLING ON LENOVO K3 NOTE :
1. Flash TWRP recovery using SP Flash Tools by following tutorial from this link here : http://yoyovirus.blogspot.in/2015/08/how-to-flash-custom-recovery-to-lenovo.html
2. After you successfully flash TWRP recovery, boot your phone into the recovery mode by presssing Volume UP + Volume DOWN + Power buttons together at the same time.
3. Once you boot into TWRP recovery you will see some options like shown in the below image.
4. Now select Mount Option and then put a cross on "System" option to Mount the System as hown in below image.
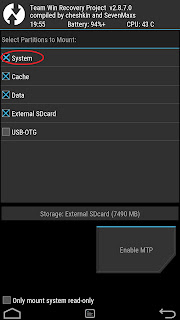
5. Then press the back button to return to the main screen of TWRP
recovery.
6. Now, select Advanced option and then select File Manager option.
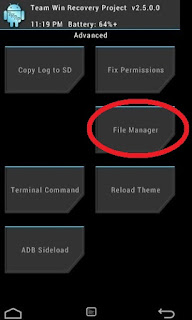
7. Here browse goto root path and then browse to System/etc/.tp path.
8. Here you will see three files . Select the file with name "thermal.conf".
9. Rename this file by giving any extension like "thermal.conf.xxx".
10. Congrats you have successfully disabled CPU throttling from Lenovo K3 Note.
11. Go back to main screen of your TWRP recovery and power off your phone by selecting Restart and then Turn off option.
12.Now Flash "Stock Recovery" using SP Flash Tools in similar way you flashe TWRP recovery.
13.Power On your phone and now you can play all the Gameloft games like Asphalt 8 and Modern Combat 5 and other HD games with no lags and frame drops.
Note :
1.Only for Vibe UI ROW Stock ROM.
2.You can also disable CPU throttling on a rooted K3 Note by renaming "thermal.conf" to "thermal.conf.xxx" file in "System/etc/.tp" directory using ES File Explorer. But by rooting your k3 Note you can not update your phone via OTA updates.So, I suggest the above procedure.
FB GROUP : LENOVO K3 NOTE OFFICIAL GROUP [INDIA]
https://www.facebook.com/groups/Lenovo.K3.Note.Official.Group.India/
Saturday, December 30, 2017
How to Install Official Stock ROM for Lenovo A316
How to Install Official Stock ROM for Lenovo A316
This is the update official Stock ROM tutorial of�Lenovo A316. In this tutorial we have to provide all the step�with proper screen shot therefore its very easy and safe method to install official�Stock ROM�on your�Lenovo A316. First you have to read my all the step, then�after you are also able to install this official�Stock ROM�on your�android device without any troubles. So don�t search just download and implementing on your android device.
Friday, December 29, 2017
how to unlock free lenovo a1000 WITH CM2
how to unlock free lenovo a1000 WITH CM2
Operation : SP Unlock [ v1.18 ]
Mode : DirectUnlock
1. Remove battery. Insert battery back
2. Press and hold VolumeUp and VolumeDown keys
3. Insert cable
==== Wait for phone...
Phone found! [ 14 ]
Port Opened
Sync...
InitBoot Done [ 0x81 ] , Ver : SPRD3
Sync...
Sending FDL
[Info] : If SW freeze here more, than 15 seconds - remove cable
FDL Ready!
Boot Ver : SC773x eMMC v2.0 Loader Infinity
Sending FLASH FDL
FLASH FDL Ready!
Boot Ok!
Detected eMMC Flash , Structure detect Ok!
Checking Structure ...
SimLock state : Locked!
Unlocking ...
Unlock Done!
Elapsed: 00:00:18
Reconnect Power/Cable!
Thursday, December 28, 2017
How to root Lenovo K3 Note k50 t5 k50 a40
How to root Lenovo K3 Note k50 t5 k50 a40

REQUIREMENTS:
1. Super SU zip : Click Here to Download (Check the files section on fb group)
2. Custom Recovery(CWM/TWRP) installed on your K3 Note : Click Here to learn how to flash custom recovery to Lenovo K3 Note.
3. Lenovo K3 Note (Obviously)
PROCEDURE TO ROOT LENOVO K3 NOTE:
1. After flashing custom recovery using SP Flash Tool by following this guide.
2. Power On Lenovo K3 Note and copy the downloaded Super SU zip file (Note: Do not extract the zip file) in your memory card.
2. Power Off your phone.
3. Press Volume Up + Volume Down + Power Button at the same time to boot into custom recovery (TWRP/CWM).
4. Once in custom recovery, select "Install".
5. Then choose your Super SU zip file from the location in your memory card you copied earlier.
6. Swipe to right to flash the SuperSU zip file. This will root your Lenovo K3 Note by installing SU binaries and SuperSU superuser app.
7. Then select Reboot System.
8. You should find a new app called SuperSU in your app drawer. Run it once and update the SU binaries if it asks you.
9. Download any Root Checker app from Play Store and check if your phone is successfully rooted or not.
10. Njoy! You have successfully rooted your Lenovo K3 Note.
FB GROUP : LENOVO K3 NOTE OFFICIAL GROUP [INDIA]
https://www.facebook.com/groups/Lenovo.K3.Note.Official.Group.India/How to Install Android 8 0 Oreo on Lenovo P2
How to Install Android 8 0 Oreo on Lenovo P2
How to Install Android 8.0 Oreo on Lenovo P2

Lenovo P2 smartphone was launched in September 2016. It came out of the box with Android 6.0 Marshmallow and later upgraded to Android 7.0 Nougat. Looking For Android Oreo Update for Lenovo P2? Then you are the right place. Finally, we have the first Custom AOSP Android 8.0 Oreo for Lenovo P2 (P2a42). A few days back, Google unwrapped the latest Android O known as Android 8.0 Oreo. We have already listed the supported device to receive the Android 8.0 Oreo. After the release of Android Oreo AOSP Source code, we always expect some developer in the community to develop the unofficial build to our release before the manufacturer does. Download Android 8.0 Oreo for Lenovo P2 (AOSP Custom ROM)
Today I will share the link to download the Android 8.0 Oreo for Lenovo P2 (P2a42). This ROM is an unofficial version of Android 8.0 Oreo built from the scratch by XDA Recognized Developer, FireLord. Full Credits to him for developing Android Oreo for Storm. This ROM is under development. So in case if you find any bugs you can report to the source. You can use this has a daily driver. You can just try this ROM on your Storm by following the below guide.
Bugs �
CM-14.1 bugs
NFC
VoLTE
Download AOSP 8.0 ROM for Lenovo P2
Download AospExtended 8.0 ROM for Lenovo P2 � Download (Development Page)
Android 8.0 Oreo Gapps For Lenovo P2 � Download
Magisk for Lenovo P2 � Download
How to Install Android 8.0 Oreo on Lenovo P2
First, download and install a custom recovery. If you already had a custom recovery installed on your device then skip this step.
Download Andriod 8.0 ROM and Gapps from above and save it on your device.
Now Boot your device into Recovery mode.
Now in TWRP, create a Nandroid backup (Recommended) of your device for safer side, if anything goes wrong.
Now do a Factory Reset by Goto Wipe>Advanced Wipe>Select Wipe cache, Dalvik cache, System, and data and swipe to confirm it.
Now, Go to Install and locate the ROM zip file & swipe to Install the ROM file. After the process completes, Flash the GApps zip file.
Now wipe cache & Dalvik cache again and Reboot your device.
Done!
This is the complete guide to Download and Install Android 8.0 Oreo on Lenovo P2. Let us know how�s your experience with AOSP 8.0 update for Lenovo P2 by comments below.
Tuesday, December 26, 2017
How to Unbrick and flash Stock ROM on Lenovo K3 Note k50 t5
How to Unbrick and flash Stock ROM on Lenovo K3 Note k50 t5
If you are familiar with the rooting process, you probably know that rooting and changing the ROM in android phone remove the manufacturer warranty. But if the phone already have official ROM the warranty will never void.
The official ROM for Lenovo K3 Note smartphone is now available. At below I have given the procedure to install the stock ROM on your phone. By installing this ROM you will back to official ROM.
PRE-REQUISITES:
1. First ensure the battery of your phone is above 75%, so then it will never get switched OFF during the middle of the process.
2. Next take full backup of your phone.
3. Also backup the important data like SMS messages, Whatsapp messages, Contacts etc., as this would be formatted during the process.
4. Next install the drivers for your phone using Lenovo K3 Note drivers.
Disclaimer : Follow the given below procedure at your own risk. I would not be held responsible for any damage that occurs to your phone, in case you do not follow the procedure properly.
REQUIREMENTS:
1. Official stock ROM (K50a40_S112_150610_ROW.7z) Lollipop 5.0 Indian version : download link Click Here to Download
2. Lenovo K3 Note Drivers : Click Here to Download (Check the files section on fb group)
3. SP Flash Tool download link: Click Here to Download (Check the files section on fb group)
4. A Windows PC
5. A Lenovo K3 Note (obviously)
Install Driver :
Install the driver then restart your PC, then connect your phone to PC via USB cable and wait till Windows configures it. Make sure the USB Debugging is enabled in this process. Once the configuration has completed, again restart your PC.
If you are using Windows 8 or Windows 8.1 then you may face problem to install the driver so follow these steps to install an unsigned driver.
For Windows 8:
1. Win + I -> Change the computer settings -> General -> Special boot options -> Restart Now.2. When you turn off the tap Diagnostics -> Advanced Settings -> Boot Options -> Restart.
3. A menu appears, select it in the �Disable the mandatory driver signing checks� � for this you have to press F7.
For Windows 8.1:
1. Win + I -> Change the computer settings -> Update and Restore -> Restore -> Restart Now.2. When you turn off the tap Diagnostics -> Advanced Settings -> Boot Options -> Restart.
3. A menu appears, select it in the �Disable the mandatory driver signing checks� � for this you have to press F7.
PROCEDURE TO INSTALL STOCK ROM ON LENOVO K3 NOTE SMARTPHONE:
1. Next extract the Stock Rom folder
2. Extract and open the SP Flash Tools and run "flash_tool.exe" as administrator.
3. In SP Flash Tools, just click the �scatter loading� it will ask you the location of the scatter loading file for your phone.
4. In the extracted folder of the stock ROM, go to the folder named �K50a40_S112_150610_ROW� and in there go to target_bin folder select the file �MT6752_Android_scatter.txt�(it is our scatter loading file).
5. In the menu �Option� tab, go to �Download�, and put a �tick� in the �DA DL All with Checksum�.

6. Next Switch off your phone .
7. Make sure Download only option is selected in SP Flash Tool as shown in the image below. Now hit the Green Download button.

8. Connect your phone now to PC via USB. The Flash tool will start the flashing process, you can see the progress at the bottom of the flash tool.
9. Don�t disturb the process until it get finished, otherwise it will brick your phone.
10. Once the process is finished, a green check box will appear in SP Flash Tool, which implies the installation of stock firmware on your device is successful.
11. Now, disconnect your phone from USB Cable and Power On your phone.
12. Njoy! You have successfully installed the stock ROM or Official ROM on Lenovo K3 Note.
FB Group : Lenovo K3 Note Official Group [India]
https://www.facebook.com/groups/Lenovo.K3.Note.Official.Group.India/How to Install CM13 Marshmallow 6 0 on Lenovo Zuk Z1
How to Install CM13 Marshmallow 6 0 on Lenovo Zuk Z1
There is a Good news for Lenovo ZUK Z1 users. Now they can easily Download & Install CM13 On ZUK Z1 Marshmallow 6.0 (Unofficial ).The ROM is actually better than the official firmware as it comes pre loaded with different features and apps which can help you improve the performances of your Lenovo Zuk Z1.

Moreover, the CM13 software ensures an unlocked system which means that you can afterwards customize, optimize and personalize your device by your own taste. So, bottom line, complete this tutorial if you want to enjoy a better Android 6.0.1 Marshmallow experience.
Prerequisites:
Moreover, the CM13 software ensures an unlocked system which means that you can afterwards customize, optimize and personalize your device by your own taste. So, bottom line, complete this tutorial if you want to enjoy a better Android 6.0.1 Marshmallow experience.
Prerequisites:
- This tutorial is only for installing CM13 marshmallow 6.0 on Lenovo Zuk Z1 . Please do not try on any other Lenovo variants.
- your phone should rooted and have a custom recovery installed in order to install the CM13.
- We will be using TWRP Recovery for this tutorial.
- This tutorial will wipe out all your data. Make sure you backup all your data in your phone before proceeding.
Important: Backup important files stored on your device before proceeding with the steps below, so that in case something goes wrong you�ll have backup of all your important files.
How to Install CM13 Marshmallow 6.0 on Lenovo Zuk Z1
1- Download CM13 Marshmallow 6.0 and Google Gapps.
2- Save these files on desktop if possible.
3- Connect your Lenovo Zuk Z1 with your computer with the help of the USB cable.
4- Select and then transfer the downloaded files from your computer to your phone.
5- Unplug the USB cable and the transfer is over.Power off your device; wait while the power off process is completed.Afterwards, reach recovery mode on your Android device.
6- From recovery make a hard reset and wipe everything else; select �wipe data factory reset�, �wipe cache partition� and �wipe dalvik cache�.
7- Go back to main menu of recovery and select �install zip from SD card� and �choose zip from SD card�.
8- Pick the CM 13 firmware file and install the Marshmallow update on your Lenovo Zuk Z1.
9- Repeat the last step and flash Google Apps.When done, go back to main menu of recovery and select �reboot system now�.
Great; you are done. You can now test the Android 6.0.1 Marshmallow firmware on your own Lenovo Zuk Z1. So, check CM 13 in order to see how the new ROM runs on your phone; of course, in the end share all your impressions with us and with other users by using the comments field from below.
Monday, December 25, 2017
How To Root Lenovo K4 Note
How To Root Lenovo K4 Note
Benefits of rooting
- With the help of root access, one can remove those apps which are pre-installed by your network provider or by manufacturer.
- Because of rooting you can also get the free storage space, rooted apps are available for efficient memory management.
- After rooting user can also update their phone to the latest version of Android (by flashing a custom recovery/ROM).
- It provides customization options when you use your new administrative rights to flash a custom ROM (again, see the end of this procedure for more info on that).
- Rooting also increases the battery life of the Smartphone because those running constantly can be removed).
Disclaimer
rooting your device will void its warranty and you will be no longer eligible for any kind of free device services by the manufacturers/warranty providers. Make sure that whatever you do, you are doing it at your own responsibility.
STEPS FOR ROOTING LENOVO K4
Step 1: First download the root app for K4 Note from : Here
Step 2: Install King root on your phone. ( To install it you first need to enable Unknown sources in Setting )
Step 3: Open the application, And tap on the "Root" button.
Step 4: It will take about 5 minutes to root your phone and after the process your phone will be rooted
Step 5: After the process is finished check your apps gallery, If you can find a new app installed named "king user" it means that your Phone is successfully rooted.
So, Friends this was all about Root Lenovo K4 Note and keep visiting out website to get more updates on this phone, And tricks and tip about android phone . And if you have any doubt or got any problem while rooting Lenovo K4 Notejust Comment it below, We will try to solve it as soon as possible.
Sunday, December 24, 2017
How to Install Official Stock ROM for Lenovo A630
How to Install Official Stock ROM for Lenovo A630
This is the update official Stock ROM tutorial of�Lenovo A630. In this tutorial we have to provide all the step�with proper screen shot therefore its very easy and safe method to install official�Stock ROM�on your�Lenovo A630. First you have to read my all the step, then�after you are also able to install this official�Stock ROM�on your�android device without any troubles. So don�t search just download and implementing on your android device.
Saturday, December 23, 2017
How To Remove FRP Lock Lenovo K5 A6020A46 Qualcomm Serpit Complete Guideline Download
How To Remove FRP Lock Lenovo K5 A6020A46 Qualcomm Serpit Complete Guideline Download
How To Remove Frp Lock Lenovo Vibe K5 A6020A46
Lenovo Vibe K5 A6020A46 Official FRP Lock Remove Complete Solution
Before Starting Your About Lenovo Vibe K5 Plus A6020A46 Google Verify FRP Lock Remove Software Download.is it Require How To know that Alarege Number Of Mobile Smartphone unlocking and Software Update Center Avlibale in Bangladesh.we will descrive the Complete Solution to Remve FRP Lock Verify The Latest Working Software about Lenovo Vibe K5 Qualcomm Seript Tools Download.Read more Forum below
How to Download Lenovo Vibe K5 Plus A6020A46 FRP Remove Seript & Firmware File Free ?
If You want to get Lenovo Vibe K5 Plus A6020A46 FRP Remove Official Factory Firmware Free Download.Thes is The Right Place is Really Helpful For you you are Wilugible to Download
How To Remove Lenovo Vibe K5 A6020A46 FRP Lock Google Verify Account
Lenovo Vibe K5 Plus FRP Remove Process,
1. Press Volume Down key then Press Power Key in Power Off Mode To Enter fastboot mode.
2. Open Qualcomm FRP Script and Press 1 to remove frp
3. Wait for phone to boot up fully
4. You Are Done

How to Update Lenovo K3 Note to Android 6 0 Marshmallow
How to Update Lenovo K3 Note to Android 6 0 Marshmallow
How to Upgrade Lenovo K3 Note with android 6.0 Marshmallow - Tutorial .
Do you want to upgrade your lenovo k3 Note with Android 6.0 marshmallow ? Then you are at right place . today we will tell you a way with which you will be able to Upgrade your lenovo k3 note after the marshmallow official release for lenovo k3 note .
Before going to the guide please remember that Update is Available for indian version of Lenovo K3 note .This post is only for educational purpose which will help you to update your lenovo k3 note to android 6.0 Marshmallow so please dont get confused with the updating and teaching purpose .

Update Lenovo K3 Note to Android 6.0 Marshmallow - How to tutorial
As i told earlier that this guide is just for educational purpose which means this is just a guide which will help you and will tell you the procedure which will be used in updating your lenovo k3 note to marshmallow 6.0 .
Starting the guide :-
Prerequisites Before Updating Lenovo k3 Note To Android 6.0 Marshmallow .- Charge Lenovo k3 note To Full I.e 100%
- Wifi Or 3g Network Is Recommended
- Minimum 1 Gb Of Free Space Should Be available in Your Device as The Update can size A Bit Much Then Your expectation .
List of All Devices getting android 6.0 Marshmallow update .
- First Of all shutdown Your Android Device .
- Let the Device turned off for 4 minutes .
- Switch on The Device
- Connect The Device To Wifi Or 3g And Wait For A While .
- Now After Some Time You will Receive A Notification In The Lenovo k3 note Notification Bar
- Pull Down The Notification Bar And Open The Notification
- You will Land On A Screen Showing Download Update .
The Images Are Screenshot From Micromax Yu Yureka , But The Updating Procedure is All Most Same In Both .

After clicking The Option To update Lenovo k3 Note To Android 6.0 Marshmallow, You Will Land On A Screen Asking To Download the Update .
How to update Lenovo A7000 To android 6.0 Marshmallow .

Choose The download Android Marshmallow 6.0 update for Lenovo k3 note Option .
After choosing The Download Update Option The Update Will Start Downloading Automatically .

Wait For the Update Downloading To Complete , after The downloading is Completed The Lenovo k3 note Will Automatically Start And The Update will Be Completed On Its own .
This was Our Guide On How To Update Lenovo k3 Note To Android 6.0 Marshmallow .
After Following Our Guide You Will Be Able To update Lenovo k3 Note To Android 6.0 Marshmallow .

Friday, December 22, 2017
How To Install BBM On Your Device SONY Samsung HTC LG Lenovo Oppo Etc
How To Install BBM On Your Device SONY Samsung HTC LG Lenovo Oppo Etc
How To Install BBM On Your Device (SONY, Samsung, HTC, LG, Lenovo, Oppo, Etc)
Wednesday, December 20, 2017
How to Install Official Stock ROM for Lenovo A630T
How to Install Official Stock ROM for Lenovo A630T
This is the update official Stock ROM tutorial of�Lenovo A630T. In this tutorial we have to provide all the step�with proper screen shot therefore its very easy and safe method to install official�Stock ROM�on your�Lenovo A630T. First you have to read my all the step, then�after you are also able to install this official�Stock ROM�on your�android device without any troubles. So don�t search just download and implementing on your android device.
Tuesday, December 19, 2017
How To Lenovo Vibe k5 Note Hard Reset Unlock Code
How To Lenovo Vibe k5 Note Hard Reset Unlock Code
lenovo vibe k5 note hard reset, lenovo vibe k5 note factory reset, lenovo vibe k5 note pattern unlock, lenovo vibe k5 note flash file, lenovo vibe k5 note reset lock, how to lenovo vibe k5 note hardreset, lenovo vibe k5 note unlock code, lenovo vibe k5 note,

First method :
1. Switch off your cell phone
2. Press the combine keys given below
Volume Up + Camera button
Volume Down + Power button
Volume Up + Power button
Volume Up + Home + Power button
Volume Down + Home + Power button
Volume Up + Volume Down + Power button
Volume Down + Volume Up + Power button
Home + Camera button
Home + Power button
The above keys combinations are for every mobile brand try until you find the correct key combination if any of the keys doesn t work with your device then leave a message below with you mobile name and we will help you to reboot your device
3. Release the button when the device power is on.
4. Now you are in Android Recovery System and see 4 different option.
5. To Scroll up don you have to press volume up button down button
6. Select Wipe/Data Factory Reset
7. To confirm you want to erase data press power button
Now wait untill your cell phone is rebooting
Monday, December 18, 2017
How To Root Lenovo A850 Android Smartphone
How To Root Lenovo A850 Android Smartphone
Lenovo A850 is a quality and money worthy android smartphone which comes with 5.5 inches IPS LCD capacitive touchscreen display powered by 1.3 GHz Quad-core processor along with 1 GB RAM and the device runs on Android V4.2 (Jelly Bean) operating system. If you are using this smartphone and looking for a way to root it then you are in the right place. I have given a tutorial to root Lenovo A850 smartphone here.
You can be able to root Lenovo A850 smartphone by using the following rooting tutorial given here, and get the ability to remove pre-installed system applications, install custom ROM firmware�s, custom recoveries and do a lot more things.
WARNING: Rooting your Lenovo smartphone will null your device warranty and you won�t be able to claim it until you unroot your device. So, think well about it before getting started with the rooting procedure.Prerequisites:
1) Make sure that your device has at least 50% to 60% of battery backup, as the rooting process is always a time-consuming one.2) Although this rooting process is not a data-loss process, it won�t hurt to have a backup of your personal data in your device. So, take a complete backup before getting started with the rooting tutorial.3) Next, enable the USB Debugging Mode in your smartphone by following this path: Settings ->Developer Options -> USB Debugging. If you can�t see the developer options in your device Settings, then enable it by following this path: Settings -> About Phone (tap on the Build Number for 5-7 times to enable it).4) Now, download Lenovo A850 USB Driver and install it in your computer. By doing this you can be able to connect your device with your computer.Once you have finished all these prerequisites, you can move on to rooting tutorials given below.Tutorial To Root Lenovo A850 Smartphone:
1) To get started, download kingoroot for windows and install it in your computer. Once the installation is completed, launch its window.2) Next, connect your smartphone to the computer using the original USB data cable. If you haven�t installed the USB driver of your device in the computer properly, Kingo Root will automatically download the required USB drivers and install it.3) After the installation of USB driver, you will get the following message: Lenovo A850 Normal Mode. Root Status: No. Now, click on the �Root� button to begin the rooting process.4) It will take one or two minutes for Kingo Root to finish the rooting process and once it is finished, you will get the message �Root Succeeded�.That�s it. Now you have successfully finished rooting Lenovo A850 smartphone. For confirmation, install Root Checker for android in your device and confirm your device�s root privileges.If you encounter any issues while following this rooting tutorial, do let me know via comments.


Sunday, December 17, 2017
How To Root Lenovo A2010
How To Root Lenovo A2010
Specs:
- Phone comes with 1 Ghz Quad Core processor.
- RAM is 1 GB with 8 GB internal storage.
- It has a 2 MP front camera and 5 MP rear camera.
- Display is 4.5 Inch Captative Display.
- Other feature are 4G.Wifi and 3G.

Benefits of rooting
- With the help of root access, one can remove those apps which are pre-installed by your network provider or by manufacturer.
- Because of rooting you can also get the free storage space, rooted apps are available for efficient memory management.
- After rooting user can also update their phone to the latest version of Android (by flashing a custom recovery/ROM).
- It provides customization options when you use your new administrative rights to flash a custom ROM (again, see the end of this procedure for more info on that).
- Rooting also increases the battery life of the Smartphone because those running constantly can be removed).
Disclaimer
rooting your device will void its warranty and you will be no longer eligible for any kind of free device services by the manufacturers/warranty providers. Make sure that whatever you do, you are doing it at your own responsibility.
STEPS FOR ROOTING LENOVO A2010
Step 1: First download the root app for A2010 from : Here
Step 2: Install King root on your phone. ( To install it you first need to enable Unknown sources in Setting )
Step 3: Open the application, And tap on the "Root" button.
Step 4: It will take about 5 minutes to root your phone and after the process your phone will be rooted
Step 5: After the process is finished check your apps gallery, If you can find a new app installed named "king user" it means that your Phone is successfully rooted.
So, Friends this was all about Root Lenovo A2010 and keep visiting out website to get more updates on this phone, And tricks and tip about android phone . And if you have any doubt or got any problem while rooting Lenovo A2010 just Comment it below, We will try to solve it as soon as possible.
How to Install Official Stock ROM for Lenovo A798T
How to Install Official Stock ROM for Lenovo A798T
This is the update official Stock ROM tutorial of�Lenovo A798T. In this tutorial we have to provide all the step�with proper screen shot therefore its very easy and safe method to install official�Stock ROM�on your�Lenovo A798T. First you have to read my all the step, then�after you are also able to install this official�Stock ROM�on your�android device without any troubles. So don�t search just download and implementing on your android device.
Saturday, December 16, 2017
How to Install Official Stock ROM for Lenovo A850 Plus
How to Install Official Stock ROM for Lenovo A850 Plus
This is the update official Stock ROM tutorial of�Lenovo A850 Plus. In this tutorial we have to provide all the step�with proper screen shot therefore its very easy and safe method to install official�Stock ROM�on your�Lenovo A850 Plus. First you have to read my all the step, then�after you are also able to install this official�Stock ROM�on your�android device without any troubles. So don�t search just download and implementing on your android device.
Subscribe to:
Posts (Atom)