Showing posts with label note. Show all posts
Showing posts with label note. Show all posts
Wednesday, January 3, 2018
How to install Theme pack for Lenovo K3 Note
How to install Theme pack for Lenovo K3 Note

Instructions :
- Download file Theme pack from links given below.
- Save file .zip (dont extract or unzip) in storage0.
- Go to Theme Center.
- Click Button ��� in top right corner.
- Import theme.
- Choose theme.
- Wait the process to complete.
Links to download theme :
- https://www.dropbox.com/s/cdymhebs1nj23ir/265.zip?dl=
- https://www.dropbox.com/s/29m5z9flu6iduif/280.zip?dl=
- https://www.dropbox.com/s/4e63izn09yjdk63/302.zip?dl=
- https://www.dropbox.com/s/rdc8ndzdk4yb1bn/306.zip?dl=
- https://www.dropbox.com/s/nfp9lx6elje8c18/360.zip?dl=
- https://www.dropbox.com/s/crzno93vpoefkzp/473.zip?dl=
- https://www.dropbox.com/s/5m6h4mtzbbjn6em/540.zip?dl=
- https://www.dropbox.com/s/wn8jtgvckfycxv7/566.zip?dl=0
- https://docs.google.com/uc?id=0B9nEOPekbIRRaWxHVTdJaTJBdDA (New Themes)
FB Group : Lenovo K3 Note Official Group [India] https://www.facebook.com/groups/Lenovo.K3.Note.Official.Group.India/
FB Group : Lenovo K3 Note Official Group [India]
https://www.facebook.com/groups/Lenovo.K3.Note.Official.Group.India/
How To Unlock sm n910w8 Note 4
How To Unlock sm n910w8 Note 4
How To Unlock sm-n910w8 Note 4
Model: SM-N910W8
Sales Code: RWC
Country Code: Canada
Timezone: Asia/Karachi
Android Version: 6.0.1 [MMB29M]
Build Date: Fri Nov 4 19:20:45 KST 2016
PDA Version: N910W8VLS1DPK1 [november 2016, rev1]
Phone Version: N910W8VLU1COI4 [september 2015, rev4]
CSC Version: N910W8OYA1DPK1 [november 2016, rev1]
Board Platform: APQ8084
Modem Platform: MDM9225M
Serial Number: xxxxxxx
Imei: xxxxxxxxxxxxxx
 Battery Status: 3.86V (80%)
Network Type: GSM
SIM Status: NETWORK_LOCKED
Knox Version: v30
Warranty Bit: 0
Security Patch: 2016-11-01
Checking root state...
Not rooted.
There is no backup, because there is no root access.
Unlocking...
Trying on SAMSUNG Mobile USB Serial Port (COM648)
Protocol is not supported.
Trying on SAMSUNG Mobile USB Serial Port (COM649)
Unlocked.
Finished successfully.
Finished at local time: [03.09.17 12:13:04]
ALL MOBILE SOLUTIONSSales Code: RWC
Country Code: Canada
Timezone: Asia/Karachi
Android Version: 6.0.1 [MMB29M]
Build Date: Fri Nov 4 19:20:45 KST 2016
PDA Version: N910W8VLS1DPK1 [november 2016, rev1]
Phone Version: N910W8VLU1COI4 [september 2015, rev4]
CSC Version: N910W8OYA1DPK1 [november 2016, rev1]
Board Platform: APQ8084
Modem Platform: MDM9225M
Serial Number: xxxxxxx
Imei: xxxxxxxxxxxxxx
Network Type: GSM
SIM Status: NETWORK_LOCKED
Knox Version: v30
Warranty Bit: 0
Security Patch: 2016-11-01
Checking root state...
Not rooted.
There is no backup, because there is no root access.
Unlocking...
Trying on SAMSUNG Mobile USB Serial Port (COM648)
Protocol is not supported.
Trying on SAMSUNG Mobile USB Serial Port (COM649)
Unlocked.
Finished successfully.
Finished at local time: [03.09.17 12:13:04]
Tuesday, January 2, 2018
HOW TO ROOT GALAXY NOTE 8 0 N5100 ON 4 4 2 KITKAT
HOW TO ROOT GALAXY NOTE 8 0 N5100 ON 4 4 2 KITKAT
Recently Galaxy Note 8.0 GT-N5100 received the official KitKat 4.4.2 update via OTA. We also posted a guide on how to manually update Galaxy Note 8.0 using Odin. Now if you�ve updated your phone to 4.4.2 KitKat, then follow this quick step-by-step guide to root Galaxy Note 8.0 on Android 4.4.2 KitKat using the CF-Root procedure.
Guidelines and Requirements:
- Samsung Galaxy Note 8.0 GT-N5100
- CF-Root package: CF-Auto-Root-kona3g-kona3gxx-gtn5100.zip
- Odin3 tool is required but that is included in the cf-auto-root package.
- Install Samsung Kies or USB drivers on your PC.
- Go to Settings > Developers Options and enable USB debugging.
- Charge your tablet battery to at least 50%.
- Last but not the least, Carefully read and follow the instructions to safely and successfully root your tablet.
How to Root Samsung Galaxy Note 8.0 on Android 4.4.2 KitKat
Step 1: First of all, extract the CF-Auto-Root-kona3g-kona3gxx-gtn5100.zip a new folder on your desktop:

Step 2: Now from the extracted folder run Odin3-v3.o7 application on your PC.
Step 3: Reboot your Note 8 into Download Mode:
- Turn Off.
- Press and Hold down the Volume Down+Home+Power buttons at the same time till you see a warning on your screen.
- Further hit the Volume Up button to continue.
Step 4: Connect your device to PC via the USB data cable. Just make sure that Odin3 detects your device.
Step 5: Finally click the PDA button and from the extracted folder select the CF-Rooted kernelfile:

Step 6: Click on the START to flash the kernel.
Step 7: Within a few seconds your Galaxy Note 8.0 will be rooted. Odin will notify you via the PASS!! message and note will automatically reboots.
Step 8: Check that SuperSU has been installed. To verify root access, Open Google Play Store app on your phone and install �Root Checker�.
Feel free to ask for further support, if you get stuck at any step. For more working tutorials keep visiting.
Monday, January 1, 2018
How to SIM Unlock the Samsung Galaxy Note 3
How to SIM Unlock the Samsung Galaxy Note 3
- Launch your smartphone�s dialer.
- Enter the following code : *#197328640#
- Press the Menu softkey.
- Press Back.
- Press Menu and then open the Key input.
- Enter 1, press OK.
- Press Menu and press Back again.
- Tap [1]UMTS
- Tap [1]Debug Screen
- Tap [8]Phone Control
- Tap [6]Network Lok
- Tap Options and then tap [3]Perso SHA256 OFF
- Press Menu and Back.
- Press [6]COMMON
- Tap [4]NW Lock NV Data INITIALLIZ.
How To spot Fake Cloned Infinix Note 3
How To spot Fake Cloned Infinix Note 3
Hello viewers, im putting up this article having intended buyers of Infinix Note 3 in mind after getting numerous complaints from some of my readers about how to treat the issue of their note 3 battery draining faster and also other noticeable issues comcerning Infinix Note 3.
It has come to the point that greedy and unfair people are now cloning Infinix Note 3 and then selling it in market or shops to unsuspected buyers. Please look at below image very well which will really help all intended Infinix Note 3 buyers to differentiate between original Infinix Note 3 and the cloned Infinix Note 3.

Please share this article and image with your friends to save one the stress of buying fake and cloned phone
Sunday, December 31, 2017
How to Update Galaxy Note 3 to Android Nougat 7 0 for sock rom go to rompure com
How to Update Galaxy Note 3 to Android Nougat 7 0 for sock rom go to rompure com
How to Update Samsung Galaxy Note 3 to Android N 7.0 Nougat .
Do you want to update Samsung galaxy Note 3 to android n 7.0 nougat ? And want to Download CM14 for Galaxy Note 3 ? if yes then you are at right place . Today we are here with the Guide on How to Update Galaxy Note 3 in Nougat 7.0 .
Samsung Galaxy Note 3 was launched around 3 years ago and being a old device Samsung Discontinued support for the smartphone . The smartphone currently runs on android 5.0 Lollipop which is Quite old . So in this guide we are here with the Nougat 7.0 update for galaxy note 3 . Android N 7.0 nougat is the latest android version . N 7.0 comes with many new features and upgrades over marshmallow . Due to no support from Samsung Developers there will be No official nougat 7.0 update for galaxy note 3 However we can still use Nougat 7.0 based custom roms to update the smartphone .

Download CM14 for Galaxy Note 3 .
As we already mentioned Earlier that there will be no official Nougat 7.0 update for Galaxy Note 3 so we will use Cyanogenmod 14 for Samsung galaxy note 3 to update in Nougat 7.0 . Cm14 is one of the best custom rom that comes with many advanced features . Some of the main features of the Cm14 for Galaxy note 3 are :-
- Android N 7.0 Nougat based .
- Supports Gravity Box .
- Theme Support .
- Nougat 7.0 Wallpapers .
- Pre rooted .
- Battery Saver profile which increase battery backup .
- Smooth .
- No lag
- Ram management for better Multitasking .
Related : CM14 Supported Devices List .
There are some pre requirement before flashing the Nougat 7.0 custom rom on galaxy note 3 , Make sure you follow all of them :-
- This Custom rom is only for Samsung Galaxy Note and Dont try to flash it on any other Device .
- Make sure there is more then 4Gb Space available on your smartphone .
- Minimum 70% battery is required to Flash the custom rom on Your galaxy Note 3 .
- TWRP or CWM recovery is required to flash the custom rom .
- As this is a custom rom so it may contain some Bugs .
Upgrade Samsung Galaxy Note 3 To Android N 7.0 Nougat .
- First of all Download CM14 for Galaxy Note 3 .
- Download the rom in your Computer or Laptop .
- After Downloading Connect the Note 3 with computer using a USB cable .
- Now copy CM14 and Paste it in the root of Sd card .
- Now disconnect the smartphone from Pc .
- Now turn off your Smartphone .
- Now you have to boot Galaxy Note 3 in Twrp recovery mode .
- To Boot Galaxy Note 3 in Recovery mode you have to Press Volume up + Power + Home button Together Untill the Phone boots in recovery mode .

- Now Your Device will enter in Recovery mode .
- You will see many options .

- First of all Tap on Wipe .
- Now Wipe data factory reset .
- Now Wipe Cache .
- Now Wipe Cache partition .
- Wipe Dalvik cache .
- Now tap on backup and make backup of all files .
- Now tap on Install and Choose the Cm14 you downloaded earlier .
- Now tap on yes and Confirm the installation .
- As soon as you tap on yes the recovery will start Flashing the Custom rom .
- After Some time you will get a Notification " Zip file flashed successfully " . which means your galaxy note 3 has been updated successfully .
- Now just go back to the main screen and tap on Reboot System .

So this was our guide on How to Update Galaxy note 3 to nougat 7.0 , I hope you liked CM14 for Galaxy Note 3 .
How to play Gameloft games without lag and Disable CPU throtling without root on Lenovo K3 Note k50t5 k50a40
How to play Gameloft games without lag and Disable CPU throtling without root on Lenovo K3 Note k50t5 k50a40

The Lenovo K3 Note is an amazing budget phablet that does pretty much everything right. But users complained that games lagged after playing for about 5-10 minutes in K3 Note whereas the Meizu M2 Note which has the same CPU as the Lenovo K3 Note handled all the games very smoothly.
So what do you think what might be the problem here?
Lenovo has enabled CPU throttling to prevent CPU temperatures from going above 50 degree celsius.
So, whenever you play game on K3 Note after a few minutes the CPU temp hits 50 degree celsius mark which activates the thermal throttling mechanism. When thermal throttling gets activated you can see a sudden frame drop while playing games like Asphalt 8 and Modern Combat 5.
Here I will show you how to disable thermal throttling in Lenovo K3 Note without rooting your phone!
PROCEDURE TO DISABLE CPU THROTTLING ON LENOVO K3 NOTE :
1. Flash TWRP recovery using SP Flash Tools by following tutorial from this link here : http://yoyovirus.blogspot.in/2015/08/how-to-flash-custom-recovery-to-lenovo.html
2. After you successfully flash TWRP recovery, boot your phone into the recovery mode by presssing Volume UP + Volume DOWN + Power buttons together at the same time.
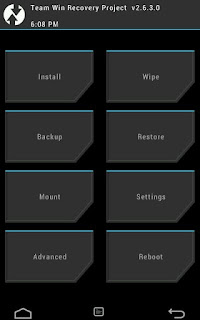
3. Once you boot into TWRP recovery you will see some options like shown in the below image.
4. Now select Mount Option and then put a cross on "System" option to Mount the System as hown in below image.
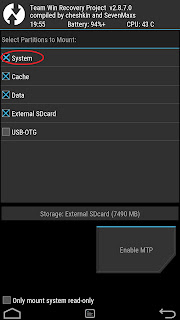
5. Then press the back button to return to the main screen of TWRP
recovery.
6. Now, select Advanced option and then select File Manager option.
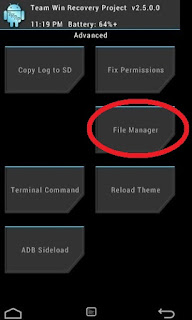
7. Here browse goto root path and then browse to System/etc/.tp path.
8. Here you will see three files . Select the file with name "thermal.conf".
9. Rename this file by giving any extension like "thermal.conf.xxx".
10. Congrats you have successfully disabled CPU throttling from Lenovo K3 Note.
11. Go back to main screen of your TWRP recovery and power off your phone by selecting Restart and then Turn off option.
12.Now Flash "Stock Recovery" using SP Flash Tools in similar way you flashe TWRP recovery.
13.Power On your phone and now you can play all the Gameloft games like Asphalt 8 and Modern Combat 5 and other HD games with no lags and frame drops.
Note :
1.Only for Vibe UI ROW Stock ROM.
2.You can also disable CPU throttling on a rooted K3 Note by renaming "thermal.conf" to "thermal.conf.xxx" file in "System/etc/.tp" directory using ES File Explorer. But by rooting your k3 Note you can not update your phone via OTA updates.So, I suggest the above procedure.
FB GROUP : LENOVO K3 NOTE OFFICIAL GROUP [INDIA]
https://www.facebook.com/groups/Lenovo.K3.Note.Official.Group.India/
Friday, December 29, 2017
How to Update Redmi Note 3 to Android 7 0 Nougat Cm14 for sock rom go to rompure com
How to Update Redmi Note 3 to Android 7 0 Nougat Cm14 for sock rom go to rompure com
Cm14 Cyanogenmod N 7.0 Nougat update for Xiaomi redmi note 3 .
Do you want to update Xiaomi redmi note 3 to android 7.0 Nougat ? And Want to Download Cyanogenmod Cm14 Nougat 7.0 for redmi note 3 ? if yes then you are at right place . Today we are here with the guide on How to Upgrade Xiaomi redmi note 3 in android n 7.0 nougat officially .
Xiaomi redmi note 3 is one of the most popular and most sold device in India in 2016 . Recently Xiaomi also launched the Successor of the Redmi note 3 named as redmi note 4 . The device comes with almost Identical features to the redmi note 3 . Xiaomi rolled out the Miui 8 update for redmi note 3 and the Miui 8 based on Android 6.0 marshmallow is in beta testing . So today we are here with the Cyanogenmod 14 also known as Cm14 Custom rom for redmi note 3 .

Download Cm14 Rom For Redmi note 3 .
So to update redmi note 3 to Nougat 7.0 We will use Cm14 custom rom . Cyanogenmod is one of the best custom roms . Some days ago we also told you the method to Update Redmi note 3 to Android 6.0 Marshmallow By Using Cm13 . And Now when Nougat 7.0 has been officially released we are here with the Guide which will help you to update your redmi note 3 in Latest android Version . Incase if you want to update in to Miui 8 you can follow our guide on How to Update redmi note 3 to Miui 8 .
Before going to the Guide Here are some Prerequisites :-
- Make sure you are using Redmi note 3 Snapdragon Variant .
- Make sure there is More then 70% battery available in your smartphone .
- Cm14 For redmi note 3 is still in Beta phase and once it gets released you will be able to upgrade .
- As this is a custom rom so we recommend you to follow each and every step carefully .
- Active internet Is required to download the update .
Upgrade Xiaomi redmi Note 3 to Android N 7.0 Nougat .
- First of all Download Cm14 for redmi note 3 Kenzo .
- After Downloading Connect your Smartphone to Pc through Usb Cable .
- Now Copy the Downloaded Cm14 in root of Sdcard or Internal Memory .
- After Copying Disconnect Smartphone and Make a reboot .
- Now go to Updater app and tap on the Menu button .
- As soon as you tap on menu button you will see many option .

- Choose Reboot to recovery mode .
- Now after booting in Recovery mode you Will again see many options . Just choose .

- Wipe Data / Wipe Cache / Wipe Cache Partition .
- After Wiping everything Select Install .
- Now Choose the Cm14 custom rom you have downloaded earlier .
- Now Tap on Yes Flash .
- As soon as you tap on yes the Flashing will start .
- Around 5 Minutes later you will get a Successful notification .
- Now just go back to the Main menu and choose Reboot .
- Thats All !!!!! You have successfully Update Xiaomi redmi note 3 to Android n 7.0 Nougat .
Screenshots of CM14 rom For redmi note 3 :-

So This was our Guide on Android N 7.0 nougat update for Redmi note 3 i hope you liked our guide Cm14 for redmi note 3 .
Thursday, December 28, 2017
How to root Lenovo K3 Note k50 t5 k50 a40
How to root Lenovo K3 Note k50 t5 k50 a40

REQUIREMENTS:
1. Super SU zip : Click Here to Download (Check the files section on fb group)
2. Custom Recovery(CWM/TWRP) installed on your K3 Note : Click Here to learn how to flash custom recovery to Lenovo K3 Note.
3. Lenovo K3 Note (Obviously)
PROCEDURE TO ROOT LENOVO K3 NOTE:
1. After flashing custom recovery using SP Flash Tool by following this guide.
2. Power On Lenovo K3 Note and copy the downloaded Super SU zip file (Note: Do not extract the zip file) in your memory card.
2. Power Off your phone.
3. Press Volume Up + Volume Down + Power Button at the same time to boot into custom recovery (TWRP/CWM).
4. Once in custom recovery, select "Install".
5. Then choose your Super SU zip file from the location in your memory card you copied earlier.
6. Swipe to right to flash the SuperSU zip file. This will root your Lenovo K3 Note by installing SU binaries and SuperSU superuser app.
7. Then select Reboot System.
8. You should find a new app called SuperSU in your app drawer. Run it once and update the SU binaries if it asks you.
9. Download any Root Checker app from Play Store and check if your phone is successfully rooted or not.
10. Njoy! You have successfully rooted your Lenovo K3 Note.
FB GROUP : LENOVO K3 NOTE OFFICIAL GROUP [INDIA]
https://www.facebook.com/groups/Lenovo.K3.Note.Official.Group.India/Wednesday, December 27, 2017
How To Hard Reset Samsung N7100 Galaxy Note II Using Its Hardware Keys
How To Hard Reset Samsung N7100 Galaxy Note II Using Its Hardware Keys
When you need to do a Hard Reset?
You can apply this operation in many cases, We will mention some of them here:
- After installing bad or unsupported application into your Samsung mobile phone which causes your phone to be frozen.
- Your Samsung mobile phone doesnt respond to any order after booting because of some software errors.
- Forgotten pattern lock in Samsung Android mobile phones.
- Forgotten user code.
- Forgotten phone code.
- Before or after installing new firmware updates into your device.
What to do before performing the Hard Reset?
- In case your Samsung mobile phone can connect to a computer then it is better to make a backup of your saved data using Samsung kies software.
- But in case that is not possible then you can check that your phones battery has enough charging, Otherwise you should charge it.
Samsung N7100 Galaxy Note II Hard Reset Steps:
- Take out your phones battery, SIM-card and memory card too.
- After 10 seconds put the battery back into your phone.
- Press and hold Volume Up key + Home key then press Power key.
- Keep pressing the above keys until Samsung logo appears,Then when you see the Android Green Man release all keys.
- You will be into Factory Reset menu.
- Use Volume Down key to scroll down and select Wipe Data / Factory Reset option.
- Use Power key to confirm the operation.
- You need to use the Volume Down key again to select "Yes -- delete all user data"
- Use Power key to confirm the operation.
- After performing the hard reset, Select Reboot System Now option, And confirm it using Power key.
- Now the phone will reboots, Wait for it to be fully on and then you can start using it.
Notice: The hard reset operation will delete anything that are saved in your phones internal memory, So make a backup of your data in case you can access them.
Tuesday, December 26, 2017
How to Unbrick and flash Stock ROM on Lenovo K3 Note k50 t5
How to Unbrick and flash Stock ROM on Lenovo K3 Note k50 t5
If you are familiar with the rooting process, you probably know that rooting and changing the ROM in android phone remove the manufacturer warranty. But if the phone already have official ROM the warranty will never void.
The official ROM for Lenovo K3 Note smartphone is now available. At below I have given the procedure to install the stock ROM on your phone. By installing this ROM you will back to official ROM.
PRE-REQUISITES:
1. First ensure the battery of your phone is above 75%, so then it will never get switched OFF during the middle of the process.
2. Next take full backup of your phone.
3. Also backup the important data like SMS messages, Whatsapp messages, Contacts etc., as this would be formatted during the process.
4. Next install the drivers for your phone using Lenovo K3 Note drivers.
Disclaimer : Follow the given below procedure at your own risk. I would not be held responsible for any damage that occurs to your phone, in case you do not follow the procedure properly.
REQUIREMENTS:
1. Official stock ROM (K50a40_S112_150610_ROW.7z) Lollipop 5.0 Indian version : download link Click Here to Download
2. Lenovo K3 Note Drivers : Click Here to Download (Check the files section on fb group)
3. SP Flash Tool download link: Click Here to Download (Check the files section on fb group)
4. A Windows PC
5. A Lenovo K3 Note (obviously)
Install Driver :
Install the driver then restart your PC, then connect your phone to PC via USB cable and wait till Windows configures it. Make sure the USB Debugging is enabled in this process. Once the configuration has completed, again restart your PC.
If you are using Windows 8 or Windows 8.1 then you may face problem to install the driver so follow these steps to install an unsigned driver.
For Windows 8:
1. Win + I -> Change the computer settings -> General -> Special boot options -> Restart Now.2. When you turn off the tap Diagnostics -> Advanced Settings -> Boot Options -> Restart.
3. A menu appears, select it in the �Disable the mandatory driver signing checks� � for this you have to press F7.
For Windows 8.1:
1. Win + I -> Change the computer settings -> Update and Restore -> Restore -> Restart Now.2. When you turn off the tap Diagnostics -> Advanced Settings -> Boot Options -> Restart.
3. A menu appears, select it in the �Disable the mandatory driver signing checks� � for this you have to press F7.
PROCEDURE TO INSTALL STOCK ROM ON LENOVO K3 NOTE SMARTPHONE:
1. Next extract the Stock Rom folder
2. Extract and open the SP Flash Tools and run "flash_tool.exe" as administrator.
3. In SP Flash Tools, just click the �scatter loading� it will ask you the location of the scatter loading file for your phone.
4. In the extracted folder of the stock ROM, go to the folder named �K50a40_S112_150610_ROW� and in there go to target_bin folder select the file �MT6752_Android_scatter.txt�(it is our scatter loading file).
5. In the menu �Option� tab, go to �Download�, and put a �tick� in the �DA DL All with Checksum�.

6. Next Switch off your phone .
7. Make sure Download only option is selected in SP Flash Tool as shown in the image below. Now hit the Green Download button.

8. Connect your phone now to PC via USB. The Flash tool will start the flashing process, you can see the progress at the bottom of the flash tool.
9. Don�t disturb the process until it get finished, otherwise it will brick your phone.
10. Once the process is finished, a green check box will appear in SP Flash Tool, which implies the installation of stock firmware on your device is successful.
11. Now, disconnect your phone from USB Cable and Power On your phone.
12. Njoy! You have successfully installed the stock ROM or Official ROM on Lenovo K3 Note.
FB Group : Lenovo K3 Note Official Group [India]
https://www.facebook.com/groups/Lenovo.K3.Note.Official.Group.India/Monday, December 25, 2017
How To Root Lenovo K4 Note
How To Root Lenovo K4 Note
Benefits of rooting
- With the help of root access, one can remove those apps which are pre-installed by your network provider or by manufacturer.
- Because of rooting you can also get the free storage space, rooted apps are available for efficient memory management.
- After rooting user can also update their phone to the latest version of Android (by flashing a custom recovery/ROM).
- It provides customization options when you use your new administrative rights to flash a custom ROM (again, see the end of this procedure for more info on that).
- Rooting also increases the battery life of the Smartphone because those running constantly can be removed).
Disclaimer
rooting your device will void its warranty and you will be no longer eligible for any kind of free device services by the manufacturers/warranty providers. Make sure that whatever you do, you are doing it at your own responsibility.
STEPS FOR ROOTING LENOVO K4
Step 1: First download the root app for K4 Note from : Here
Step 2: Install King root on your phone. ( To install it you first need to enable Unknown sources in Setting )
Step 3: Open the application, And tap on the "Root" button.
Step 4: It will take about 5 minutes to root your phone and after the process your phone will be rooted
Step 5: After the process is finished check your apps gallery, If you can find a new app installed named "king user" it means that your Phone is successfully rooted.
So, Friends this was all about Root Lenovo K4 Note and keep visiting out website to get more updates on this phone, And tricks and tip about android phone . And if you have any doubt or got any problem while rooting Lenovo K4 Notejust Comment it below, We will try to solve it as soon as possible.
Sunday, December 24, 2017
How To Install Android 8 0 Oreo On Redmi Note 3 AOSP ROM stock rom go to rompure com
How To Install Android 8 0 Oreo On Redmi Note 3 AOSP ROM stock rom go to rompure com
How To Install Android 8.0 Oreo On Redmi Note 3 [AOSP ROM]
Finally We got Android Oreo 8.0 AOSP Rom For our Redmi Note 3. In this post I am going to teach you How to download and install Android O (Oreo) 8.0 ROM On Redmi Note 3. Here comes the AOSP Rom for Redmi Note 3 via an unofficial build.This Redmi Note 3 AOSP ROM is brought to you by jhenrique09
An AOSP ROM is a ROM based on the Android Open Source Project. In the purest sense, AOSP refers to unmodified ROMs or code from Google.
If you like jhenrique09 (Rom Devloper) work then Donate.

If You Do Wrong Steps Then You Brick Your Device So I AM NOT RESPONSIBLE FOR ANY DAMAGES OF YOUR PHONE DO DO IT AT YOUR OWN RISK.
Redmi Note 3 Pro [kenzo/kate]
1. Unlocked Bootloader Needed. If you dont know how to unlock bootloader on any Xiaomi deivce the watch this tutorial video or follow the full tutorial post. (which may VOID your warranty and may delete all your data. SO first Take a full backup of your all data).
2. Need Latest custom Recovery installed (Like CWM OR TWRP). If you dont know how to install custom recovery on your Redmi Note 3 then watch this video tutorial or follow the post link.
3. AOSP Android oreo Rom for Redmi Note 3 zip file. (Download this file from the link given below).
4. No need to download Gapps for this rom because Rom have inbuilt Gapps.
1. First take a full backup of your current rom in to your pc.
2. Download UnOfficial AOSP Android oreo Rom for Redmi Note 3 zip file and from the given links on your pc.
3. Boot your phone into recovery mode using key combinations. Or if you dont know How to boot in to twrp recovery mode then google it
4. Go to Wipe section and Wipe data factory reset, Cache partition, Dalvik Cache and Format the System partition.
5. Now move your files from the pc (AOSP Android oreo Rom file)
6. Now go to install section and select AOSP Android oreo rom file and flash it. It will take some time to flash.
7. Now reboot your phone. It will take some time to first hoot.
. 9. Now finally Android O (Oreo) installed on your Redmi Note 3
9. Done & Enjoy.
1. Download Supersu zip file from the given link.
2. Flash supersu zip file from the TWRP Recovery.
. 3. Done. Now your Android O (Oreo) 8.0 Rom is successfully Rooted.
ALLSO READ : Lineage OS 15 On Redmi Note 3 [Android Oreo 8.0 Stable ROM]
 8.0 For Redmi Note 3 ROM zip File")
I Make Tech Videos Based Around SmartPhones especially Android Devices
Easy To Use Tutorials,Cool Android Tips & Tricks,Games & Apps Reviews.I Also show case interesting accessories & Gadgets
So what are you waiting for S-U-B-S-C-R-I-B-E and Join the best Android Tips and Hacks Channel On Youtube
Mahesh Technicals
![Android 8.0 Oreo On Redmi Note 3 [AOSP ROM]](https://blogger.googleusercontent.com/img/b/R29vZ2xl/AVvXsEi3u4XO6kWs5c1HTCa749I3sYHfT1gay23PR9eMEyVuVcY6bIFipj5cPxZnNdJ1gB6zOve5YoaGcLOITaJ0L1ZtcnY1kaLPwEvhlOLvuSHKjtZFuB4S9kC9aHNtn5iXn64e1sCOYpGz1q0B/s640/How+To+Install+Android+8.0+Oreo+On+Redmi+Note+3+%255BAOSP+ROM%255D.jpg "Android 8.0 Oreo On Redmi Note 3 [AOSP ROM]") |
| Android 8.0 Oreo On Redmi Note 3 [AOSP ROM] |
Finally We got Android Oreo 8.0 AOSP Rom For our Redmi Note 3. In this post I am going to teach you How to download and install Android O (Oreo) 8.0 ROM On Redmi Note 3. Here comes the AOSP Rom for Redmi Note 3 via an unofficial build.This Redmi Note 3 AOSP ROM is brought to you by jhenrique09
What Is AOSP ROM??
An AOSP ROM is a ROM based on the Android Open Source Project. In the purest sense, AOSP refers to unmodified ROMs or code from Google.
Donate
If you like jhenrique09 (Rom Devloper) work then Donate.
DISCLAIMER
If You Do Wrong Steps Then You Brick Your Device So I AM NOT RESPONSIBLE FOR ANY DAMAGES OF YOUR PHONE DO DO IT AT YOUR OWN RISK.
ROM supported On
Status of AOSP ROM For Redmi Note 3 Nougat 8.0 ROM
WHAT�S WORKING:
� XDA
KNOWN ISSUES:
� XDA
Requirements For Installing a custom ROM on a Redmi Note 3:
1. Unlocked Bootloader Needed. If you dont know how to unlock bootloader on any Xiaomi deivce the watch this tutorial video or follow the full tutorial post. (which may VOID your warranty and may delete all your data. SO first Take a full backup of your all data).
How To Unlock Bootloader Of Redmi Note 3
2. Need Latest custom Recovery installed (Like CWM OR TWRP). If you dont know how to install custom recovery on your Redmi Note 3 then watch this video tutorial or follow the post link.
How To Install TWRP Recovery On Redmi Note 3 With Root
3. AOSP Android oreo Rom for Redmi Note 3 zip file. (Download this file from the link given below).
4. No need to download Gapps for this rom because Rom have inbuilt Gapps.
How To Install Android O (Oreo) 8.0 In Redmi Note 3
1. First take a full backup of your current rom in to your pc.
2. Download UnOfficial AOSP Android oreo Rom for Redmi Note 3 zip file and from the given links on your pc.
3. Boot your phone into recovery mode using key combinations. Or if you dont know How to boot in to twrp recovery mode then google it
4. Go to Wipe section and Wipe data factory reset, Cache partition, Dalvik Cache and Format the System partition.
5. Now move your files from the pc (AOSP Android oreo Rom file)
6. Now go to install section and select AOSP Android oreo rom file and flash it. It will take some time to flash.
7. Now reboot your phone. It will take some time to first hoot.
. 9. Now finally Android O (Oreo) installed on your Redmi Note 3
9. Done & Enjoy.
How To Root Android O (Oreo) ROM
1. Download Supersu zip file from the given link.
2. Flash supersu zip file from the TWRP Recovery.
. 3. Done. Now your Android O (Oreo) 8.0 Rom is successfully Rooted.
ALLSO READ : Lineage OS 15 On Redmi Note 3 [Android Oreo 8.0 Stable ROM]
Download Rom & Supersu zip File For Redmi Note 3
Download AOSP Android O (Oreo) 8.0 For Redmi Note 3 ROM zip File (Download Latest Build) :
Download Supersu Zip File:
Credits :
jhenrique09
Thanks to all who have helped me (directly or indirectly), especially to these guys: @xyyx, @billchen1977,@akhilnarang, @GreekDragon, @abhishek987
XDA
ABOUT ME :
I Make Tech Videos Based Around SmartPhones especially Android Devices
Easy To Use Tutorials,Cool Android Tips & Tricks,Games & Apps Reviews.I Also show case interesting accessories & Gadgets
So what are you waiting for S-U-B-S-C-R-I-B-E and Join the best Android Tips and Hacks Channel On Youtube
Mahesh Technicals
Thank You For Reading How To Install Android 8.0 Oreo On Redmi Note 3 [AOSP ROM].
How to Unlock Verizon Galaxy Note 4 Bootloader
How to Unlock Verizon Galaxy Note 4 Bootloader

Carrier locked devices are very tough shells to crack and thus many carrier locked devices won�t have a bootloader unlock method. The Verizon Galaxy Note 4 also comes under the same category where the bootloader was not unlockable. Lucky for Verizon Galaxy Note 4 users, the bootloader unlock method is now available for the device. So, you can now install and use custom recoveries like TWRP and use it to flash awesome custom ROMs and mods. The credit goes to ryanbg of XDA for sharing this useful method
Many users in the XDA developer forum have confirmed the exploit working and they were able to unlock the bootloader. The exploit is working on Verizon Note 4 running Android 5.1.1 Lollipop and a permanent root and TWRP is also achieved. Before proceeding with the tutorial, you need to have root permissions on your device to install some scripts to unlock the bootloader. You can easily root your device by using our tutorial from here or you can simply use Kingroot 4.8.5 to gain temporary root access.
You also need an SDcard in your device which will be formatted during the process, so make sure you don�t have any important data on the SDcard. It�s better to take a full backup of the SDcard to prevent any data loss. Also, you must disable the reactivation lock to avoid any issues. And finally, your device CID should start with 15, else the process won�t work. You can check using the eMMC app. If you�re all set, let�s start with the tutorial.
Prerequisites
- Charge your Galaxy Note 4 above 60% battery level to avoid shutdowns during the process.
- Enable USB Debugging: Link
- Install Required USB Drivers: Link
- Backup your device storage, Contacts, SMS etc. using Google Sync service or any third-party app.
- Install ADB on your PC. You can follow our comprehensive tutorial from Here.
- Download the latest Odin tool Odin3_v3.10.6.zip. You can also download the older Odin version from Here
- Download samsung_unlock_n4-2 script ? Download | Mirror
- Download samsung_unlock_n4-2 fix? Download
- Download TWRP for Verizon Note 4 (Use .tar file) ? Download
How to Unlock Bootloader on Verizon Galaxy Note 4
- Download the samsung_unlock_n4-2 scipt and place it in the same folder where you have the ADB tools installed.
- Navigate to the ADB files folder and open a command prompt inside the folder by pressing Shift key + Right-click in the empty space inside the folder, and select Open command window here option from the Windows context menu.
- In the command prompt, use the below command to transfer the unlock file to the temporary location in the device.
adb push samsung_unlock_n4-2 /data/local/tmp/
- Now, use the below command to open ADB shell on your PC.
adb shell
- To gain the root permission on your device, enter the below command. Make sure you grant the r SuperSU permission on your device to get the root access.
su
- Now enter the below commands one by one to set the correct permissions and ownership for the unlock file.
cd /data/local/tmp/
chmod 777 samsung_unlock_n4-2
chown root.root samsung_unlock_n4-2
- Now, run the below command to execute the script.
./samsung_unlock_n4-2
You�ll see the below warning banner after running the above script. Read it carefully.
[+] CID at boot time is/was: 1501xxxxxxxxxxxxxxxxxxxxxxxxx
Note: If you�re facing any issues like �this is for Samsung devices only error,� use the samsung_unlock_n4-2 fix script and run it using the same process defined above.
[+] device not yet dev CID, now changing to dev CID
[+] programming new CID 150100523231384d4100657e54fc1200
[+] success! powering off device, power back on and verify CID
[+] then run this binary again to finish the process - As stated, the CID of your device will change after the reboot. The device will be powered off automatically after running the script. Before turning it on, make sure you placed the SDcard on your device. Once the device boots up, follow the steps 3-7 again. This will unlock the bootloader on your device.
- Pull the SDcard and keep it safe as it contains the loader files which will help fix your device in case of any brick.
- Now, enter into download mode on your device. To do this:
- Power off your phone first.
- Press and hold Volume Down + Power + Home together until you seeWarning screen with Android logo.
- Press Volume Up now to continue to Download Mode.
- Flash the TWRP file from Odin tool. You can follow our Odin flashing guide from here.
- Once installed, boot into recovery mode by pressing �Volume Up+ Power + Home� buttons together and take a nandroid backup of your device.
- You can now obtain root access on your device by flashing SuperSu zip from TWRP or you can use CF Auto Root method using this tutorial.
Saturday, December 23, 2017
How to Update Lenovo K3 Note to Android 6 0 Marshmallow
How to Update Lenovo K3 Note to Android 6 0 Marshmallow
How to Upgrade Lenovo K3 Note with android 6.0 Marshmallow - Tutorial .
Do you want to upgrade your lenovo k3 Note with Android 6.0 marshmallow ? Then you are at right place . today we will tell you a way with which you will be able to Upgrade your lenovo k3 note after the marshmallow official release for lenovo k3 note .
Before going to the guide please remember that Update is Available for indian version of Lenovo K3 note .This post is only for educational purpose which will help you to update your lenovo k3 note to android 6.0 Marshmallow so please dont get confused with the updating and teaching purpose .

Update Lenovo K3 Note to Android 6.0 Marshmallow - How to tutorial
As i told earlier that this guide is just for educational purpose which means this is just a guide which will help you and will tell you the procedure which will be used in updating your lenovo k3 note to marshmallow 6.0 .
Starting the guide :-
Prerequisites Before Updating Lenovo k3 Note To Android 6.0 Marshmallow .- Charge Lenovo k3 note To Full I.e 100%
- Wifi Or 3g Network Is Recommended
- Minimum 1 Gb Of Free Space Should Be available in Your Device as The Update can size A Bit Much Then Your expectation .
List of All Devices getting android 6.0 Marshmallow update .
- First Of all shutdown Your Android Device .
- Let the Device turned off for 4 minutes .
- Switch on The Device
- Connect The Device To Wifi Or 3g And Wait For A While .
- Now After Some Time You will Receive A Notification In The Lenovo k3 note Notification Bar
- Pull Down The Notification Bar And Open The Notification
- You will Land On A Screen Showing Download Update .
The Images Are Screenshot From Micromax Yu Yureka , But The Updating Procedure is All Most Same In Both .

After clicking The Option To update Lenovo k3 Note To Android 6.0 Marshmallow, You Will Land On A Screen Asking To Download the Update .
How to update Lenovo A7000 To android 6.0 Marshmallow .

Choose The download Android Marshmallow 6.0 update for Lenovo k3 note Option .
After choosing The Download Update Option The Update Will Start Downloading Automatically .

Wait For the Update Downloading To Complete , after The downloading is Completed The Lenovo k3 note Will Automatically Start And The Update will Be Completed On Its own .
This was Our Guide On How To Update Lenovo k3 Note To Android 6.0 Marshmallow .
After Following Our Guide You Will Be Able To update Lenovo k3 Note To Android 6.0 Marshmallow .

Subscribe to:
Posts (Atom)