Thursday, January 4, 2018
I Can Freekick v1 4 1 4 Android Apk Game
I Can Freekick v1 4 1 4 Android Apk Game
I Can Freekick v1.4
Requirements:�Android 2.2 and up
Overview:�Now your chance to be a world-renowned spot kicker come with this freekick game!


Have you always dreamed of scoring great goals like world class footballers? Think you have what it takes to be the best spot kick taker? Now your chance has finally come with this new freekick game! Realistic ball physics, great defence and goal keeper animations and with 6 different modes to challenge yourself. The time has come to put on your boots and be a professional with “I Can Freekick”…. can you?
Multiple Game modes:
“Practice” Warm up and get to know the ball before you take on the real challenges!
“Target Mode” Can you hit the targets and get a highscore?
“Bend it like….” Can you bend the ball around the defence and score?
“Beat the keeper” Show the keeper that he cant stop you!
“Time attack” How many can you score before the whistle blows?
“Memory Blocks” Unique game mode for freekick games.
Local Multiplayer, Got your friend with you? then let him play as well�

Coming Features for Pro version only:
Online Multiplayer!
Global Leader boards and achievements!
New game modes!
More Info:
https://play.google.com/store/apps/details?id=com.sobee.freekick.en.type1
Download:�Released by getapk.co
apk
mirror
The post I Can Freekick v1.4 (1.4) Android Apk Game appeared first on ApkPedia.
How To Root Infinix X557 Infinix Hot 4
How To Root Infinix X557 Infinix Hot 4
This is a tutorial on how to Root Infinix X557 (Infinix Hot 4).
What Is Rooting?
Rooting can be said to be Android jailbreaking. Its simply a means of unlocking the operating system of a device so you can install unapproved apps, delete unwanted bloatware, update the OS, replace the firmware, overclock (or underclock) the processor, writing or changing IMEI, installing fonts, customizing anything and so on.
How To Root Infinix X557
|
STEPS �
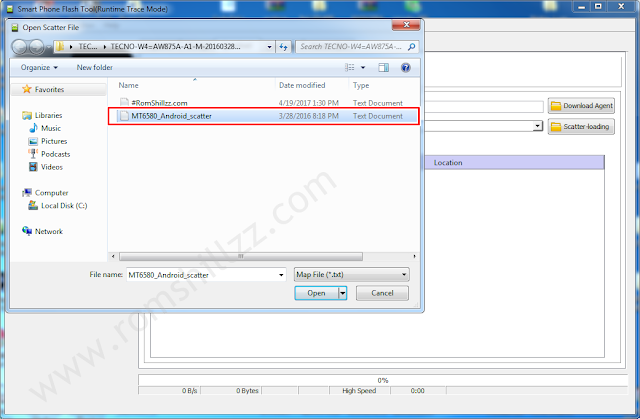
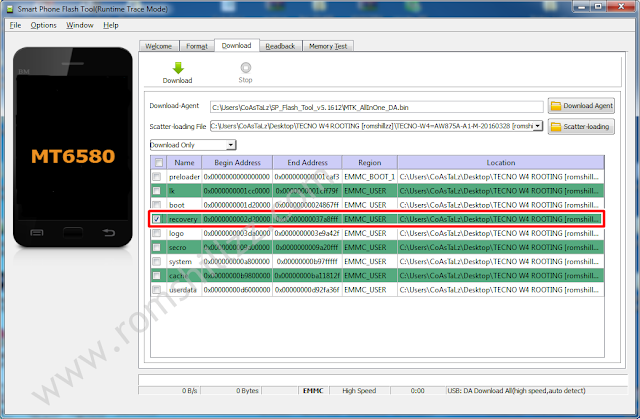
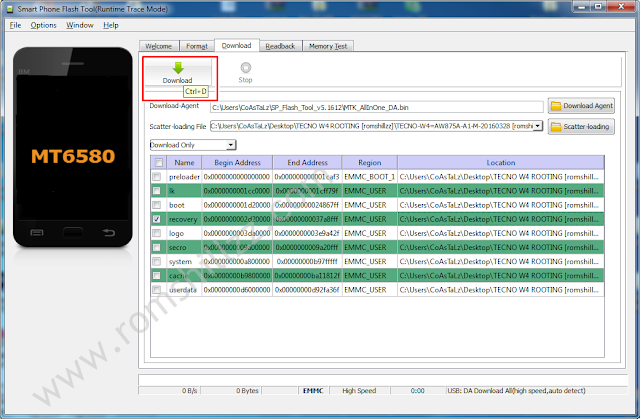
STEP 1: Download and install Miracle Box Drivers v1.0 to your PC.Flashing the TWRP recovery.img using SP Flash tool.


STEP 8: In TWRP, if you will get a prompt asking you to swipe to allow modification then swipe.
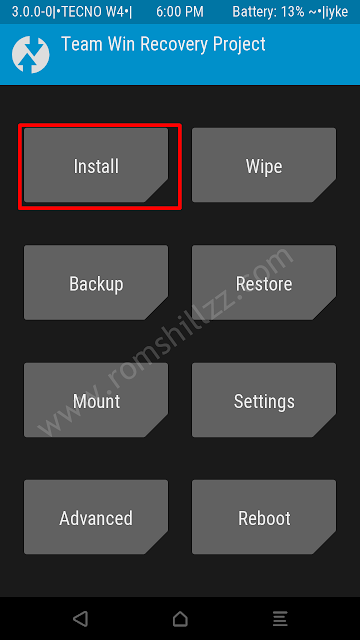
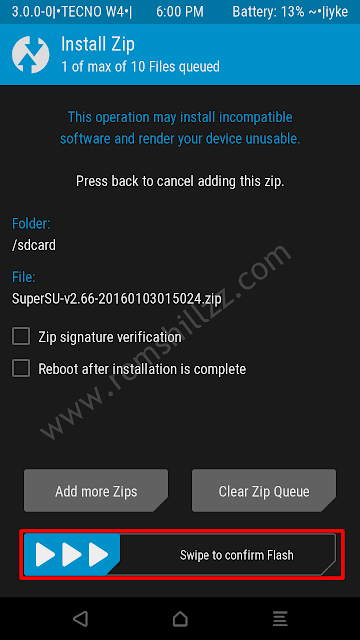
STEP 9: In TWRP recovery, tap Install.
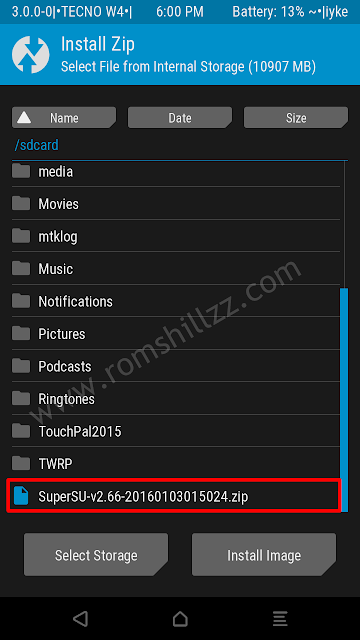
STEP 10: Navigate to the location of the SuperSU.zip and select it.
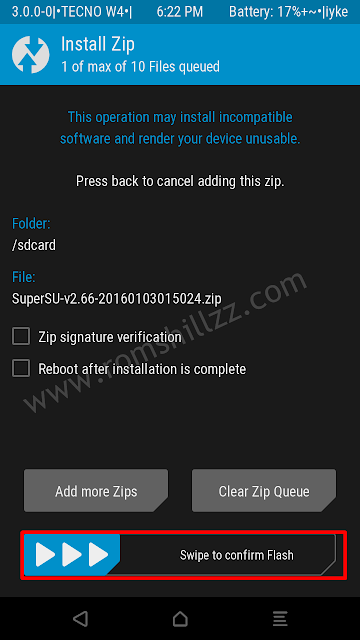
STEP 11: Swipe to confirm flash and patiently wait until the flashing process is complete.
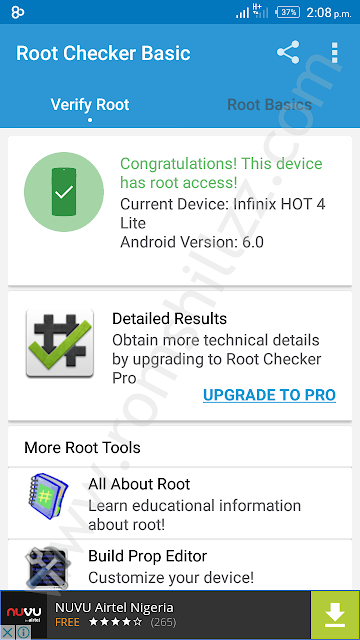
STEP 12: After the flashing process is completed, Reeboot System.
|
Please Leave a comment after using this Tutorials
Report if you cannot do this.
How to Install Android 4 4 KitKat Based ROM on Galaxy S3 GT I9300 GT I9305 AT T Sprint T Mobile Verizon
How to Install Android 4 4 KitKat Based ROM on Galaxy S3 GT I9300 GT I9305 AT T Sprint T Mobile Verizon

Owning a Google Nexus device is a kind of guarantee that you would be one of the first to receive the latest version of Android, but if you got a phone/tablet from manufacturers like Samsung, LG, HTC, Sony, etc., you might have no choice but to wait perpetually. Even if you get a new (?) update, it�s got to be an old thing by the time it reaches you. Samsung�s treatment with its popular phones like the Galaxy S3 and Note 2 is a very relevant example of how manufacturers shirk from sending software updates to their users.
Yesterday we published an article on installing Android 4.4 KitKat based custom ROMs on the Galaxy Note 2 and many of its variants. Extending our KitKat treat, we have now come with a collection of Android 4.4 custom ROMs for the Samsung Galaxy S3. If you own any of the following variants of the device, you can update your phone with the newest sensation of Android:
- Samsung Galaxy S3 GT-I9300
- Samsung Galaxy S3 LTE GT-I9305
- AT&T Galaxy S3 SGH-I337 (the ROMs for this model can also be installed on the Canadian variants e.g, Rogers, Bell, Telus, etc.)
- Sprint Galaxy S3 SPH-L710
- T-Mobile Galaxy S3 SGH-T999
- Verizon Galaxy S3 SCH-I535
Warning:
The procedure described below is not meant for perfect noobs as it is considered risky. Follow all instructions carefully if you do not wish to caught into a compromising situation. We would always be at our end to help you in case of a mishap but we take no responsibility. Proceed only if you agree to these terms.Prerequisites:
- A rooted Samsung Galaxy S3. If you have not rooted your phone yet, please take some time and root it using our easy rooting tutorial.
- The KitKat ROMs we are going to talk about are custom ROMs and therefore they require the presence of a custom recovery like ClockworkMod or TWRP on your device. Not only this, you must have the latest version of the recovery you use. You can download ROM Manager (CWM) or Goo Manager (TWRP) to install the latest version.


Note:
Since Goo Manager is working properly these days, we recommend that you install CWM version 6.0.4.3 on your device. If you know how to install recovery image file using ADB command, download the latest CWM recovery .img file from here and install it. 6.0.4.3About the ROMs:
Please note that most of the ROMs that we have mentioned below are based on CM 11 and therefore have all the bugs of their parent. Being in early stage of development, it is obvious that you might encounter a few bugs in performance. Please install the appropriate ROM on your phone, test them and if you find them stable enough for you,use them. We hope that with new updates, all these ROMs will become more mature and stable.
Downloads:
Download the Android 4.4 ROM:
Now here are the CyanogenMod 11 based KitKat ROMs for Samsung Galaxy S3. In case you find more that one ROM listed for your S3 model, download any of the two.- Samsung Galaxy S3:
- CM 11 Unofficial ROM: cm-11-2013-UNOFFICIAL-i9300-V5.zip
- Samsung Galaxy S3 LTE:
- CM 11 Unofficial ROM: cm-11-2013-UNOFFICIAL-i9305.zip
- AT&T & Canadian Galaxy S3 (SGH-1747 and 1747M):
- CM 11 Unofficial ROM: cm-11-2013-UNOFFICIAL-d2att.zip
- Quantum ROM: Quantum-v3-Beta.zip
- BeansTalk ROM: BeanStalk-4.4001-20131120-d2att.zip
- Sprint Galaxy S3:
- CM 11 Unofficial ROM: cm-11-2013-UNOFFICIAL-d2spr.zip
- T-Mobile and Canadian Galaxy S3 (SGH-T999 and T999V):
- CM 11 Unofficial ROM: cm-11-2013-UNOFFICIAL-d2tmo.zip
- Verizon Galaxy S3:
- CM 11 Unofficial ROM: cm-11-2013-UNOFFICIAL-d2vzw.zip
Download Google Apps:
Google apps are not included in the ROM package. Therefore, you need to download and install them separately. Always choose the latest version of Gapps.pa_gapps-full-4.4-20131118-signed.zip
Mediafire Mirror
Download Latest SuperUser:
UPDATE-SuperSU-v1.69.zipHow to Install:
- Important: Do not forget to backup your phone�s EFS/IMEI before. Read this article for detailed tutorial.
- Charge your phone.
- Copy the downloaded Android 4.4 ROM file and the latest Gapps package from above and copy them to your phone.
- Also copy the SuperSU zip file to the device.
- Boot your Galaxy in recovery mode. Here is how to do it: hold down the Volume Up+Home+Power buttons together for 4-6 seconds till the screen turns up and you see the recovery screen. Alternatively,you can enter recovery mode using these apps.
- If you are using CWM, use the volume keys to scroll up/down and the power button to select files and options. TWRP users can simply touch the corresponding buttons to get a job done.
- Important: Before doing anything, do not forget to backup your current ROM using �backup and restore�option (in CWM) or �Backup� option (in TWRP) and check all items to backup.
- CWM Users: Go back to main menu in recovery and select �wipe data / factory reset> yes�. Then go to�mounts and storage� and wipe data and system.
- TWRP Users: Just tap on �Wipe� button and select Data, System and Cache.
- Now go back again and choose �install zip from sdcard> choose zip from sd card� option, select the ROM file in zip and choose �yes� when asked. If you have TWRP, use �Install� button, select the ROM and swipe the slider to confirm installation.
- When the ROM is installed, install the Gapps zip package just like you flashed the ROM in Step 11.
- Then install the �UPDATE-SuperSU-v1.69.zip� file the same way.
- Finally, select the reboot system option.
How To Update Samsung Galaxy Ace S5830 to Android 4 1 2 Jellybean
How To Update Samsung Galaxy Ace S5830 to Android 4 1 2 Jellybean
 Samsung Galaxy Ace GT-S5830 won�t going to see official Android 4.1 Jelly Bean ever due to its hardware spec but that not going to stop developer to push Android 4.1.2 Jelly Bean on Galaxy Ace S5830.
To update Samsung Galaxy Ace GT-S5830 to Android 4.1.2 Jellybean, follow our guide below.
Disclaimer: The procedure given in this tutorial is considered as risky and may cause damage to your phone. It is recommended that you should not follow it unless you are familiar with these things. Follow this guide completely at your own risk.
I. Before You Begin:
1. The following procedure works for Samsung Galaxy Ace GT-S5830 smartphones.
2. Make sure your device have at least 80% battery power.
3. You must have ClockworkMod Recovery installed on your device.
4. Make sure USB Debugging is enabled
II. Downloading Required Files:
1. Jelly Bean 4.1.2 ROM For Samsung Galaxy Ace S583 [Filename: cooper_PAC_jb-13Dec.zip]
2. Google Apps [Filename: gapps-jb-20121017-KonstaKANG.zip]
III. Install Android 4.1.2 Jelly Bean ROM on Samsung Galaxy Ace S5830:
1. Connect your phone to PC using USB cable.
2. Copy downloaded files to the SD card of your phone.
3. Disconnect USB
4. Turn off your phone
5. Boot into recovery by pressing and holding Volume Down, Home and Power buttons
6. Wipe the Data and Dalvic Cache or you might brick your device afterwards
7. Select install zip from sdcard, then select choose zip from sdcard. (Now, locate the cooper_PAC_jb-13Dec.zip) and select it by pressing Power button.
8. Once the ROM installation process end, repeat the step 7 but choose gapps-jb-20121017-KonstaKANG.zip instead of ROM zip to install the Google apps package.
9. When installation is completed, go back to the main recovery menu and select reboot system now to reboot the smartphone and boot up into customized Android 4.1.2 Jelly Bean
Free work from home License Key Losing weight quickly Quick weight loss Moneys
Congrats! Well known and super customize Android 4.1.2 Jelly Bean firmware based custom ROM now installed and running on your Samsung Galaxy Ace S5830.
How to solve E30 4 service is currently scrambled on Sun Direct
How to solve E30 4 service is currently scrambled on Sun Direct
Reason for E30-4 service is currently scrambled
The cause for this error could be anyone of the given problems.
- If you are not using the DTH for too long.
- If you are using different smart card on your set top box(STB).
Solution to E30-4 service is currently scrambled
Follow anyone of the given instructions
- If you trying to use someone elses smart card, do not try. use your own smartcard that comes with the STB.
- If you have not used DTH for too long you will not get service. You need to customer care, they will ask you address and name. And again activate and provide service.
Wednesday, January 3, 2018
How To LG Nexus 4 E960 Sim Card Ways Insert Sim Solution 100 Working
How To LG Nexus 4 E960 Sim Card Ways Insert Sim Solution 100 Working

Make a Jumper
Check the voltage hanging in the balance as appeared above and ensure everything produce voltage.
On the off chance that there is one line does not deliver voltage then you need to make a jumper as appeared previously.
On the off chance that the four lines has created a voltage then please attempt to embed sim card and turn on the phone.
Perhaps its only data from MobileRdx..com about LG Nexus 4 E960 No Sim Card Issue Arrangement and Trap Jumper Ways. I seek this guide can be helpful after all of you
Remember:- The each arrangements posted on Our site is very much tried before by our authority group, Yet at the same time we dont assume any liability for any harm it might bring about to your wireless. Utilize these repairing arrangements at your own particular Hazard, Bless your heart.
ICE AGE 4 CONTINENTAL DRIFT
ICE AGE 4 CONTINENTAL DRIFT


Supplied by Dedomil, Stox
Kategori = Adventure
Vendor = Gameloft
Sony Ericssom
176x220 W810 (1.5 MB)
128x160 W200 (263 KB)
240x320 k800 (1.5 MB)
Nokia
128x128 s40v2 (126 KB)
128x128 s40v2 N6101 (150 KB)
128x160 s40v3 5200 (269 KB)
128x160 s40v6 X2-00 (373 KB)
176x208 s60v2 (305 KB)
240x320 s40v3 (1.0 MB)
240x320 s60v3 N73 (1.1 MB)
320x240 s40v6 C3-00 (1.1 MB)
how to upgrade micromax unite2 to Official lollipop from kitkat 4 4
how to upgrade micromax unite2 to Official lollipop from kitkat 4 4
on whole YouTube... you cant found this type of easy and detailed step by step instructions video..
Video link--HERE
Achievement:- in this firmware internal app storage and sd card storage combined..so you can install upto 5 gb of apps...tried on my mmx unite2
(with video proof-
WATCH NOW
Requirements:- pc and watch video only...and run side by side...
Download.. Files-direct and fast speed links
1.) firmware-DOWNLOAD NOW
& 2.) sp flash tools+drivers-
DOWNLOAD HERE
video tutorial-how to root official lollipop:-HERE
F.A.Q
1. My phone is 4GB/8GB. Will this work for me?
Sol: Yes. This will work on both versions.
2. While updating, I got this error: "brom error: s_not_enough_memory..."
Sol: Try using different version of flash tool.
3. My phone is not detected on Flash tools.
Sol: It is because of missing of proper drivers.
follow this guide: http://thetechnolyte.blogspot.in/2014/04/installing-vcom-drivers-in-windows-81.html
4. Can I install this by CWM/TWRP/CTR etc?
Sol: No. You cant do that.
5. Do i need a valid internet connection on my pc while downloading?
Sol: No. Its not required.
6. I installed all the necessary drivers, but my phone is not getting detected.
Sol: Try changing the USB Cable, Usb port, etc.
7. Will this void my warranty?
Sol: Actually, this is an official firmware update provided by micromax. So flashing this will not void your warranty.
8. Does this require root access?
Sol: No. Its not necessary.
9. Will this delete my data?
Sol: Yes. This will delete whole data and applications from your internal storage.
10. Flashtool shows " S_INVALID_ARGUMENT (1002)"
Sol: Its because of the corrupted scatter file. You have to download the firmware again.
11.) does your phone does not installed?
sol:- install drivers properly ...
How to solve the E100 4 Service is Currently Scrambled error in Sun Direct
How to solve the E100 4 Service is Currently Scrambled error in Sun Direct
How to solve the E100-4 Service is Currently Scrambled error in Sun Direct
Do not worry if you get this error, in some rare cases you can solve it by very simple process.
Follow this steps
- Turn off your sun direct setup box
- Remove smartcard and re insert it again
- Turn on the setup box Second Solution Before calling to the technician make sure you have done the following troubleshoot steps.
- Go to the place where your sun direct antenna is located and make sure nothing is placed in front of the lnb antenna like cloths, covers...etc
- See the sky, if it is too cloudy you wont get signal.wait for clear sky and check still the error is coming or not.
Advertisement
Last Solution to E100-4 Service is Currently Scrambled error
If the error is still showing even after above solutions.then you have no choice other than calling sun direct technician, you will have to pay him.
How to Root Sony Xperia Neo Neo V ICS 4 0 4 4 1 B 0 431 Firmware
How to Root Sony Xperia Neo Neo V ICS 4 0 4 4 1 B 0 431 Firmware

How To Unlock sm n910w8 Note 4
How To Unlock sm n910w8 Note 4
How To Unlock sm-n910w8 Note 4
Sales Code: RWC
Country Code: Canada
Timezone: Asia/Karachi
Android Version: 6.0.1 [MMB29M]
Build Date: Fri Nov 4 19:20:45 KST 2016
PDA Version: N910W8VLS1DPK1 [november 2016, rev1]
Phone Version: N910W8VLU1COI4 [september 2015, rev4]
CSC Version: N910W8OYA1DPK1 [november 2016, rev1]
Board Platform: APQ8084
Modem Platform: MDM9225M
Serial Number: xxxxxxx
Imei: xxxxxxxxxxxxxx

Network Type: GSM
SIM Status: NETWORK_LOCKED
Knox Version: v30
Warranty Bit: 0
Security Patch: 2016-11-01
Checking root state...
Not rooted.
There is no backup, because there is no root access.
Unlocking...
Trying on SAMSUNG Mobile USB Serial Port (COM648)
Protocol is not supported.
Trying on SAMSUNG Mobile USB Serial Port (COM649)
Unlocked.
Finished successfully.
Finished at local time: [03.09.17 12:13:04]
How To Root Micromax Canvas Doodle 4 Q391
How To Root Micromax Canvas Doodle 4 Q391

Follow these Steps to Root your Micromax Canvas Doodle 4:
Step 1: Download Framaroot app, clickhere
Step 2: Copy Framaroot app in your phone internal storage or external SD card.
Step 3: Go to setting >>> tap on security >>> tick on the unknown sources box (After install un-tick this option doesnt forget it).
Step 4: Install Framaroot App on your phone. After then tap on App file >>> You will get a popup tab then select by tap on the verify and install option >>> After then tap on Just once option >>> Now tap on install.
Step 5: After completion, you will get two option first one "Done" and second one "Open" . Now tap on the open and run Framaroot App and Now Select �Install Super Su�.
Step 6: After then you will see one of these options �Boromir/Gandalf/Aragorn� and tap on it. Now Reboot your Mobile and Enjoy rooted phone. That�s all
Tuesday, January 2, 2018
HOW TO ROOT GALAXY NOTE 8 0 N5100 ON 4 4 2 KITKAT
HOW TO ROOT GALAXY NOTE 8 0 N5100 ON 4 4 2 KITKAT
Guidelines and Requirements:
- Samsung Galaxy Note 8.0 GT-N5100
- CF-Root package: CF-Auto-Root-kona3g-kona3gxx-gtn5100.zip
- Odin3 tool is required but that is included in the cf-auto-root package.
- Install Samsung Kies or USB drivers on your PC.
- Go to Settings > Developers Options and enable USB debugging.
- Charge your tablet battery to at least 50%.
- Last but not the least, Carefully read and follow the instructions to safely and successfully root your tablet.
How to Root Samsung Galaxy Note 8.0 on Android 4.4.2 KitKat

- Turn Off.
- Press and Hold down the Volume Down+Home+Power buttons at the same time till you see a warning on your screen.
- Further hit the Volume Up button to continue.

How to install GO Keyboard Ice Cream Theme 4 172 54 79 apk for android
How to install GO Keyboard Ice Cream Theme 4 172 54 79 apk for android

ID: com.jb.gokeyboard.theme.twgokeyboardicecreamtheme
Version: 4.172.54.79
Size: 4.4 Mb
GO Keyboard Ice Cream Theme Screenshots


How to setup GO Keyboard Ice Cream Theme apk for android
- For Android 4.0 or higher:Please to Settings, look down to Security, and select Unknown sources. Choosing this choice will enable to install apps download from the internet.
- For devices running on lower Android 4.0:
Please go to Settings - open the Applications option, and select Unknown sources, click OK on the popup alert.
GO Keyboard Ice Cream Theme Description
Who doesnt love ice cream, right? Well ,in case you feel the same way, this is the theme for your phone: GO KEYBOARD ICE CREAM THEME! DOWNLOAD GO Keyboard Ice Cream Theme now and enjoy the flavor!- To install, just follow the 3 steps: open after downloading, press "Set as Active Theme" and select the theme from the following page!
- The amazing HD screenshots we added will show you just how great this theme will look on your phone keyboard!
- This theme uses GO Keyboard, so if you do not have it installed, you will be redirected to a download page!
- The menus for this theme come with 48 different language translations!
Take the time to RATE and COMMENT after you install, your opinion will help us improve our work! And do not hesitate to contact us at themesonlyex@gmail.com with any suggestions or questions you have!
This theme uses a free font which can be found at http://www.1001fonts.com/pacifico-font.html and graphic elements from http://pixabay.com/en/cone-ice-cream-flake-cornet-295052/?oq=ice%20cream
To support further development of high quality themes, this app may show some ads that do not interfere with the apps functionality.
Whats new in GO Keyboard Ice Cream Theme 4.172.54.79
* Added quality HD wallpapers* Added option to boost charge your phone.
Download GO Keyboard Ice Cream Theme patch 4.172.54.79 APK
Search terms:
How to download GO Keyboard Ice Cream Theme lastet apk for laptop
How to use GO Keyboard Ice Cream Theme mod apk
How to mod GO Keyboard Ice Cream Theme 4.172.54.79 apk
How to get GO Keyboard Ice Cream Theme lastet apk
HTC Desire 526 MT6582 V4 4 4 Update Firmware Flash File
HTC Desire 526 MT6582 V4 4 4 Update Firmware Flash File
Download Firmware Link Area
Flashing/Installer Guideline
3rd Step: Download Mediatek Usb Driver.Mustbe Your smartphone Model Supported1st Step: Download Your Targeted Flash File/Stock Rom.Recheck Your Model & Version.2nd Step: Download Smartphone (SP) Flash Tools Or Supported Flash Tools.
4th Step: Unzip download flash firmware/Stock Rom.5th Step: Setup Usb Android Mediatek smartphone Driver.(Skip Already Install driver.)6th Step: Setup/open Mediatek smartphone Flash Tools.7th Step: Open Smartphone (SP) Flash Tool.8th Step: Load your Targeted model scatter/Document file.Then All File Auto Select .9th Step: Battery Charge minimum 50%.Its important issue for Flash.10th Step:Connect Usb Cable with Pc.11th Step: Press Flash/Download/Upgrade Button.12th Step: Reconnect Battery.13 Step: Press Volume � or Boot key & inset usb Cable.14th Step: Wait 3-8 Minute For Flash Done.
For Flashng Tutorial/Guideline Click Now
��.www.xdarom.com Always 1 Step Ahead��..
Monday, January 1, 2018
Htc One On T Mobile Now Get Android 4 3 Update
Htc One On T Mobile Now Get Android 4 3 Update
Htc One On T-Mobile Gets Android 4.3 Update:-

- Improved low-light camera performance
- new lock screen widgets
- A quick settings panel in the notification bar
How to Install G730VVRUAMI9 for Verizon Samsung Galaxy S3 Mini G730V 4 2 2 JB Firmware Update Guide
How to Install G730VVRUAMI9 for Verizon Samsung Galaxy S3 Mini G730V 4 2 2 JB Firmware Update Guide

Important Note:
Android 4.2.2 Jelly Bean G730VVRUAMI9 Official Firmware Download List
Pre-Requisites:
- Check battery percentage, your device should have at least 60% battery power
- Turn on USB Debugging mode, go to Settings-Developer Options-USB Debugging
- Backup important data and settings to external storage- follow this guide
- Install USB driver for your device on your computer- Download Samsung USB Driver
Points to be noted:
- If you are using any Custom ROM such as- CyanogenMod, Paranoid Android, AOKP, SLIM ROMs etc, then it�ll replaced by this official Stock ROM
- Custom Recovery (CWM or TWRP Recovery) will be replaced by Stock Recovery
- After flashing official firmware, your device will no longer belongs to rooted device. However you can root your device any time after flashing the firmware.
How to Install Android 4.2.2 Jelly Bean Official Firmware on Galaxy S3 Mini G730V through Odin:

- Download Android 4.2.2 VRUAMI9 Firmware for Galaxy S3 Mini G730V from the above list
- Download Odin 3.09
- Switch off your phone and boot Galaxy S3 Mini G730V into Download Mode by pressing and holding the Volume Down+Home+Power buttons (long press until the boot screen appear), now press Volume Up key to proceed to Download Mode.
- Extract the downloaded Odin3.07 zip file and run the Odin3 v3.07.exe file as an administrator (Right click on the .exe file and click on Run as administrator)
- Now connect your Galaxy S3 Mini G730V to your computer via USB cable
- In Odin3 screen, you should see a COM Port number like �0:[COM7]� at ID:COM section and �Added!� text at the message box. This means your device has been detected by Odin3.
- Make sure that, only the �Auto Reboot� and �F. Reset Time� options are checked.
- Now, extract the downloaded firmware zip file, you�ll find a firmware file with extension .tar.md5
- In Odin screen, click on PDA button and select the firmware file with .tar.md5 extension (The firmware file look something like: G730VXXDLJ5_G730VODDDLI7_INU.tar.md5)
- Now, click on the Start button to begin the installation process, wait few moments.
- Once completed, you would see �PASS!� message in ID:COM port having green background
- Your phone should automatically reboot after completion
- You can now disconnect your phone from computer
- Finish