Showing posts with label hot. Show all posts
Showing posts with label hot. Show all posts
Thursday, January 4, 2018
How To Root Infinix X557 Infinix Hot 4
How To Root Infinix X557 Infinix Hot 4
This is a tutorial on how to Root Infinix X557 (Infinix Hot 4).
What Is Rooting?
Rooting can be said to be Android jailbreaking. Its simply a means of unlocking the operating system of a device so you can install unapproved apps, delete unwanted bloatware, update the OS, replace the firmware, overclock (or underclock) the processor, writing or changing IMEI, installing fonts, customizing anything and so on.
Infinix X557 (Infinix Hot 4) another Infinix device runing Android 6.0 (Marshmallow).
This simply means that rooting this device could sound difficult but its simply easy to execute if you carefully follow the few steps given bellow.
How To Root Infinix X557
|
STEPS �
STEP 1: Download and install Miracle Box Drivers v1.0 to your PC.STEP 2: Download UPDATE-SuperSU-v2.76-20160630161323.zip.
STEP 3: Copy SuperSU.zip to both the device internal storage and SD card (external storage).
STEP 4: Insert the SD card to the Device.
STEP 5: Download TWRP_3.0.2_Infinix_Hot4_X557-H807A1-M-160815V57 [romshillzz].
STEP 6: Power of Device.
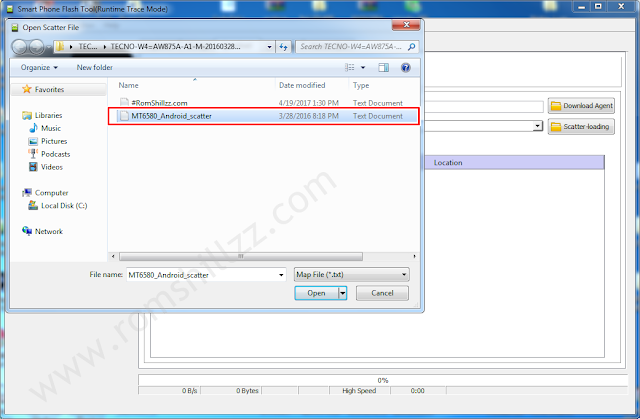
STEP 7: Flash the TWRP recovery.img to the device using SP Flash tool.
Flashing the TWRP recovery.img using SP Flash tool.


STEP 7: Boot the device into recovery mode by pressing and holding Volume up button + Power button.
STEP 8: In TWRP, if you will get a prompt asking you to swipe to allow modification then swipe.
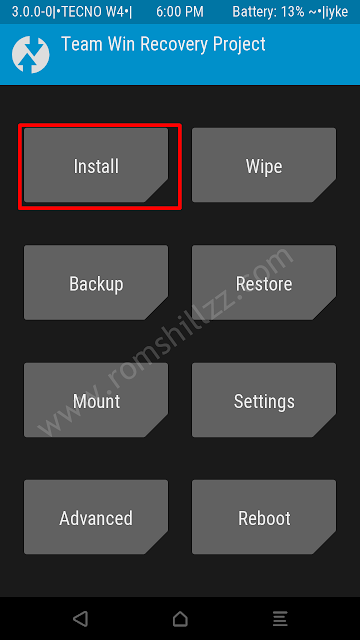
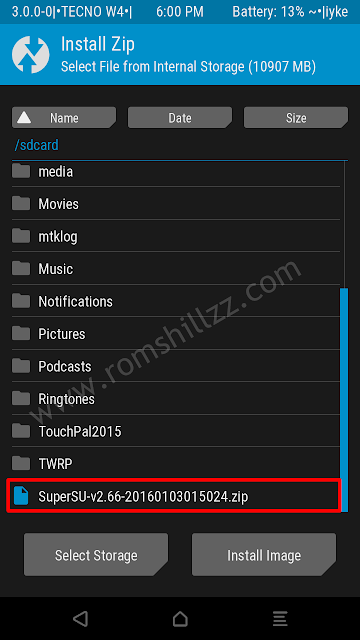
STEP 9: In TWRP recovery, tap Install.
STEP 10: Navigate to the location of the SuperSU.zip and select it.
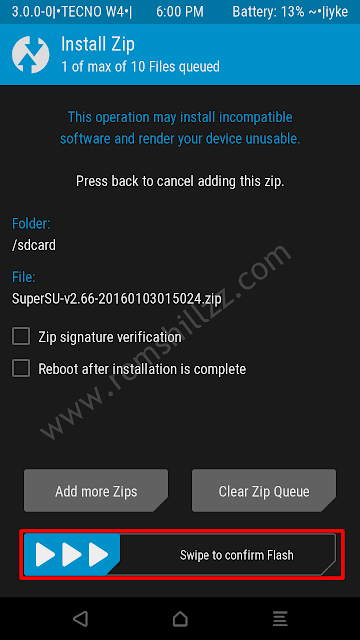
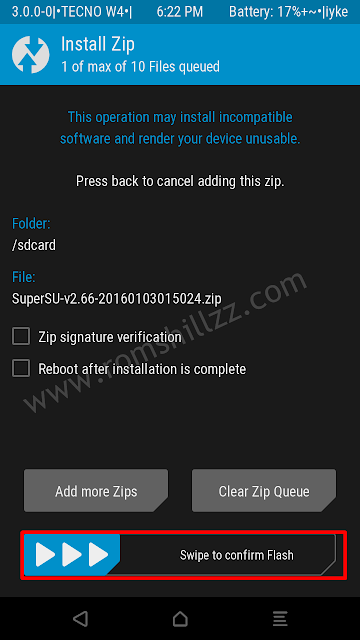
STEP 11: Swipe to confirm flash and patiently wait until the flashing process is complete.
STEP 12: After the flashing process is completed, Reeboot System.
STEP 8: In TWRP, if you will get a prompt asking you to swipe to allow modification then swipe.
STEP 9: In TWRP recovery, tap Install.
STEP 10: Navigate to the location of the SuperSU.zip and select it.
STEP 11: Swipe to confirm flash and patiently wait until the flashing process is complete.
STEP 12: After the flashing process is completed, Reeboot System.
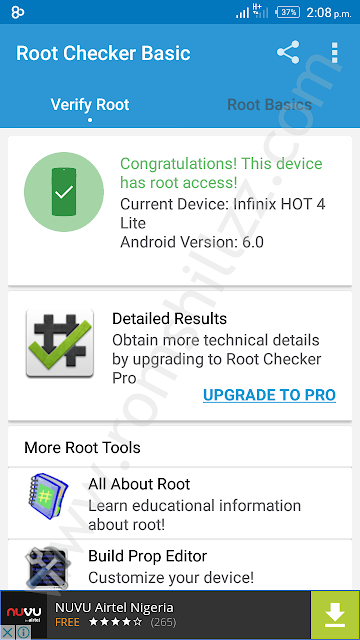
Now you have successfully rooted your Infinix X557 (Infinix Hot 4)!
Confirm Root: Download and install Root Checker from Google Play Store or from here
Follow the Screenshots or read the tutorials above
|
Please Leave a comment after using this Tutorials
Report if you cannot do this.
Monday, December 18, 2017
How To Root Infinix Hot 4 Pro X556
How To Root Infinix Hot 4 Pro X556
I believe many have been googling on how to root their Infinix Hot 4 pro and if you are one of them this article will help you to do that within minutes, �note that this Twrp for Infinix Hot 4 Pro is different from that of Hot 4..
Tuesday, December 12, 2017
Hyperiod OS Custom Rom For Infinix Hot Note X551 Pro
Hyperiod OS Custom Rom For Infinix Hot Note X551 Pro
This Hyperiod OS rom is meant for only Infinix Hot Note X551 Pro. Please do not try on any other device. Your phone should have a custom recovery installed in order to install this Rom on your phone. This Rom will wipe out all your data. Make sure you backup all your data in your phone before proceeding. Perform a Dalvik Cache wipe before proceeding from the Recovery Mode.

Whats Working?
- All cyanogen apps up to date
- Cyanogen Account, Theme Store, Theme Chooser with per-app theming
- included stable GAPPS (update it manually)
- OMX MTK VIDEO DECODER
- ES File Manager Pro
- Smart Wake
- Smart Cover
- Dolby Atoms [Optional]
- SuperSU
- Kernel Auditor
- Root Explorer
- JetAudio Plus
- AOSP Keyboard
- MLUSBMounter
- MX Player
- NEW Calendar & Email BY BOXER
- Activated ClearMotion, BRAVIA v4 and X-Reality Engine v4,
- spelled trouble-free codecs to view FullHD streaming video
- braries
- Floating Windows
- Ambient Display
- Statusbar Customizations
- Clock Alignment
- Battery Settings
- Charging animations
- Battery full customization (circle/landscape/Potrait and more)
- Battery colours
- Battery bar
- Statusbar greeting
- Network Traffic
- Breathing Notifications
- Quick Settings Management
- DPI Settings
- Live Display
- Smart cover
- smart wake
- Lockscreen weather
- Lockscreen colours
- Middle and bottom shortcuts
- Button Settings
- Navigationbar customization
- Slim PIE
- Header Machine
- cache auto cleaner
- Dynamic Ststus Bar
- freeze apps
- navigation bar with switches
- navigation bar Animations&Buttons
- navigation bar Tinted
- Gesture Anywhere
- Navigation ring Targets
- Animation Controls
- Slim Recents
- Omni Switch
- Recents RAM Bar
- HeadsUP Settings
- Trebuchet 6.0.1
- Remove Checking Signature Applications Completely
- Autostart Apps
- App circle sidebar
- Apps sidebar
- SuperUser Indicator Switch
- Toast Animations
- ListView Animations
- System Animations
- Expanded Desktop Mode
- Add many Tiles
- Enable 2/3/4 Tiles per Row
- Fixed Youtube 720p
- Fixed Green Lines In Facebook
- Fixed VPN
- Fixed Screen Record (software mode only)
- Fixed live videos
- Fixed Green Streamers in video and online TV
- Bootanimation Oreo
Bug: 2g/3g switch
HYPERIOD OS Flashing instructions:
- Download the HYPERIOD OS Rom for your Infinix to your computer or device.
- Connect and mount your device USB memory on your computer using the USB cable.
- Now copy/paste the downloaded zip file to your SD card. Make sure the files are in the SD card root (not in any folder).
- Then turn OFF your phone and disconnect from the USB cable.
- Now boot in the Recovery Mode. Switch ON the phone while pressing and holding Volume Up + Home + Power buttons together
- Once you are in Recovery Mode, select perform a full data wipe by selecting �wipe data/factory reset�. Use the Power button to select everything while in the Recovery Mode.
- Then, perform a cache wipe by selecting �wipe cache partition� .
- Now this is optional, but it is recommended to perform a wipe of your dalvik cache as well. You will not get into boot loops or any other errors. From recovery, go to �advanced� and then select �wipe dalvik cache�.
- Then go back to the main recovery screen and select �install zip from SD card�.
- Now select �choose zip from sdcard�. Using your volume keys, navigate to the zip file that you copied to your SD card and select it using the Power button. Confirm the installation on the next screen and the installation procedure should start now.
- After the installation completes, go to �+++++Go Back+++++� and reboot the phone by selecting �reboot system now� from the recovery menu.
- Your Infinix Hot Note X551 Pro will boot now and it might take about 5 minutes to boot on your first time. So, please wait. Your phone should now have Hyperiod OS Rom installed on It! Go to Settings & About phone to verify.
Credits :
- Ahmed Nasser HK
- Tirth Patel (build From source)
- Matthew CA
- Bormental
- Kommandoz
- Fire855
- Ferhung
Sunday, December 10, 2017
How To Root Infinix Hot 4 Lite Using PhilzTouch Recovery
How To Root Infinix Hot 4 Lite Using PhilzTouch Recovery
Infinix Hot 4 Lite, the third variant of the Infinix Hot 4 series. The smartphone offers just about the same specs as the Hot 4 with the significant differences being that the Lite variant drops the fingerprint sensor and offers half the ram with only 1GB RAM.
Recently we talked about how to root Infinix hot 4 2gb+16gb and also how to root Hot 4 LTE using TWRP recovery mode which was a success to all who were interested in rooting their Infinix hot 4.
Today we will be talking about how to root Infinix Hot 4 lite for all users of Hot 4 lite who has been searching on how to root and install custom recovery on their device to enjoy the benefit of rooting.
NOTE: We will be installing PhilzTouch Recovery for Infinix Hot 4 lite and then use it to root Infinix Hot 4lite afterwards. Lets begin...
REQUIREMENTS
- PC/Laptop Running Windows.
- Working USB Cable
- SP Flash Tool latest version. Download Here.
- ADB VCOM Drivers: See how to install Vcom drivers on windows 8, 8.1 and windows 10
- Infinix Hot 4 lite PhilzTouch Recovery img and scatter file. Download Here
- SuperUser v2.78.zip. Download Here
HOW TO INSTALL TWRP RECOVERY ON INFINIX HOT 4 pro
Step 1: First download philz touch recovery zip file for Infinix Hot 4 lite from given link, and then extract the �Recovery.img� and �MT6580_Android_Scatter.txt� file to another folder in your PC desktop screen

Step 2: Now, power off your Infinix Hot 4 lite, its time to install philz touch recovery for Infinix Hot 4lite

Step 4: From the extracted files, open "Flash_tool.exe"
Step 5: Once the flash tool is launched, then click on the download/upgrade tab and click on scatter loading button
Step 6: Now, locate the �MT6580_Android_Scatter.txt� file, which is on your desktop.

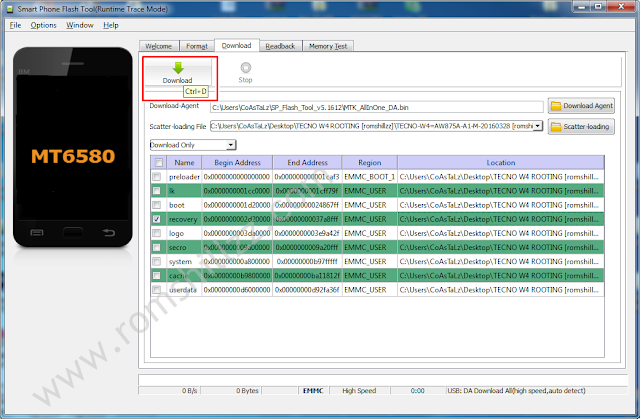
Step 7: After that, click download to begin flashing process.
Step 8: Immediately, connect your switched-off Infinix Hot 4 lite to your computer via USB cable
Step 9: The Flashing process would be in progress, and a Green button would appear once the process is completed.
Step 10. Do not turn on your phone or attempt to boot to recovery mode. Repeat the twrp recovery flashing process again so it will stick.
That�s it. PhilzTouch Recovery is now succesfully installed on your Infinix Hot 4 lite, hence rooting can now be done using philztouch recovery mode.
Now, pay attention to below method of booting to PhilzTouch recovery mode on Infinix Hot 4 lite incase the usual method dosnt work as usual.
HOW TO BOOT TO PhilzTouch RECOVERY MODE ON INFINIX HOT 4 LITE
? To boot to recovery mode, simply press and hold Volume up button + Power button until the phone comes on.
? When the phone comes on, quickly release power button, while still holding volume up button, quickly press power button again twice and hold to boot to twrp recovery mode.
Now lets move to the next phase on how to root Infinix Hot 4 pro
Infinix Hot 4 Official Stock Rom Firmware
CyanogenMod13 Stable Custom Rom For Infinix Hot 4
HOW TO ROOT Infinix Hot 4 Pro
Granted you have successfully installed PhilzTouch Recovery after going through the detailed instruction on how to install Recovery image via Sp flashtools to your Infinix Hot 4 lite, now do the following:
- Boot your Infinix Hot 4lite phone into recovery mode.
- In PhilzTouch recovery mode, Choose "Install zip".
- Then navigate to the location you placed SuperUser v2.78.zip file and proceed to install
- After installing SuperUser.zip, reboot your phone
Thats it, you have successfully rooted your Infinix Hot 4 lite. To verify if its properly rooted, goto Google playstore and download and install "Root Checker.apk" to verify.
Wednesday, December 6, 2017
HOW TO UNBRICK INFINIX HOT NOTE X551
HOW TO UNBRICK INFINIX HOT NOTE X551

Most people brick their infinix hot note while trying to update it. Follow the procedures below an unbrick your device.
Download Android ADB drivers here or here
Download SP Flash tool here
Download the Scatter file an CWM Recovery of INFINIX HOT NOTE X551 from here
Download SP Flash tool here
Download the Scatter file an CWM Recovery of INFINIX HOT NOTE X551 from here
Download INFINIX HOT NOTE X551 ROM from here.
Extract an install the Adb drivers on your PC.
Extract the infinix hot note X551 files.
Extract the infinix hot note X551 files.
Launch Flash_tool from the extracted files.

Click on Scatter Loading on SP Flash tool then select the scatter file of INFINIX HOT NOTE X551 you downloaded.


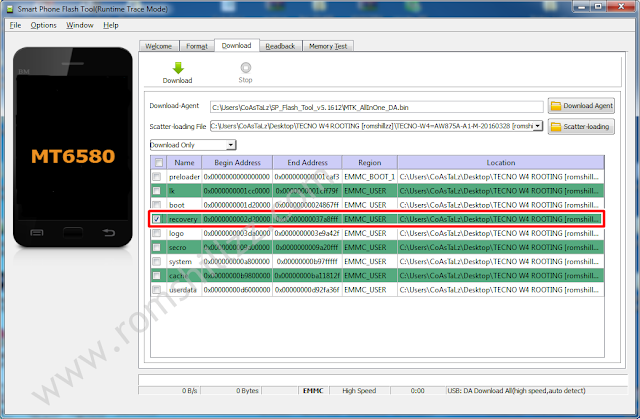
Tick only Recovery from the list then click on Location after EMMC_USER of Recovery Line as shown below. Select the CWM Recovery file you downloaded.
Tick only Recovery from the list then click on Location after EMMC_USER of Recovery Line as shown below. Select the CWM Recovery file you downloaded.


Now click Download on SP Flash Tool.

Turn off the device and connect it to the PC holding down vol + button. (This is just to make the PC detect the device easy and start the flashing process.)
The process will take about 30 seconds to complete. When you see the successful sign, unplug your device from the PC.
Copy the extracted files of the Rom to your sdcard > clockworkmod > backup. (Create these folders if they are not available.)
Insert the sdcard into the device and boot into recovery mode.
Select backup and restore option.
Select restore
Browse through the folders and select the backup file you copied in the memory card.
Wait for the Process to complete then select reboot system now.
First booting after this process might take a while. Be patient ............. ;)
Subscribe to:
Posts (Atom)