Showing posts with label root. Show all posts
Showing posts with label root. Show all posts
Thursday, January 4, 2018
How to Install TWRP 3 1 1 1 and Root Huawei Honor 8 Pro Success 100 Tested
How to Install TWRP 3 1 1 1 and Root Huawei Honor 8 Pro Success 100 Tested
How to Install TWRP 3.1.1-1 and Root Huawei Honor 8 Pro Success 100% Tested.
Root Huawei Honor 8 Pro. If you need any information about how to root Huawei Honor 8 Pro, now you are at the right place. This guide will show you how to root the Honor 8 Android phone. Also, this guide is fully tested on this video. You can directly watch it or continue reading this guide. We will present this guide very simple, and easy to understand. Even if you are a beginner on Android trick. Everyone has different reasons to root their Android device, so does the Honor 8 Pro owner.
By rooting your Huawei Honor 8 Pro, you will get some advantages, for example, you can increase your phone speed and battery life, Block Ads in Apps that contains Ads, even you can remove pre-installed crapware. as we have seen, that crapware cannot be uninstalled without root access. And much more advantages.
Now, lets this guide begin.
Prerequisite.
- As the main requirement to root your Huawei Honor 8, you need to unlock the bootloader. If you dont know how to do it, you can read the following guide - How to unlock the bootloader on any Huawei phone.
- Enable USB debugging on your phone.
- D0wnl0ad ADB and fastboot from Here
- Downl0ad PHH Superuser from Here
- Downl04d TWRP recovery root from this link.
- Once TWRP successfully downloaded, now put this TWRP into a platform-tools folder.
- Rename it to twrp.img
Install TWRP 3.1.1-1 Honor 8 Pro | Guide.
- Extract platform-tools-latest-windows.zip file.
- Go to extracted folder
- Then, Open platform-tools folder.
- Now, connect your Huawei Honor 8 Pro to the computer via USB cable.
- Then, from the ADB fastboot folder right click and hold the shift button, and click open command window here.

open command in adb fastboot - Once command prompt windows come up, now you need to check your Huawei Honor 8 Pro successfully connected or not using the following command and press enter.
- adb device.
- If your device is successfully connected to the computer, then the result will return like this.
- list of devices attached ...

- Once your Huawei Honor 8 Pro successfully connected to the computer. Now, reboot your device into bootloader using this command and press enter
- adb reboot bootloader
- Just wait a minute, your device will reboot into fastboot and rescue mode.
- Once your device in the fastboot and rescue mode, its time to flash TWRP recovery to your device. Therefore you need to type this command at prompt and then press enter button
- fastboot flash recovery twrp.img
- Just wait for 2 or 3 seconds for the complete flashing process.
Boot Honor 8 Pro into Recovery.
- Power off your Honor 8 Pro.
- Now, press and hold three buttons simultaneously located at the side phone body
- Volume UP + Volume Down + Power Button
- Release all button if you see a Honor logo comes up on your screen.
- Now, you will see that honor 8 Pro has been unlocked status on screen.

Honor 8 pro recovery mode - And now your device will boot into TWRP recovery.

- Tap Wipe - Format Data - type Yes - Ok
- Tap Back - Reboot - Recovery - Dont install
- Now your device will reboot into TWRP recovery.again. To root your Honor 8 Pro read the next step below.
Root Honor 8 Pro.
- You need to copy Superuser-r310-beta (download link available at prerequisite) to the internal storage of Huawei Honor 8 Pro
- Continued from step no. 8 above. or, make sure your device in TWRP recovery mode.
- From TWRP main menu, tap Install.
- Then, tap Superuser-r310-beta.zip from internal storage.
- Now, Swap to confirm flash.
- Once Zip file successfully flashed, you just need to click on reboot.system.
- Now, your Huawei Honor 8 Pro will reboot into the system.
How To Root Nearly Any Android Phone
How To Root Nearly Any Android Phone
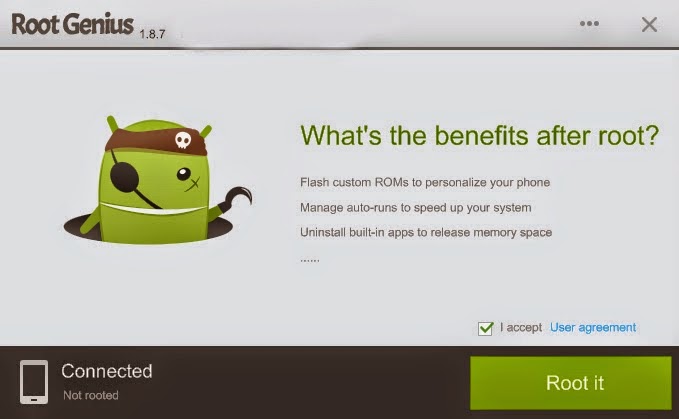
This is a rooting process for nearly any smartphone. The rooting process will be carried out with the help of an application for Windows called Root Genius.
Root Genius is a software which can be used to root 95% of the android phones. It uses special algorithms and features to try and root any android phone it is asked to root. So there is a very good chance for you to root your smartphone.
Disclaimer: The process and instructions given in this article are correct. However I am not responsible if you damage/brick your phone in anyway. Carry out the process at your own risk.
If this method doesnt work try out this one - How To Root Android
If this method doesnt work try out this one - How To Root Android
Follow the following instructions to root your phone:
- Download Root Genius.
- Enable USB debugging on your phone. To do so, open Settings>Developer options. Tick USB Debugging. If Developer options is unavailable then go to Settings>About Phone and tap on Built Number 5-8 times until you get the message You are now a developer.
- Connect your phone to the computer via USB cable. Make sure USB Debugging is enabled.
- Once successfully connected, Root Genius will automatically detect your phone.
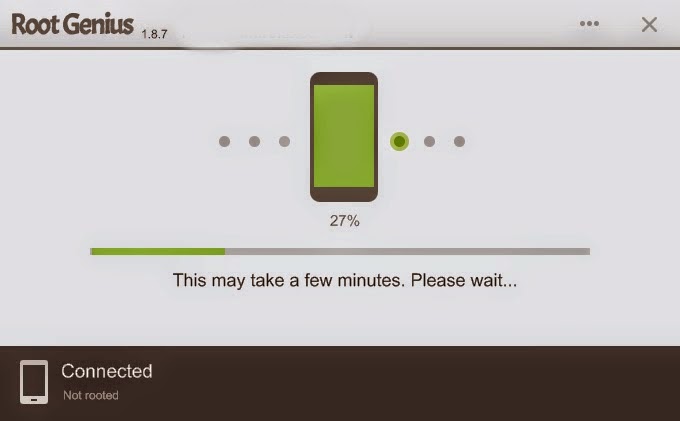
- Click on Root Now to begin the rooting of your phone.
- Root Genius will automatically root your phone and install the KingUser application(an application which is used to grant super user access to apps).
- Your phone is successfully rooted(hopefully).
How To Root Infinix X557 Infinix Hot 4
How To Root Infinix X557 Infinix Hot 4
This is a tutorial on how to Root Infinix X557 (Infinix Hot 4).
What Is Rooting?
Rooting can be said to be Android jailbreaking. Its simply a means of unlocking the operating system of a device so you can install unapproved apps, delete unwanted bloatware, update the OS, replace the firmware, overclock (or underclock) the processor, writing or changing IMEI, installing fonts, customizing anything and so on.
Infinix X557 (Infinix Hot 4) another Infinix device runing Android 6.0 (Marshmallow).
This simply means that rooting this device could sound difficult but its simply easy to execute if you carefully follow the few steps given bellow.
How To Root Infinix X557
|
STEPS �
STEP 1: Download and install Miracle Box Drivers v1.0 to your PC.STEP 2: Download UPDATE-SuperSU-v2.76-20160630161323.zip.
STEP 3: Copy SuperSU.zip to both the device internal storage and SD card (external storage).
STEP 4: Insert the SD card to the Device.
STEP 5: Download TWRP_3.0.2_Infinix_Hot4_X557-H807A1-M-160815V57 [romshillzz].
STEP 6: Power of Device.
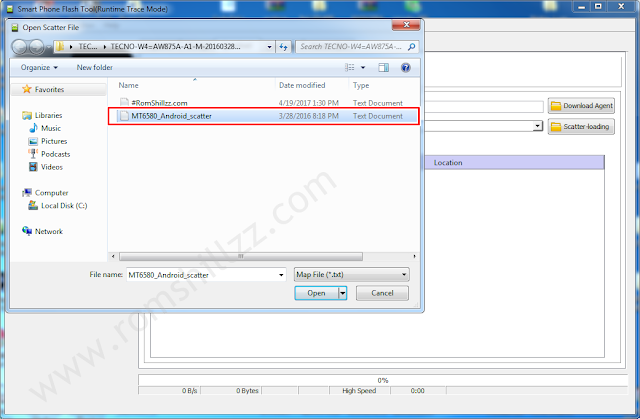
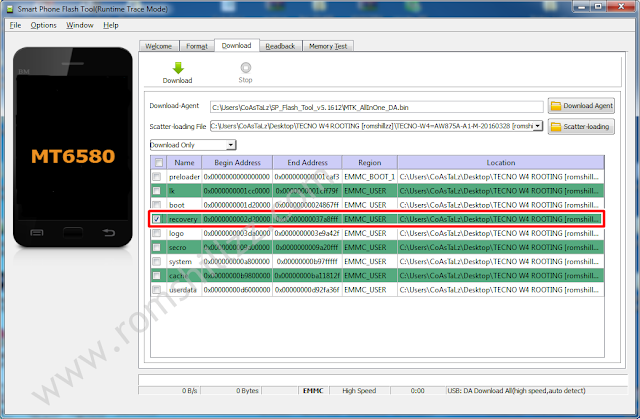
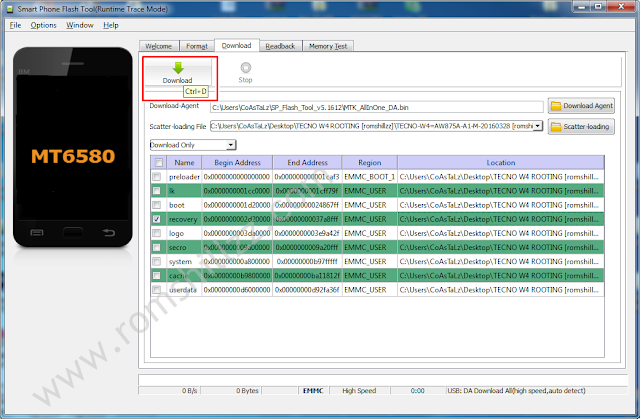
STEP 7: Flash the TWRP recovery.img to the device using SP Flash tool.
Flashing the TWRP recovery.img using SP Flash tool.


STEP 7: Boot the device into recovery mode by pressing and holding Volume up button + Power button.
STEP 8: In TWRP, if you will get a prompt asking you to swipe to allow modification then swipe.
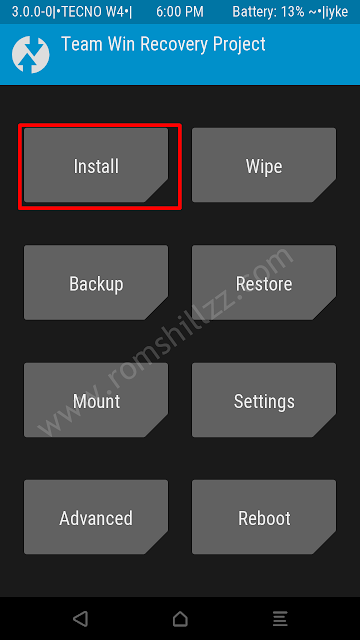
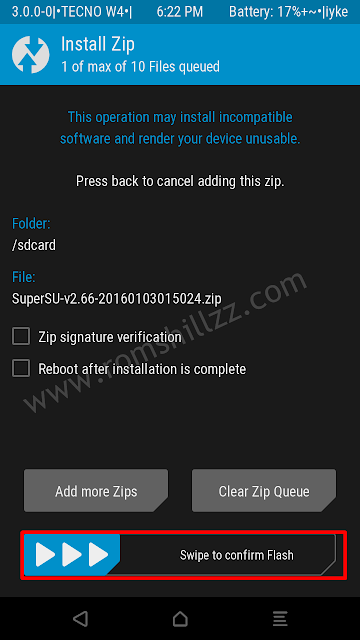
STEP 9: In TWRP recovery, tap Install.
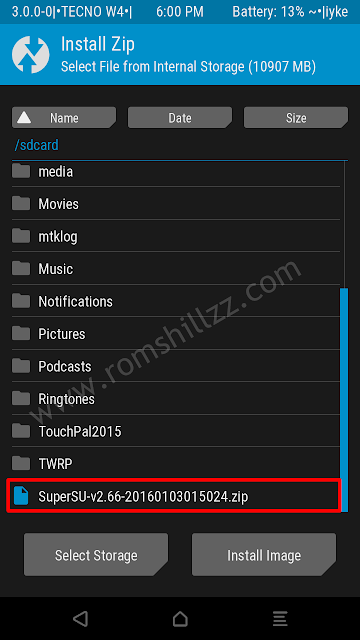
STEP 10: Navigate to the location of the SuperSU.zip and select it.
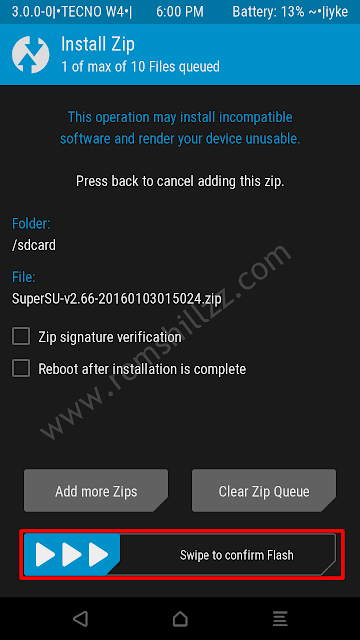
STEP 11: Swipe to confirm flash and patiently wait until the flashing process is complete.
STEP 12: After the flashing process is completed, Reeboot System.
STEP 8: In TWRP, if you will get a prompt asking you to swipe to allow modification then swipe.
STEP 9: In TWRP recovery, tap Install.
STEP 10: Navigate to the location of the SuperSU.zip and select it.
STEP 11: Swipe to confirm flash and patiently wait until the flashing process is complete.
STEP 12: After the flashing process is completed, Reeboot System.
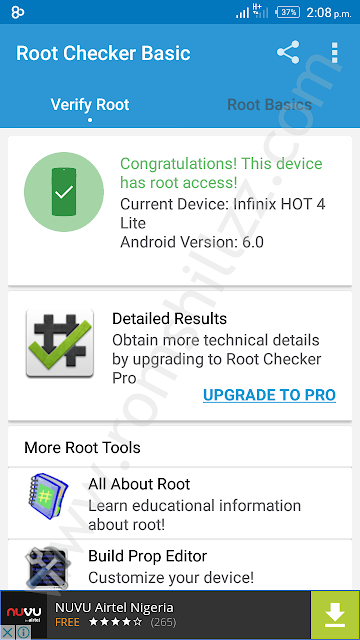
Now you have successfully rooted your Infinix X557 (Infinix Hot 4)!
Confirm Root: Download and install Root Checker from Google Play Store or from here
Follow the Screenshots or read the tutorials above
|
Please Leave a comment after using this Tutorials
Report if you cannot do this.
How to Root and Flash Custom Recovery on Samsung Galaxy SL GT I9003
How to Root and Flash Custom Recovery on Samsung Galaxy SL GT I9003

Maybe you�re looking to run some root-only apps on your device? Maybe you want the freedom that your friend�s having with his rooted Android device? No problem, we�ll help you root your device. The Samsung Galaxy SL can be rooted using the popular SuperOneClick app and this guide walks you through all the steps to root the device. So, follow it and get your device rooted.
I. Before You Begin:
1. Be aware that rooting your device will void its warranty. However, unrooting should help you reinstate the warranty provided an unrooting procedure�s available there.
2. This works on Windows based PCs only.
II. Downloading Required Files:
1. SuperOneClick (Download the latest version of the app)
III. Rooting the Samsung Galaxy SL (GT-I9003):
1. Download and place the app archive onto your Desktop.
2. Extract files from the archive over to your Desktop.
3. Turn ON the USB debugging option on your device by heading to Menu>>Settings>>Applications>>Development>>USB debugging.
4. Once enabled, connect your device to your PC via USB cable.
5. Run the SuperOneClick app by double-clicking on its executable file.
6. Click Root button in the app and it�ll start rooting your device.
7. Once it�s done, reboot your device.
8. You�re done!
Awesome! Your device has been rooted and you should be able to find the Superuser app in your App Drawer. Your phone is now ready to be loaded with root-only apps!
IV. Flash a Custom Recovery Image (Optional):
1. If you would like to flash a custom recovery image in order to flash custom ROMs, head to the How To Flash a Custom Recovery Image on the Samsung Galaxy SL (GT-I9003) to learn how to do that.
If this procedure helped you please thank/donate to the original developers here and here.
If you need help with this procedure, please ask in the comments below.
How to Root Huawei Nexus 6P on Android N Developer Preview 3
How to Root Huawei Nexus 6P on Android N Developer Preview 3
Android N Developer Preview Beta is now available for the Nexus 5X, Nexus 6P, Nexus 6, and Nexus 9 phones and tablets. The latest Android N Developer Preview Beta NPD35K is the next upcoming major firmware release by Google. It brings some new features like multi-window mode, an enhanced doze mode, a revamped Settings screen and a quick toggle in the notifications panel. Other changes include improved notifications, improved multitasking and app switching, dark mode etc...

Meanwhile, you can Root your Nexus 6P on latest Android N Developer Preview 3 NPD35K.
Today share step by step guide to safely Root your Nexus 6P on latest Android N Developer Preview 3 NPD35K Factory Image.
Step 12: Once completed, choose RECOVERY from the Fastboot menu and enter Recovery Mode.
Step 13: In ClockworkMod recovery, scroll down to �flash zip from SD card� and press the power button to select it.
Step 14 : Press the Power button again and select �choose zip from sdcard�.
Step 15 : Now using your volume keys, navigate to BETA-SuperSU-v2.71-20160331103524.zip and select it using the Power button. Confirm the installation on the next screen and the installation procedure should start now.
Step 16 : After the installation completes, go to �+++++Go Back� and reboot the phone by selecting �reboot system now� from the Recovery menu. The phone will boot now and it might take about 5 minutes to boot on your first time. So, please wait.
Meanwhile, you can Root your Nexus 6P on latest Android N Developer Preview 3 NPD35K.
Today share step by step guide to safely Root your Nexus 6P on latest Android N Developer Preview 3 NPD35K Factory Image.
Prerequisites:
- This root method is only for Android N (NPD35K) installed on Nexus 6P and I am not sure if it will work on the other variants of the Nexus 6P on other carriers.
- Your Nexus 6P bootloader should be unlocked. Nexus 6P should be on Android N NPD35K software version.
- Make a Nandroid backup of your previous phone set up before proceeding
Disclaimer: We provide various Firmware Updates and Rooting process along with Custom ROM,Modes,file are all belong to their owners/developers. The author of this site or the developers are not responsible, if you damage or brick your device.Do it on your own risk and follow the instruction properly.
How to Root Huawei Nexus 6P on Android N Developer Preview 3 NPD35K :
Step 1: Download Android SDK from the Android Developers website and install. Also set it up with downloading platform-tools and USB drivers� package in SDK.
Step 2 : Enable USB Debugging mode in your Nexus 6P.
Step 3: Download Fastboot from the following links depending on your OS and extract it in android-sdk-windowsplatform-tools directory. Create directory if not already there.
Step 2 : Enable USB Debugging mode in your Nexus 6P.
Step 3: Download Fastboot from the following links depending on your OS and extract it in android-sdk-windowsplatform-tools directory. Create directory if not already there.
- Windows: Download here
- Mac: Download here
- Linux: Download here!
[Note: Skip Steps 1, 2, 3 if you already have them.]
Step 4: Download SuperSU v2.71 for Nexus 6P on your PC, if you haven�t already.
Step 5: Connect and mount your Nexus 6P USB memory on your computer using the USB cable.
Step 6: Now copy/paste the BETA-SuperSU-v2.71-20160331103524.zip file to your SD card. Make sure the file is in the SD card / internal storage root (not in any folder).
Step 7: Then turn OFF your phone.
Step 8: twrp-2.8.7.0-angler.img and save it to your android-sdk-windowsplatform-tools directory on your computer.
Step 9: Now go into Fastboot/Bootloader Mode on Nexus 6P.
How? Press Volume Down + Power keys for a few seconds till you see some text on the screen. This is Bootloader Mode.
Step 10: Navigate to android-sdk-windowsplatform-tools directory and open Command Prompt (Shift + Right-click > Open Command Prompt).
Step 11: Type in the following command and press Enter.
Step 10: Navigate to android-sdk-windowsplatform-tools directory and open Command Prompt (Shift + Right-click > Open Command Prompt).
Step 11: Type in the following command and press Enter.
fastboot flash recovery twrp-2.8.7.0-angler.img
Step 12: Once completed, choose RECOVERY from the Fastboot menu and enter Recovery Mode.
Step 13: In ClockworkMod recovery, scroll down to �flash zip from SD card� and press the power button to select it.
Step 14 : Press the Power button again and select �choose zip from sdcard�.
Step 15 : Now using your volume keys, navigate to BETA-SuperSU-v2.71-20160331103524.zip and select it using the Power button. Confirm the installation on the next screen and the installation procedure should start now.
Step 16 : After the installation completes, go to �+++++Go Back� and reboot the phone by selecting �reboot system now� from the Recovery menu. The phone will boot now and it might take about 5 minutes to boot on your first time. So, please wait.
That�s it! Your Nexus 6P is now rooted on Android N Developer Preview 3 firmware on your phone! Check for the SuperSU app in your apps list to verify.
Wednesday, January 3, 2018
How To Root Verizon LG V10 VS990
How To Root Verizon LG V10 VS990

LG V10 is a phablet that comes with a dual screen setup which was released by LG last year in the month of October. V10 comes with a primary display measuring 5.7? and with a quadHD resolution and a secondary display measuring 2.1? in size and has a resolution of 160 x 1040. On the inside, the V10 is powered by a 1.82GHz hexacore Qualcomm Snapdragon 808 processor and 4GB of RAM. It has 64GB internal storage which can be expanded up to a further 128GB more using the microSD slot. The rear shooter has a 16MP sensor with optical image stabilization, laser autofocus, and 4K video recording while the front has a 5MP duo camera setup. The V10 runs on a 3000mAh battery.
On the software front, Lg V10 runs Android Lollipop 5.1.1 which has been customized by LG to include several useful and a few gimmicky features. The LG�s customized user interface is not appreciated by many users and it may not appeal to you as well. Moreover, there is a ton of bloatware added by both LG and your carrier(Verizon in this case).
To get rid of this annoying bloatware you can root your device and remove some unnecessary applications that are otherwise not removable. Rooting also gives you better control over your Android device. You may read the article linked below to get to know more about benefits of rooting and the risks involved with it.
Thanks to XDA developer tungkick, now Verizon users can also enjoy root on their Lg V10. Just follow the guide given below to get root access on your device.
Read � Rooting Android: Why you Should and Why not
Warning: Rooting your Android device will void your manufacturer warranty, so proceed at your own risk. Also taking backup of your data before proceeding with the guide is recommended.
Things You Will Need
- Lg V10 (VS990) and a PC
- VS990 Root.zip| Link
Steps To Follow
Step 1. Download the VS990 Root.zip file from the link given above and extract the file using any unzipping tool you have on your PC.Step 2. You will find LG drivers on extracting the zip file in above step. Install on them on your PC, just like any other software.
Step 3. Now extract the .rar file again using any file unzipping tool you have on your PC. On extracting the .rar file you will get the .tot file needed for rooting your LG V10.
Step 4. Now we will install LGUP, a software used to install firmware on your Lg V10. To do so, extract the lgupnew.zip.This will give you two files LGUP_Store_Frame_Ver_1_14_3.msi and LGUP_8994_DLL_Ver_0_0_1_18.msi.
Step 5. Run LGUP_Store_Frame_Ver_1_14_3.msi file first and then run LGUP_8994_DLL_Ver_0_0_1_18.msi. This will install the LGUP software on your PC.
Step 6. Now you will have to copy the �common� folder that should be present in the zip file you extracted in Step 1 and move it to this location �C:Program Files (x86)LG ElectronicsLGUPmodel�.
Step 7. Now move to your phone and enable USB Debugging. To do so first enable Developer Options by going into Settings> About Phone and then tapping Build Number multiple times. Once your phone shows a toast message that �You are now a Developer!� you have successfully enabled Developer Options.
Step 8. Now open the Developer Options and enable the option that says USB Debugging. Now plug in your phone to your PC using a USB cable.
Step 9. Run the LGUP software using Start menu of your Windows.
Step 10. Select your phone. Then select UPGRADE option otherwise, your data would be wiped. For the �BIN File� select the �rootedsystemvs.tot� file you extracted in step 3. Finally, click Start.
Step 11. Reboot your device and update the SuperSU application and then reboot your device again.
Congrats! you have successfully achieved root access on your Verizon Lg V10. You may confirm the root access using the root checker application linked below.

 Root Checker
 joeykrim Tools Free
Download How To Root Yu Yuphoria Unlock Bootloader And Install CWM Recovery
How To Root Yu Yuphoria Unlock Bootloader And Install CWM Recovery

Yu has already rocked the Indian markets with its Yureka, and now it has introduced the Yuphoria, trying to cover each and every area of the smartphone segment. If you are looking for a guide to root your Yuphoria, then this is a one stop shop to do so.
Note: We are not responsible for any damage caused to your device. Proceed on your own risk, And follow tutorial carefully. However, we will try our best to get your device recovered from any disastrous situations.
You need:
1. Yu Yuphoria- Obviously.
2. Battery Charged up to 50%- To prevent accidental shut down of the device.
3. A computer to install recovery temporarily in the phone.
4. Root kit (Custom Recovery and SuperSU) to root the device. (Download)
To root your phone follow these steps:
To root your phone follow these steps:
Prerequisites:
Before we go into the process, let do make some necessary settings on your Yuphoria.
- Go to Settings.
- Scroll down and go to About Phone.
- Scroll down and tap build number 7-10 times until you see a popup stating �You are now a developer�.
- Press back and now a new section called �Developer Options� will appear in settings. Tap on it and turn on the toggle at the top.
- Now scroll down and turn on USB Debugging.
- Now make a backup of all your data as the next step will wipe all the data present in the Internal Memory.
- Make sure you have 70-80% battery to prevent unexpected failures.
How To Unlock Yu Yuphoria�s Bootloader:
- Extract the adb_fastboot file in a new folder in your C:/ drive.
- Power Off your phone.
- While continuously pressing the Volume Up key, connect your phone to the PC/Laptop via USB cable.
- You will get a black screen stating �Fastboot Mode� at the middle.
- As soon as you plug your phone into the PC, windows will start installing drivers all by itself. Please wait for the installation to complete.
- After the drivers have been installed successfully, go to the folder where you have extracted adb_fastboot file.
- While pressing the Shift key on your keyboard, right click in the folder and select �Open Command Prompt Here�. The command prompt will open up.
- Now type the following command to check if your device has been detected in the fastboot mode.
fastboot -i 0x2A96 devices - You�ll get an error if the drivers aren�t installed successfully. However, if you don�t get any error, you may proceed to the next step.
- Now, run the following command to unlock the bootloader.
fastboot -i 0x2A96 oem unlock - Now, run the following command to reboot your device to system.
fastboot -i 0x2A96 reboot
Now, that you have successfully completed the first step, let�s jump onto the next step.
How To Hotboot CWM Recovery:
- Hotbooting is way of temporarily introducing a custom recovery in your recovery partition. As soon as you reboot your device, the custom recovery will be replaced by the stock cyanogen recovery.
- Now, since we have to flash supersu zip from a hotbooted recovery, you first need to copy the supersu zip from the rooting kit to the sd card of your phone.
- Now, copy the yuphoria-cwm-recovery file from the rooting kit to the folder where you extracted adb_fastboot.
- Using the same old method, go to fastboot mode and open command prompt. Now, type the following command.
fastboot -i 0x2A96 boot yuphoria-cwm-recovery.img - The above command will boot your yuphoria into cwm recovery.
How To Root Yu Yuphoria By Flashing SuperSU:
Now that you are in cwm recovery, to flash SuperSu zip on your device, you need to follow these steps-
- Select �Install zip from sd card� and navigate to the place where you copied the SuperSU file.
- Now, select �Yes�. It will flash the SuperSU zip on your phone.
- You should now have root access on your phone. After rooting, it is recommended to install Busybox.
- Download Busybox installer app from playstore and follow the instructions to install it.
Congratulations, you�ve rooted your Yu Yuphoria! Enjoy!
SUCCESS :-) N
How to Root Android Oreo 8 0 OPR6
How to Root Android Oreo 8 0 OPR6
Android Oreo was officially launched a few hours back and the factory image for the latest update is already available for the Google Pixel and Nexus devices. You can download and install them by following this guide
Using the latest SuperSu and the Magisk Module flashable filles, you can root your Nexus or Pixel device running the latest official stable version of Android 8.0 Oreo. However, you need to have an unlocked bootloader and a custom recovery installed on your device, in order to root it. You can follow the above guide to unlock the bootloader and install a Custom TWRP recovery on your Google Pixel, Google Pixel XL, Nexus 5X and Nexus 6P devices.

How to root Android Oreo 8.0 [OPR6] (SuperSU Method)
- First, download the latest SuperSU file from the above link.
- Now transfer the downloaded file to the internal storage of your device.
- Now folllow the guide to flash SuperSu via TWRP recovery and root your device >
- Download and transfer the SuperSU to your device internal memory. (download section)
- Now Boot your device into TWRP recovery.Guide How To to Boot Into Recovery Mode On Android (Various Ways)
- Then Just Select Install and flash the SuperSUfile that you transferred in the Previous step
- Once flashing is done. Reboot your device.
- Done!!! Your Android device is now rooted
- For confirmation, install Root Checker from Google Play Store and confirm the root privileges in your smartphone.
Download Magisk
How to root Android Oreo 8.0 [OPR6] (Magisk Module Method)
- First, download the latest Magisk Module Zip file and the Magisk installer APK file from the above links.
- Now transfer the downloaded files to the internal storage of your device.
- Now you have to boot into the TWRP recovery mode. To do that, switch off your phone and then hold the power and volume down buttons together for a few seconds until you boot into the TWRP mode.
- Once you are in TWRP, select install from the main screen.
- Now, browse for the downloaded Magisk file and then select it.
- Swipe to install the file.
- Once the installation is completed, wipe the Dalvik and Cache and then reboot your phone.
- Your device running Android 8.0 will now be rooted. Now, install the Magisk APK file you previously downloaded and open it to check for root.
Download SuperSu Zip File
Download Magisk Module Zip File
Download Magisk Manager APK
How To Root Lg Optimus L9 P769 Easy Way
How To Root Lg Optimus L9 P769 Easy Way
How to root Lg Optimus L9 P769 or Rooting LG Optimus L9 P769 is what you might be searching. Rooting LG Optimus L9 P769 is a guide i gonna show you today. This is easiest way of rooting LG Optimus L9 P769. LG Optimus L9 P769 is a high end android device with many features which are premium. LG Optimus L9 P769 has 4.5 inches of screen with IPS LCD, capacitive touchscreen, 16M colors means awesome pictures and gaming. The screen glass is also quite nice, Corning Gorilla Glass 2. The sound is also very nice and powered with Dolby mobile sound enhancement means you can say it HD (high defination). The RAM is very impressive! yes! not like all android that 512 MB RAM it is having 1 GB RAM! which is very cool and awesome leading to very cool multitasking, gaming etc. The camera is like other android devices! yep! it is 5 MP boosted with 2592 x 1944 pixels, autofocus, LED flash. The Video output is nice, 30 fps and HD (1080p) view. The processor is Dual-core 1 GHz which does not suites with these features, the processor should be Quad-Core like of Micromax A116 Canvas HD. There is a vast number of common sensors available like Accelerometer, proximity, compass. The android version is Ice Cream Sandwitch (Android: 4.0.4) but further updates are available by developers. Lg Optimus L9 P769 is a great phone, oh! lets see how to root Lg Optimus L9 P769-

Responsibility
Geekyzz is ~not~ responsible for your bricked Lg Optimus L9 P769 . Rooting voids your warranty, be careful while rooting your android device, if you did anything wrong and bricked Lg Optimus L9 P769 its your responsibility but i will help you to unbrick your Lg Optimus L9 P769 , but please be careful while rooting.
Fixing Google Play Store application cant download error
Sorry Guys!! this guide is not working. This guide is working- Click ME. It was due to some misunderstanding. Sorry.
What you need to root Lg Optimus L9 P769
1 Bin4ry Rooting Toolkit, Bin4ry Rooting Toolkit XDA thread(on first post)
2 Lava Lg Optimus L9 P769 (No download link for Lg Optimus L9 P769 :P)
3 Download .Android (its on .rar).
Extract android.rar in C:>Users>YourUserName and Reboot your computer.
Rooting Lg Optimus L9 P769 -
How to Root Lg Optimus L9 P769 -
1 Enable USB debugging on Lg Optimus L9 P769 by going,link download
Read more »
Responsibility
Geekyzz is ~not~ responsible for your bricked Lg Optimus L9 P769 . Rooting voids your warranty, be careful while rooting your android device, if you did anything wrong and bricked Lg Optimus L9 P769 its your responsibility but i will help you to unbrick your Lg Optimus L9 P769 , but please be careful while rooting.
Must Read:
What is Rooting | Why to Root | Features of Rooting
Removing Lag from HD games androidFixing Google Play Store application cant download error
Sorry Guys!! this guide is not working. This guide is working- Click ME. It was due to some misunderstanding. Sorry.
What you need to root Lg Optimus L9 P769
1 Bin4ry Rooting Toolkit, Bin4ry Rooting Toolkit XDA thread(on first post)
2 Lava Lg Optimus L9 P769 (No download link for Lg Optimus L9 P769 :P)
3 Download .Android (its on .rar).
Extract android.rar in C:>Users>YourUserName and Reboot your computer.
Rooting Lg Optimus L9 P769 -
How to Root Lg Optimus L9 P769 -
1 Enable USB debugging on Lg Optimus L9 P769 by going,link download
Subscribe to:
Posts (Atom)