Showing posts with label with. Show all posts

Wednesday, January 3, 2018

iCloud Activation Lock Bypass for iOS 7 with Untether Method

iCloud Activation Lock Bypass for iOS 7 with Untether Method


Forgot icloud password remove bypass ios 11.03. Don�t remember your icloud password and you iPhone keeps asking you to for icloud or apple id password? here we have one solution for your iphone. Works on every iphone using ios11. including ipad, iPad pro and iPod on latest generation. This method is called bypass using a backup. How this icloud removal works ? its one easy trick you can make just using itunes , your iphone or ipad and on old backup from any device. The backup you need to inject into your target device must be customized.

Forgot icloud password remove bypass ios 11.03

Forgot icloud password remove bypass ios 11.03Forgot icloud password remove bypass
Thins you must know before you start:
This process doesn�t work directly with iTunes , you must have your iPhone activated, working normally, use this if the only thing you need is removing the icloud account from your iphone . will still be activated. Find my iPhone will be turned off as well.
NOTE: your original icloud activation email will still be linked to your icloud.com servers. You must be careful do not restore your iDevice because it can be locked to the original account icloud or apple id. Use this method at your own risk. this tutorial is for education proposals.
DOWNLOAD ITUNES BACKUP

Forgot icloud password how to remove bypass ios 11.03, video tutorial, iOS11, turn off find my iPhone without password, apple id remove from iPhone


visit link download
Read more »

How To Send Anonymous Messages with Sarahah App

How To Send Anonymous Messages with Sarahah App


Sarahah, an app which lets people send constructive feedbacks or messages anonymously has been currently trending on both Google Play Store as well as Apple app Store. Sarahah is an app which was developed by a Saudi programmer Zain al-Abidin Tawfiq. This app has been named Sarahah based on an Arabic word which translates to �frankness� or �candour�. The name of the app resembles the working of the app as well which is to give frank answers towards another person as the person�s identity will not be revealed. This app was launched some time ago but the app started to gather people�s attention in the month of June this year. Currently, it is one of the most downloaded apps on the Google Play Store with over 10 million app downloads already.
The developers of the Sarahah app have described the app as a platform that �helps you in discovering your strengths and areas of improvement by receiving honest feedback from your employees and your friends in a private manner�. This is done as the app does not store the username or passwords of the sender. Instead, anyone can visit the link and comment to give anonymous feedback.
Talking about Sarahah, it is a very simple app to setup and use for sending out anonymous messages. Some of the features of the Sarahah app include saving the anonymous messages, searching for various people that already use Sarahah through the app�s search feature and also choosing the audience from which you get the messages only.
 First of all, when a user wants to create a way for people to send anonymous messages then the app lets you log in or register a new account. If the user has not registered on Sarahah yet, the app will let you register and a new account will be created. In order to fill out the registration form, the app will ask a user for the username which is usually the name of the person followed by .sarahah.com. Do note that this username can be accessed via a browser as well as the app has a website also. The usernames are generally set as example.sarahah.com. Other details for registration include Name, Email, and Password.

 After registration, you can receive anonymous messages by giving a link to the Sarahah username on various social media platforms like Facebook and Twitter. The other screens on the Sarahah app are pretty barebones as the main purpose of the app is to give anonymous messages only.

 In the settings of Sarahah app, you can set notification sound to turn on or off and also see the notification preview. The app also lets you select if you want to feature in search results so that anyone can post on your username. Other than that, the app has the option to select language and connect with the official Sarahah accounts on Twitter and Facebook.

 Sarahah also lets you search for the other users of Sarahah of they have turned on the option to allow other users search for your username.


Sarahah app has an explore tab as well which is currently just a place holder and the screen reads soon. We have not known what this explore tab will feature but the description says that this explore feature will be available in the next update.

This app is very good for sending and receiving constructive messages about a person as the identity is kept anonymous. This app is currently available on the Google Play Store for free.
Sarahah
Sarahah Social Free


visit link download
Read more »

How To Record Games On Pc With Audio

How To Record Games On Pc With Audio


Krut is a screencast tool that is written in Java and well suited for making video tutorials (instructional videos) on most platforms. Krut records movie files, including sound, of selected parts of your screen. The files use the quicktime mov format. The program has an intuitive and compact user interface.

In addition to a movie file, the program also records separate files for audio (wav) and video (mov), which easily allows encoding to any movie format using an external encoding program.


download free

Features

  • Timer-controlled recording
  • Moveable recording areas during recording
  • Preview of ongoing recording
  • Optional mouse pointer recording
  • Record/Playback at 2 different frame rates
  • Highly accurate audio-video synchronization


visit link download
Read more »

Tuesday, January 2, 2018

Htc 626G Stuck On Logo Solved With Flash By Falcon Box™

Htc 626G Stuck On Logo Solved With Flash By Falcon Box™


Add caption


Htc 626G Stuck On Logo Solved With Flash By
Falcon Box�
Htc 626G Stuck On Logo Solved With Flash By
Falcon Box�


visit link download
Read more »

Increase Internal space of any Android device with low internal space

Increase Internal space of any Android device with low internal space


Few Days back, I posted a similar post regarding the internal space. which worked well however that method was too much laggy and made the mobile phone very slow Link to the older method. I have found this new method which will also increase the internal space but there will be no lag. 


Old method had lots of bugs and most of the apps gave Force close errors like play store app. and sometimes due to which the mobile restarted automatically and app stopped responding.

Now the new method has solved the issue.

You will need to enable the init.d support on your device and then a mod will be applied.

Features in the new Mod:
The Mod is called INT2EXTV2+. It is also a cron mod similar to the older one but bug has been fixed. It has following features:

-Mounts /sd-ext to /data
-Leaves /data/data on internal for speed
-Works with EXT 2/3/4 filesystems
-ZipAligns /data/app on every boot
-No symlinks
-Supports SWAP2INT
-Completely universal


Lets Begin with the installation:

Step 1: Preparing the Device.


  1. Make a Nandroid backup using CWM.
  2. after backup Mounts & storage > format /system,
  3. Wipe/Data 
  4. Wipe cache
  5. wipe dalvik
  6. wipe battery stats.
  7. Advanced > partition SD card
  8. ext partition as 1024MB (Not more than 1024 else your device will be slow),
  9. swap partition as 512MB
  10. Complete the partitioning.
  11. Now install a new ROM that you want to use (I used Samsung Y rom for micromax A44 and Myphone A618 Link of the ROM)
  12. After installation Reboot the Device.
  13. Now Install Titanium Backup (Download here)
  14. and remove link2SD (It creates some problem.)
  15. Device is ready for step 2.
Step 2: Setting Up Busybox

  1. Download BusyBox from this link 
  2. and install it
  3. Proceed to step 3..

Step 3: Setting up Init.d support in the device.

We will use this Uni-init v1.0.apk to give init.d support to your device. 

  1. Install Uni-init apk
  2. Click on Activate
  3. click on verify to Check if it is installed or not.
  4. Now download and copy Aroma_kernel.zip to your sd card.
  5. Reboot to CWM
  6. Install from SD card
  7. Choose from SD card
  8. select Aroma_kernel.zip and flash it
  9. Reboot the device
  10. Proceed to step 4.

Step 4: Applying INT2EXTV2+ suport on the device.

  1. Download the INT2EXTV2+.zip 
  2. Copy the downloaded file to your SD card
  3. Reboot to CWM recovery
  4. and flash it
  5. Reboot the device
Note: During this reboot the device will take time it may hang during reboot and you may need to pull out the battery but you must wait for at least 20Minutes before pulling out the battery. Just have patience. :)

After Reboot you must see that you have got about 800MB+ of storage available.

My personal Review:
I have tested it 24Hrs and couldnt wait to share it. I used the older method which was way too laggy and Lots of FCs.. but honestly this works. I am running more apps then earlier and its still smooother.

Alternate Links of The Downloads Above:

  • Uni-Initd
  • CronMOd
  • Busybox, Titanium backup, etc (Use Google.com :P)


The Credit Goes to the developers 
croniccorey (for Cron Mod)
Ryuinferno (For Uni-Init.d)

Me for writing this Post and testing :P

For any questions and Queries Please Go to the FB Group i may not reply here.
Thanks  and please share if it works for you.


visit link download
Read more »

How To Setup ADB Fastboot Driver With Android SDK On Windows Complete Guide

How To Setup ADB Fastboot Driver With Android SDK On Windows Complete Guide


Setting up ADB (Android Debug Bridge) and Fastboot is a very basic step to make communication with your android device with Windows. In short, Android Debug Bridge (adb) is a versatile command line tool that lets you communicate with an emulator instance or connected Android-powered device. By having ADB and fastboot, it helps to install and flash zip into your device like custom recovery, insecure bootloader, images, root package, stock or custom firmware, stock or custom ROMs. You must have both ABD & Fastboot to be installed if you starting to develop android app or any other android development jobs.
Let�s get started on how to set up ADB and Fastboot for your android device to Windows.

How To Setup ADB & Fastboot Driver with Android SDK on Windows

Requirements

  1. Windows PC with internet
  2. Android device
  3. MicroUSB cable

Download

  1. Download android SDK Tools Only for Windows
    Android SDK Tools.exe (Official Website, 80MB)
    Android SDK provides needed API libraries and developer tools necessary to build, test, and debug apps for Android. If you�re a new Android developer, we recommend you download the ADT Bundle (FULL bundle) to quickly start developing apps. It includes the essential Android SDK components and a version of the Eclipse IDE with built-in ADT (Android Developer Tools) to streamline your Android app development.
  2. Java SE Development Kit 7 (JDK)
    jdk-7u11-windows-i586.exe, 32 bit Windows x86, 88.77MB (Only install Windows 32 bit even you are with 64x bit Windows.

Instructions:

  1. Unzip the downloaded zip file and execute the Android SDK ***.exe file.
  2. You will be prompted to install Java Platform JDK from Java SE Software if you do not have it in your Windows PC.
  3. Execute the downloaded Java SE Development kit 7 before proceed. image
  4. Execute again the Android SDK ***.exe to continue. image
  5. Follow the instruction to complete installation of Android SDK Tools. Start SDK Manager. image
  6. Check Android SDK Platform-tools and Google USB Driver. image
  7. Press Install 2 packages to continue installation.
  8. Select Accept and press Install and let�s the download to complete. imageimage
  9. When you see the log file below, the installation is completed. Press close.image
  10. Now you have ADB and USB drivers installed in PC.
  11. Now, connect your device to PC with micro usb cable.
  12. You will see USB driver has installed successfully. image
  13. Activate your android device USB debugging mode. (Settings-> Developer option �> USB debugging.
  14. Let�s Windows continue to install the driver. image
  15. You are now complete all the ADB and USB driver.
  16. Reboot your device into fastboot mode and complete fastboot mode driver installation.

Take Note:

To complete installation if you use other than Nexus device, you need additional USB driver from Samsung Kies, HTC Sync, Motorola Sync Manager or LG Mobile Tool.


visit link download
Read more »

Monday, January 1, 2018

IDM 6 26 Build 1 Full With Crack Download

IDM 6 26 Build 1 Full With Crack Download


Today i want to share a great pc software that name is IDM 6.26 Build 1 Full With Crack Download


IDM 6.26 Build 1 Full With Crack Download  info :


Dl4all24.com


IDM 6.26 Build 1 Full With Crack Download

IDM 6.26 Build 1 Full With Crack Download  : Dl4all24-Hello My dear Friends Today i want to give you a nice Pc Software that is  IDM 6.26 Build 1 Full With Crack Download  pc software is excellent pc Software. Most of the pc user use this  IDM 6.26 Build 1 Full With Crack Download  Software. You can also Use this IDM 6.26 Build 1 Full With Crack Download pc Software and enjoy.


Additional Information:IDM 6.26 Build 1 Full With Crack Download
link download
Read more »

How to list files in a directory with PHP

How to list files in a directory with PHP


Here�s a simple way to execute the windows dir or the linux ls in PHP Windows: <?php $row = exec(dir,$output,$error); while(list(,$row) = each($output)){ echo $row, "<BR> "; } if($error){ echo "Error : $error<BR> "; exit; } ?> Linux: <?php $row = exec(ls -ls,$output,$error); while(list(,$row) = each($output)){ echo $row, "<BR> "; } if($error){ echo "Error : $error<BR> "; exit; } [�]
Here�s a simple way to execute the windows dir or the linux ls in PHP
Windows:
<?php
$row = exec(dir,$output,$error);
while(list(,$row) = each($output)){
echo $row, "<BR> ";
}
if($error){
echo "Error : $error<BR> ";
exit;
}
?>
Linux:
<?php
$row = exec(ls -ls,$output,$error);
while(list(,$row) = each($output)){
echo $row, "<BR> ";
}
if($error){
echo "Error : $error<BR> ";
exit;
}
?>


visit link download
Read more »

HTC Launches New M8 with 5 inch Full HD Display Duo Camera

HTC Launches New M8 with 5 inch Full HD Display Duo Camera


HTC Launches New M8. The Features are:

The HTC One M8 has a 5-inch full HD display. It runs Android 4.4.2 KitKat with HTC Sense 6 on top. The smartphone is powered by a Qualcomm Snapdragon 801 processor with 2.5 GHz quad-core Krait CPUs and 2GB of RAM. It measures 146.36 x 70.6 x 9.35 mm.


On the rear, the smartphone has the new UltraPixel Duo camera featuring BSI sensor, pixel size 2.0 um, sensor size 1/3�, f/2.0, 28mm lens, HTC ImageChip 2 and 1080p Full HD video recording with HDR video. HTC says its camera captures 300% more light, while the secondary camera lens helps in detecting and separating backgrounds and foregrounds. The camera also features Slow Motion mode, which lets users shoot HD slo-mo videos. The front camera has 5MP, BSI sensor, wide angle lens, with HDR capability and 1080p Full HD video recording.

The HTC One M8 has improved audio features with the new HTC BoomSound. The smartphone has dual frontal stereo speakers with built in amplifiers Sense Voice. HTC says the new flagship delivers about 25% louder than the predecessor HTC One M7. Also read our HTC One Review

The new BlinkFeed is said to be more intuitive and has new SDK that enables developers to integrate their own content, users can more easily find and subscribe to new media sources, in addition to instantly creating custom feeds on any topic.

The phone features an integrated fitness tracking with the preloaded Fitbit app, which is also compatible with BlinkFeed. The Sense TV feature allows users to conversation about the programme online with integrated official Facebook and Twitter streams along with all the latest fan commentary from your social circles.

Theres also a Motion Launch feature, which HTC touts as the �sixth sense�. According to HTC, Motion Launch is capable of detecting position and movement, allowing users to interact with phone without turning on the screen. With a simple swipe users can active device. Auto Answer allows you to answer a call by putting the phone to your ear without touching the screen. HTC also offers Dot View flip covers that display notifications, time and weather updates and the ability to answer calls, without the need to uncover the phone.

The smartphone will be available in 16GB and 32GB storage versions, while the expansion card slot supports microSD memory card for up to 128GB additional storage.

For connectivity, the HTC One M8 supports 3.5 mm stereo audio jack, NFC, Bluetooth 4.0 with aptX enabled, Wi-Fi, HTC Connect, micro-USB 2.0, 2G, 3G and 4G LTE (in select countries). A 2600 mAh battery powers the smartphone and is rated to deliver talk time up to 20 hours for 3G.

The HTC One (M8) will be available globally in Gunmetal Gray, Glacial Silver and will be rolled out in the South Asia region in the coming weeks. According to reports, the smartphone will be available in India in April.


visit link download
Read more »

Sunday, December 31, 2017

HOW TO GET RELIANCE JIO 4G SIMCARD FOR ANY 4G DEVICE WITH 90 DAYS UNLIMITED DATA

HOW TO GET RELIANCE JIO 4G SIMCARD FOR ANY 4G DEVICE WITH 90 DAYS UNLIMITED DATA


HOW TO GET RELIANCE JIO 4G SIMCARD FOR ANY 4G DEVICE WITH 90 DAYS UNLIMITED DATA


 reliance jio 4g sim card with
90 days unlimited internet, voice call and messages
Just you need a little patience and
About 200 mb of data usage


First of all
Download myjio app Here


Now install all apps in myjio app section

After completion of downloads

Turn your internet connection off

Reboot your phone

Now open myjio app with internet off

Now you will see GETJIO SIM option

Click on it generate a barcode

Now it will get your location

Now go with your barcode to any reliance digital store

And do not tell them about your phone
Or either take any samsung phone with you
Your sim card will be activated

Verify it by dialling 1977

Enjoy your unlimited 4g.

Stay tuned for newer posts

Note-download the app by the given link only otherwise it wont work out. :)??????????? 


visit link download
Read more »

How To Speed Up Internet with Open DNS Windows XP

How To Speed Up Internet with Open DNS Windows XP


Open DNS Windows XP
Open DNS Windows XP
Windows 7 Users Click Here


What Is DNS ?


The DNS (Domain Name System) is the phonebook of the Internet. When you enter a website into a browser, its DNS that finds the optimal machine to serve that website to you. Without it, browsing as we know it would not be possible.
eg:

When you type an internet address in your web browser " www.google.com", the request first goes to the DNS servers of your local ISP. These �Domain Name Servers� will translate the web URL into some cryptic and hard-to-remember numeric address " 74.125.39.104"
_________________________________________________________________

Open DNS serve 30 billion DNS requests to 20 million customers every day, with plenty of capacity to spare. Youre probably using DNS service from your Internet Service Provider (ISP) today, but ISPs have notoriously unreliable and slow service. OpenDNS is the best  DNS service available and its the best solution for slow internet Connections.

lets see how to setup OpenDNS for your Computer


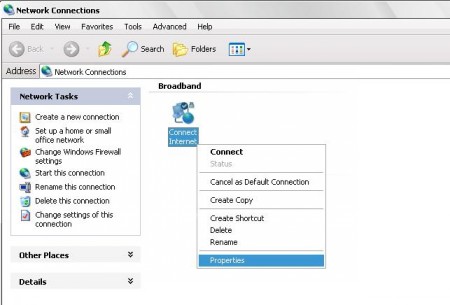
  • First go to Control Panel ---> Network Connections -->Right Click on current
    Internet connection profile
    • Go to Properties

    Open DNS Windows XP

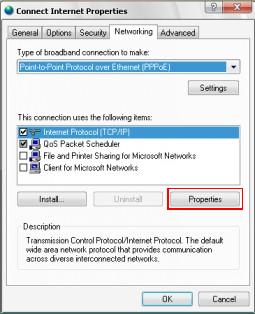
  • In properties Click on "Network" Option
    • Click on "Properties" Button

    Open DNS Windows XP

  • In the DNS section fill with this numbers
    Preferred DNS Server : 208.067.222.222
    Alternate DNS Server :  208.067.220.220

    Open DNS Windows XP

       �"������"��(�`*�.�(�`*�.. All DoNE. ..�*��)�.�*��)��"������"�

Click On this link to find out to setup is successful or not
Click Here To Check The Connection ....

If connection is successful itll appear like this


Open DNS Windows XP


NoW, Time TO Lightning FaST Web BroWsing.......


Other Public DNS Servers

Service provider: Google
Google public dns server IP address:
  • 8.8.8.8
  • 8.8.4.4
Service provider:Dnsadvantage
Dnsadvantage free dns server list:
  • 156.154.70.1
  • 156.154.71.1

Service provider:Norton
Norton free dns server list / IP address:
  • 198.153.192.1
  • 198.153.194.1

Service provider: ScrubIt
Public dns server address:
  • 67.138.54.100
  • 207.225.209.66


    _______________________________________________________________________________________________________

    Related Posts
     

      Hide any file Inside a picture
      How get back facebook old chat bar
      How To Speed Up Your Dial-UP Connection - Part 1
      How To Speed Up Your Dial-UP Connection - Part 2


visit link download
Read more »

Idm 6 17 Full Version Download With Patch 101 working

Idm 6 17 Full Version Download With Patch 101 working


This Post is about how to use idm forever .
There is no need to tell about IDM. Simply The Best download manager . Idm free download latest full version form this link below . And then follow the step and crack your idm for free . Dont skip any Step.

We will crack our idm so that we dont need any free internetdownload manager serial key . Coz theres a problem with this free Idm serial key or idm key it do not work properly. so that we use Patch and crack to make any version idm full version and to use idm forever  . 

Download any version of IDM  . Here we provide free downloads latest version idm because it is compatible with windowns Xp ,Windows 7 and also Windows  8 .  but patch or crack work fine with any version .  and then install this software . Your computer or laptop which you use need a restart. Re start your pc or laptop.  

Download  : Idm 6.17
Download  : Idm Patch 

For Patch Follow This Instruction to use idm forever and unlimited download . 


1. Unzip This With Winrar or any other unzipper .
2.Now Click on the  Patch . See the Picture  
3. you are done now click exit .


visit link download
Read more »

How to Setup wordpress with xampp on Localhost Easy Way

How to Setup wordpress with xampp on Localhost Easy Way


Things Need

Xampp
https://www.apachefriends.org/download.html

Wordpress
https://wordpress.org/download/

Download and Install Xampp On Your computer.

If you receive any security/firewall warnings during the installation process, make sure you check �Private networks, such as my home or work network� and click �Allow access.� This is very important. If you don�t allow access, XAMPP won�t work.


After Installing Open the Xampp Control Panel.
And start "Apache" and "MySQL" Service.


Next Open Your Browser,
And type in url bar "localhost" and press Enter
A page will Open Like this in below Image.


Now download And Extract Wordpress.


Copy the Wordpress Folder


And Paste It to htdocs folder in Xampp = C:xampphtdocs


Next Create Database for Wordpress to work.
Open Xampp control panel,
And click on MySQL admin


Then php My Admin  page will open,
then click on Database.

Then create A Database

After creating data base Check Its Privileges 
You can add Username And password For the data base.
Default Username and Password is 
Username = root
Password = "blank"
 no password.

Again Open up Your Browser And type in Url Bar "localhost/wordpress" hit enter 
This will open your Wordpress Installation Page.

 Follow the installation Process,
Then It will Ask to Choose Database.
In Database name choose the name which u have given = wordpress
User Name = root
Password = "blank"
Database host = localhost  
Then click on Submit


After that, It will ask you to enter the information about your Site

After Putting all information
click on Install Wordpress.
After Installation 
Login to your wordpress

Now you Can manage your Wordpress website.
Here is Dashboard.
Now you can choose theme post stuff and etc.


And Here is the First look of your web site


Your wordpress Website Url
Website url in hosting computer = localhost/wordpress
Website login url in hosting computer = localhost/wordpress/wp-admin

Other computer
Website url = "Host ip address" /wordpress
Website login url = "Host ip address" /wordpress/wp-admin

Note this will only work on local network Computers that is 
Computer sharing same network 
Via  Router or ethernet switch.

Just you have to type the ip address of the hosting computer.
like this = 192.168.0.100/wordpress 
to open the website in another computer.
 "localhost" is only work on hosting computer browser.

And if you want to make your localhost website online then you have to Forward your ip address to the external fix ip address And then forward it to the domain name.
Then you can access you website from anywhere.


visit link download
Read more »