Thursday, January 4, 2018
How to setup Network Attached Storage NAS FreeNAS 9 10
How to setup Network Attached Storage NAS FreeNAS 9 10
Hardware Recommendations
RAM
- To use ZFS deduplication, at least 5 GB of RAM per TB of storage to be deduplicated.
- To use Active Directory with many users, add an additional 2 GB of RAM for winbind�s internal cache.
=> DOWNLOAD RUFUS
Download rufus to burn on usb disk then install on 16gb FlashDrive
Setup your computer to the same network of your other
computer By router or Switch
Download NAS operating system it will be .iso file
then plug in your pen drive. And open Win 32 Disk Imager
in right corner click on blue folder icon and select the iso.
after that click on "write" then the writing process begin on
pendrive.
After finishing writing process. Plug out the Pendrive
And plug in to your Old computer. And turn on
And press Key for access in boot menu
usually key for different types of pc is mention - Esc - F9 - F10 - F11 - F12.
After Accessing select the pendrive and press enter
then system boots the pendrive and shows the Nas version and detail then again press enter.
The loading Process Begin .After loading a screen appear Select " Install / Upgrade "
Then its show the available drives . Then select one drives by pressing space bar where you want to install Nas os. And then select "ok". Then it will ask you to give root password.
Now the installation process begin. Please wait Until its finish.
After finishing up then it will show the IP address.
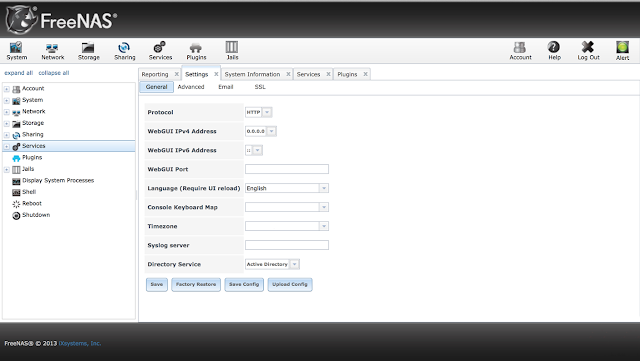
Then Open browser of Another computer Type the IP address.
hit enter . log in with User name - root
Password - which you enter in root
And manage the NAS storage. Now you have Home Network Attached Storage.

Wednesday, January 3, 2018

Tuesday, January 2, 2018
How to setup MyPhoneExplorer on Samsung Galaxy S4 – SOLVED!
How to setup MyPhoneExplorer on Samsung Galaxy S4 – SOLVED!
Trying to connect your Samsung Galaxy S4 to your computer�s USB port so that you can use your computer�s keyboard can be an irritating experience. (See here for my original article on how to Control your Android phone from your PC)
The error that I kept on getting was �Connection to phone could not be established: No device connected to USB�. I had been successful previously connecting an older phone to MyPhoneExplorer (MPE), but it seemed that the new S4�s Jelly Bean 4.2.2 operating system wasn�t too kind when it came to connecting.
I Googled a bit (no, really a lot this time), and found some interesting articles which eventually got the problem solved.
There are a few checks that I needed to do � as listed here: http://forum.xda-developers.com/showthread.php?t=2144709 The main check points are the following:
1) Install the latest version (1.8.4) of MPE from here: http://www.downloadbestsoft.com/MyPhoneExplorer.html
2) Check what version of adb (=Android Debug Bridge) you have installed by opening a command window and typing the following: cd C:Program Files (x86)MyPhoneExplorerDLLadb.exe and then adb.exe version If the version displayed is 1.0.31 or later then you should be fine. 

2b) If an earlier version is present on your PC then download this file, unzip the files and copy them over the files in this folder: c:Program Files (x86)MyPhoneExplorerDLL
3) Now you need to put your phone into Developer mode, then also turn on �USB debugging� mode. This is a pretty well hidden �feature� in the Android OS:
3a) Using the Settings menu, then "More" tab, and then Software information.
Then look for "About device" at the bottom. Tap it.
Then tap the build number seven times. Youll get a little prompt saying youre about to unlock the developer settings. Hit that button one final time -- seven! -- and theyre unlocked.
{Thanks to this article for helping me find it: http://www.androidcentral.com/how-get-developer-settings-galaxy-s4 }
That tapping also UnHid another menu option �Developer options�
3b) Now to turn on the USB debugging option: in Settings->More->�Developer options� tick �USB debugging�
4) Now plug in the USB cable and startup MPE.
then File->Settings and �connect via USB� 
then File->Connect to connect via USB� hopefully, the connection is successful and you can use your PC to control your Samsung S4 Android phone.
Let me know if it works for you!
If it doesn�t then here�s a more complex, but more complete set of checks for you: http://www.androidsim.net/2009/08/how-to-1-how-to-install-usb-driver-on.html
How To Setup ADB Fastboot Driver With Android SDK On Windows Complete Guide
How To Setup ADB Fastboot Driver With Android SDK On Windows Complete Guide
Let�s get started on how to set up ADB and Fastboot for your android device to Windows.
How To Setup ADB & Fastboot Driver with Android SDK on Windows
Requirements
- Windows PC with internet
- Android device
- MicroUSB cable
Download
- Download android SDK Tools Only for Windows
Android SDK Tools.exe (Official Website, 80MB)
Android SDK provides needed API libraries and developer tools necessary to build, test, and debug apps for Android. If you�re a new Android developer, we recommend you download the ADT Bundle (FULL bundle) to quickly start developing apps. It includes the essential Android SDK components and a version of the Eclipse IDE with built-in ADT (Android Developer Tools) to streamline your Android app development. - Java SE Development Kit 7 (JDK)
jdk-7u11-windows-i586.exe, 32 bit Windows x86, 88.77MB (Only install Windows 32 bit even you are with 64x bit Windows.
Instructions:
- Unzip the downloaded zip file and execute the Android SDK ***.exe file.
- You will be prompted to install Java Platform JDK from Java SE Software if you do not have it in your Windows PC.
- Execute the downloaded Java SE Development kit 7 before proceed.
- Execute again the Android SDK ***.exe to continue.
- Follow the instruction to complete installation of Android SDK Tools. Start SDK Manager.
- Check Android SDK Platform-tools and Google USB Driver.
- Press Install 2 packages to continue installation.
- Select Accept and press Install and let�s the download to complete.
- When you see the log file below, the installation is completed. Press close.
- Now you have ADB and USB drivers installed in PC.
- Now, connect your device to PC with micro usb cable.
- You will see USB driver has installed successfully.
- Activate your android device USB debugging mode. (Settings-> Developer option �> USB debugging.
- Let�s Windows continue to install the driver.
- You are now complete all the ADB and USB driver.
- Reboot your device into fastboot mode and complete fastboot mode driver installation.


Take Note:
To complete installation if you use other than Nexus device, you need additional USB driver from Samsung Kies, HTC Sync, Motorola Sync Manager or LG Mobile Tool.
Sunday, December 31, 2017
How to Setup wordpress with xampp on Localhost Easy Way
How to Setup wordpress with xampp on Localhost Easy Way

Xampp

Wordpress


Copy the Wordpress Folder


Other computer
Website url = "Host ip address" /wordpress
Website login url = "Host ip address" /wordpress/wp-admin
Then you can access you website from anywhere.
Friday, December 29, 2017
How To Setup Custom Domain For Your Blog In Blogger With Godaddy com
How To Setup Custom Domain For Your Blog In Blogger With Godaddy com

For Eg. your blogger domain name is www.xyz.blogspot.com and you have to redirect to www.xyz.com, thats it.
What Is Custom Domain ?
Eg. www.google.com (First level domain)
www.abc.co.in (Secondary level domain)
What Is The Need Of Custom Domain ?
Follow The Below Steps Carefully To Setup Custom Domain For Your Blog -
- You have to buy custom domains from websites like Godaddy, Bigrock etc.
- Suppose you are buying domain on Godaddy.com
- Firstly login your www.blogger.com blog
- Enter username and password.
- Go in Settings > Basics option. See below screenshot

- Now look at the publishing section, your blog name will be appear then click on setup third party url for your blog link. Now enter your custom domain name like www.xyz.com see below screenshot to understand.

- After entering the url you will get warning we have not able to verify your authority to this domain
- Now you will get Name, Label or Host and Destination, Target or Points To Fields. You can see above in Screen shot. For eg. www is your host and ghs.google.com is yuor points to field.
- Now open another tab in your browser and go to your domain provider website like www.godaddy.com and enter your login details.
- Now login into your Godaddy account and click on My Account tab.

- Now you have to go on Domain Manager.

- In the domain manager page you will see option DNS MANAGER. You have to click on DNS MANAGER.
- Note that in DNS MANAGER you have to enter A(Host) and Cname.
- Now click on A(Host) tab you have to enter this 4 ip addresses one by one using add button.
216.239.32.21
216.239.34.21
216.239.36.21
216.239.38.21
- After you done adding records click on save button to save your records.

- Now you have to enter your Cnames (alias). You Cname alias are www ghs.google.com see below screenshot. Now you have to enter your Host and Points to Fields thats it. After adding records click on save.

- Now open your blooger.com blog and enter url then click on save button.
It may take upto 72 hours to take effects in your ip records. I will suggest to you buy a domain name on Godaddy.com.
What you think right now it is easy to setup. Show your love in comments. :) And share this page on Facebook and other social sites.
Wednesday, December 27, 2017
How to Setup Windows XP from USB drive
How to Setup Windows XP from USB drive
How to Setup Windows XP from USB drive? | ||||||||
You are here: Tutorials > How to setup Windows XP from USB drive? | ||||||||
Step1: Prepping BartPE: First we�ll prep the USB drive we�ll be using for booting. This is by far the largest step in the process, though it shouldn�t be difficult for anyone to follow. It requires a functional Windows system.
Step2: Create XP Bootable USB Drive:
If no errors occurred in the above process, you should now be all set to setup Windows xp from USB drive! Step 3: Configuring the BIOS: You should now reboot and go into the BIOS configuration to boot from USB. Instructions for doing so wildly from system to system, but generally entail the following:
If you�re completely new to BIOS configuration, BIOS for Beginners over at Tom�s Hardware might be a good primer. Be aware though, that you can seriously screw up your system by providing incorrect settings! Step 4: Booting into BartPE: Assuming that you properly configured your BIOS and your USB drive supports booting, BartPE should now load. Depending on the speed of your USB drive, this may take a while. If it isn�t working, then double-check the following before making a scene:
Step 5: Prepping the Hard Disk: You need to make sure that your hard drive is partitioned and formatted properly. Especially if youve had Linux or some other operating system on it, youll need to repartition and format it. BartPE contains DiskPart for disk partitioning and A43 File Manager to format your drive. If you are sure that your hard drive is set up properly (i.e. it has only run Windows, it contains a valid FAT or NTFS partition) then you can safe yourself the hassle and skip this step. To repartition (This procedure will destroy any data on the hard drive):
To format (This procedure will destroy any data on the hard drive):
Step 6: Launching Windows XP Setup from USB drive: With your drive all ready, you can now launch the Windows XP setup with a few custom parameters. Lets assume that the files are available at X:i386. Plugging in a device now won�t work. Remember that all USB devices will need to be plugged in right from the start while using BartPE. Run the following command:
The setup program will then silently close, which might make you think that something went wrong. Dont worry though. Step 7: Continue Windows XP Setup from Hard disk:
|
Monday, December 25, 2017
How To Setup An Interal DNS Server On Ubuntu Easiest Way Bind9 DNS server
How To Setup An Interal DNS Server On Ubuntu Easiest Way Bind9 DNS server

In this tutorial we will setup a Bind9 DNS server for your home network with caching.
Running a caching DNS server it will cache DNS locally so sites you visit often will not have to make a DNS query until the DNS record has expired.
This will help improve your internet speed as well as reduce bandwidth.
Before we begin make sure you have an Ubuntu server running and configured with a static IP address
Installing Bind9 on Ubuntu
Open Terminal on Ubuntu server or Login via SSHInstallation
sudo apt-get install bind9And then type "Y" to confirm
Bind Configuration
The next step is to configure the forwards addresses for bind.
This tell bind where to look if it doesnt know the IP address of a domain.In this example we will use Googles Public DNS servers for the forward DNS servers.
Googles DNS servers are fast, and free.
If you want you can use your ISP providers DNS servers.
sudo nano /etc/bind/named.conf.options

Enter Y to confirm saving changes.
Configuring internal domain
In this example we will setup an internal domain with tne name linux.lix.
If you want to use something else just make sure you replace linux.lix in the following steps with your internal domain name.
The internal domain can be whatever you want.
sudo nano /etc/bind/named.conf.local
Most home networks will have a 192.168.1.X or 192.168.0.X type of IP address. In my case I have a 192.168.0.X IP address network.
When looking at our IP address the part we care about is the first three sets of octets ( 192.168.0.100 = three sets 192.168.0)
Then we just reverse them - 192.168.0 => 0.168.192
and make note of the names because we will need to build these files in the next few steps.
type master;
file "/etc/bind/db.linux.lix";
};
zone "0.168.192.in-addr.arpa" {
type master;
notify no;
file "/etc/bind/db.192";
};

Enter Y to confirm saving changes
Building Your DNS Forward Zone
The first file we need to build is the forward zone file (db.linux.lix)sudo cp /etc/bind/db.local /etc/bind/db.linux.lixThis will copy default zone to our zone
Now lets Edit our Zone db.linux.lix
sudo nano /etc/bind/db.linux.lixThe three most common types of DNS records are Address (A Record), Canonical Name (CNAME), and Mail Exchanger (MX). We will focus on A Record
A Record: Defines a mapping of a hostname to an IP address. This is the most common
CNAME: Defines that the domain name is an alias of another name.
MX: Defines mail servr
NS: Name Server

Replace linux.lix with internal domain name you picked
shahid.linux.lix with your internnal domain name example - user.yourdomain.ext
Change DNSserver. to your UbuntuServer Host name and put "." in end of host name as shown in above picture.
Put " ; " in front of like these
;@ IN A 127.0.0.1
;@ IN AAAA ::1
Now Maping Domain Name to IP
@ IN A 192.168.0.101
In my case 192.168.0.101 is My internal webserver.
Now Building Reverse Lookup
sudo cp /etc/bind/db.127 /etc/bind/db.192This will copy default reverse lookup file to our database
Now edit the file
sudo nano /etc/bind/db.192
Replace linux.lix as with internal domain name you picked as Mention Earlier
Make sure you have a "." at the end of the names.
IN is defining it as an Internet address.
PTR is a pointer record. This defines what name will be called when an IP address is looked up.
Enter "Y" to confirm saving the file.
Now Start Your DNS Server
sudo service bind9 startNow Test The DNS server

located in - Control PanelNetwork and InternetNetwork and Sharing Center
then click on Local area Connection Status then - > properties -> Internet Protocol Version 4
And then Put your Ubuntu Server Ip address to Preferred DNS server Box and click ok
Now Open CMD in Windows

Now open you Browser type linux.lix in url You will get your Web server - Web Page

For Any one Who Join Your Local Area connection can get the DNS server By puttion Your Ubuntu Server IP address to your Router DNS setting

If You Find This Helpful Share On Social Medias