Showing posts with label dns. Show all posts
Showing posts with label dns. Show all posts
Sunday, December 31, 2017
How To Speed Up Internet with Open DNS Windows XP
How To Speed Up Internet with Open DNS Windows XP

 |
| Windows 7 Users Click Here |
What Is DNS ?
The DNS (Domain Name System) is the phonebook of the Internet. When you enter a website into a browser, its DNS that finds the optimal machine to serve that website to you. Without it, browsing as we know it would not be possible.
eg:
When you type an internet address in your web browser " www.google.com", the request first goes to the DNS servers of your local ISP. These �Domain Name Servers� will translate the web URL into some cryptic and hard-to-remember numeric address " 74.125.39.104"
_________________________________________________________________
Open DNS serve 30 billion DNS requests to 20 million customers every day, with plenty of capacity to spare. Youre probably using DNS service from your Internet Service Provider (ISP) today, but ISPs have notoriously unreliable and slow service. OpenDNS is the best DNS service available and its the best solution for slow internet Connections.
lets see how to setup OpenDNS for your Computer
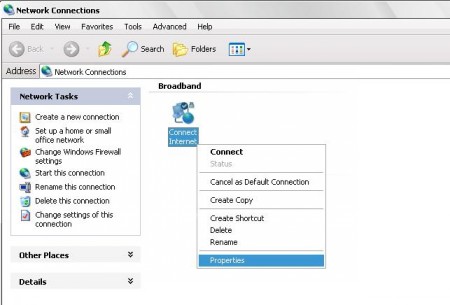
- First go to Control Panel ---> Network Connections -->Right Click on current
Internet connection profile- Go to Properties
- In properties Click on "Network" Option
- Click on "Properties" Button
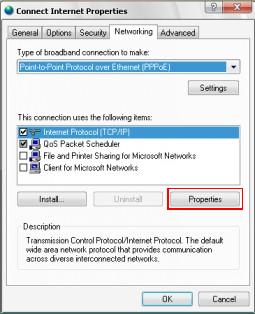
- In the DNS section fill with this numbers
Preferred DNS Server : 208.067.222.222
Alternate DNS Server : 208.067.220.220
�"������"��(�`*�.�(�`*�.. All DoNE. ..�*��)�.�*��)��"������"�
Click On this link to find out to setup is successful or not
Click Here To Check The Connection ....
If connection is successful itll appear like this

NoW, Time TO Lightning FaST Web BroWsing.......
Other Public DNS Servers
Service provider: GoogleGoogle public dns server IP address:
- 8.8.8.8
- 8.8.4.4
Dnsadvantage free dns server list:
- 156.154.70.1
- 156.154.71.1
Service provider:Norton
Norton free dns server list / IP address:
- 198.153.192.1
- 198.153.194.1
Service provider: ScrubIt
Public dns server address:
- 67.138.54.100
- 207.225.209.66_______________________________________________________________________________________________________
Related Posts� Hide any file Inside a picture� How get back facebook old chat bar� How To Speed Up Your Dial-UP Connection - Part 1
� How To Speed Up Your Dial-UP Connection - Part 2
Monday, December 25, 2017
How To Setup An Interal DNS Server On Ubuntu Easiest Way Bind9 DNS server
How To Setup An Interal DNS Server On Ubuntu Easiest Way Bind9 DNS server

In this tutorial we will setup a Bind9 DNS server for your home network with caching.
Running a caching DNS server it will cache DNS locally so sites you visit often will not have to make a DNS query until the DNS record has expired.
This will help improve your internet speed as well as reduce bandwidth.
Before we begin make sure you have an Ubuntu server running and configured with a static IP address
Installing Bind9 on Ubuntu
Open Terminal on Ubuntu server or Login via SSHInstallation
sudo apt-get install bind9And then type "Y" to confirm
Bind Configuration
The next step is to configure the forwards addresses for bind.
This tell bind where to look if it doesnt know the IP address of a domain.In this example we will use Googles Public DNS servers for the forward DNS servers.
Googles DNS servers are fast, and free.
If you want you can use your ISP providers DNS servers.
sudo nano /etc/bind/named.conf.options
then press enter

Configure Forwarders As shown is Above Picture
Exit it out of nano by hitting CTRL + X.
Enter Y to confirm saving changes.
Enter Y to confirm saving changes.
Configuring internal domain
The next step is to edit /etc/bind/named.conf.local
In this example we will setup an internal domain with tne name linux.lix.
If you want to use something else just make sure you replace linux.lix in the following steps with your internal domain name.
The internal domain can be whatever you want.
In this example we will setup an internal domain with tne name linux.lix.
If you want to use something else just make sure you replace linux.lix in the following steps with your internal domain name.
The internal domain can be whatever you want.
sudo nano /etc/bind/named.conf.local
then press enter
We will need to figure out our IP address range of our internal network so we can build the correct reverse zone lookup file.
Most home networks will have a 192.168.1.X or 192.168.0.X type of IP address. In my case I have a 192.168.0.X IP address network.
When looking at our IP address the part we care about is the first three sets of octets ( 192.168.0.100 = three sets 192.168.0)
Then we just reverse them - 192.168.0 => 0.168.192
Replace linux.lix with the internal domain name you picked and replace 0.168.192 with your IP address scheme.
and make note of the names because we will need to build these files in the next few steps.
and make note of the names because we will need to build these files in the next few steps.
zone "linux.lix" {
type master;
file "/etc/bind/db.linux.lix";
};
zone "0.168.192.in-addr.arpa" {
type master;
notify no;
file "/etc/bind/db.192";
};
type master;
file "/etc/bind/db.linux.lix";
};
zone "0.168.192.in-addr.arpa" {
type master;
notify no;
file "/etc/bind/db.192";
};

Hit CTRL + X to exit out of nano
Enter Y to confirm saving changes
Enter Y to confirm saving changes
Building Your DNS Forward Zone
The first file we need to build is the forward zone file (db.linux.lix)sudo cp /etc/bind/db.local /etc/bind/db.linux.lixThis will copy default zone to our zone
Now lets Edit our Zone db.linux.lix
sudo nano /etc/bind/db.linux.lixThe three most common types of DNS records are Address (A Record), Canonical Name (CNAME), and Mail Exchanger (MX). We will focus on A Record
A Record: Defines a mapping of a hostname to an IP address. This is the most common
CNAME: Defines that the domain name is an alias of another name.
MX: Defines mail servr
NS: Name Server

Replace linux.lix with internal domain name you picked
shahid.linux.lix with your internnal domain name example - user.yourdomain.ext
Change DNSserver. to your UbuntuServer Host name and put "." in end of host name as shown in above picture.
Put " ; " in front of like these
;@ IN A 127.0.0.1
;@ IN AAAA ::1
Now Maping Domain Name to IP
@ IN A 192.168.0.101
In my case 192.168.0.101 is My internal webserver.
Now Building Reverse Lookup
sudo cp /etc/bind/db.127 /etc/bind/db.192This will copy default reverse lookup file to our database
Now edit the file
sudo nano /etc/bind/db.192
Replace linux.lix as with internal domain name you picked as Mention Earlier
Make sure you have a "." at the end of the names.
IN is defining it as an Internet address.
PTR is a pointer record. This defines what name will be called when an IP address is looked up.
Now lets save our reverse zone file by hitting CTRL + X
Enter "Y" to confirm saving the file.
Enter "Y" to confirm saving the file.
Now Start Your DNS Server
sudo service bind9 startNow Test The DNS server

located in - Control PanelNetwork and InternetNetwork and Sharing Center
then click on Local area Connection Status then - > properties -> Internet Protocol Version 4
And then Put your Ubuntu Server Ip address to Preferred DNS server Box and click ok
Now Open CMD in Windows

Now open you Browser type linux.lix in url You will get your Web server - Web Page

For Any one Who Join Your Local Area connection can get the DNS server By puttion Your Ubuntu Server IP address to your Router DNS setting

If You Find This Helpful Share On Social Medias
Tuesday, December 19, 2017
Increase internet speed by changing DNS server Namebench
Increase internet speed by changing DNS server Namebench

Have you ever wondered why your web browser always hangs when you enter the wrong URL address? The reason is your web browser keep looking for the IP address of the URL from the DNS server but the IP address cannot be resolved.
As long as you type in the URL address (e.g. www.google.com), the DNS server will try to resolved it to the actual IP address (e.g. 64.233.181.104). Therefore if your DNS servers respond is low, it takes longer to resolve the IP address and eventually this causes your overall internet connection becomes slower.
As long as you type in the URL address (e.g. www.google.com), the DNS server will try to resolved it to the actual IP address (e.g. 64.233.181.104). Therefore if your DNS servers respond is low, it takes longer to resolve the IP address and eventually this causes your overall internet connection becomes slower.
Usually people will suggest you to use the Google DNS server (i.e. 8.8.8.8 or 8.8.4.4) as it is
believed the fastest DNS server. Is that true? The Namebench is the software / freeware to tell you to the answer!
- Download Namebench from Namebench Downloads
- Install Windows or MAC version (as per your OS)
- Run the application and you will see the following screen.
Lets everything to be default (it detects your location automatically). If the location is not correct, you can change it. Click "Start Benchmark".

As you can see from the result, the Google Public DNS is 215% faster than my default DNS server. That is really awesome. Google rocks!
These are the suggested DNS server that you will need set in your system:
- Primary Server - 8.8.4.4 (Secondary Google Public DNS Server)
- Secondary Server - 202.188.0.133 (Primary Streamyx DNS server)
- Tertiary Server - 202.188.1.5 (Secondary Streamyx DNS server)
Follow the instruction here to change DNS server for your operating system: Changing DNS Server

- For preferred DNS server in Windows, put the suggested primary server by namebench. For alternate DNS server, put the suggested secondary server by namebench.
- If you connect your PC or laptop through both LAN and Wireless network, you need to apply the setting to both network(i.e.Wireless and LAN). Basically you need to apply the setting to each of the network (i.e. wireless, LAN and dial-up connection).
Sunday, December 10, 2017
How To Speed Up Internet with Open DNS Windows7
How To Speed Up Internet with Open DNS Windows7

 |
| Windows XP Users Click Here |
What Is DNS ?
The DNS (Domain Name System) is the phonebook of the Internet. When you enter a website into a browser, its DNS that finds the optimal machine to serve that website to you. Without it, browsing as we know it would not be possible.
eg:
When you type an internet address in your web browser " www.google.com", the request first goes to the DNS servers of your local ISP. These �Domain Name Servers� will translate the web URL into some cryptic and hard-to-remember numeric address " 74.125.39.104"
_________________________________________________________________
Open DNS serve 30 billion DNS requests to 20 million customers every day, with plenty of capacity to spare. Youre probably using DNS service from your Internet Service Provider (ISP) today, but ISPs have notoriously unreliable and slow service. OpenDNS is the best DNS service available and its the best solution for slow internet Connections.
lets see how to setup OpenDNS for your Computer
- First Go to Control Panel, then select �Network and Internet�.

- Select �Network and Sharing Center�.

- Select �Change adapter settings�.

- Then Right click on your current internet connection and choose �Properties�.

- Select the �TCP/IPv4� service in the list, then click the �Properties� button.

- In the DNS section fill with this numbers
Preferred DNS Server : 208.067.222.222
Alternate DNS Server : 208.067.220.220

�"������"��(�`*�.�(�`*�.. All DoNE. ..�*��)�.�*��)��"������"�
Click On this link to find out to setup is successful or not
Click Here To Check The Connection ....
If connection is successful itll appear like this
NoW, Time TO Lightning FaST Web BroWsing.......
Other Public DNS Servers
Service provider: Google
Google public dns server IP address:
- 8.8.8.8
- 8.8.4.4
Dnsadvantage free dns server list:
- 156.154.70.1
- 156.154.71.1
Service provider:Norton
Norton free dns server list / IP address:
- 198.153.192.1
- 198.153.194.1
Service provider: ScrubIt
Public dns server address:
- 67.138.54.100
- 207.225.209.66
_______________________________________________________________________________________________________
Related Posts
� How To Speed Up Your Dial-UP Connection - Part 1
� How To Speed Up Your Dial-UP Connection - Part 2