Tuesday, January 2, 2018
How to setup MyPhoneExplorer on Samsung Galaxy S4 – SOLVED!
How to setup MyPhoneExplorer on Samsung Galaxy S4 – SOLVED!
Trying to connect your Samsung Galaxy S4 to your computer�s USB port so that you can use your computer�s keyboard can be an irritating experience. (See here for my original article on how to Control your Android phone from your PC)
The error that I kept on getting was �Connection to phone could not be established: No device connected to USB�. I had been successful previously connecting an older phone to MyPhoneExplorer (MPE), but it seemed that the new S4�s Jelly Bean 4.2.2 operating system wasn�t too kind when it came to connecting.
I Googled a bit (no, really a lot this time), and found some interesting articles which eventually got the problem solved.
There are a few checks that I needed to do � as listed here: http://forum.xda-developers.com/showthread.php?t=2144709 The main check points are the following:
1) Install the latest version (1.8.4) of MPE from here: http://www.downloadbestsoft.com/MyPhoneExplorer.html
2) Check what version of adb (=Android Debug Bridge) you have installed by opening a command window and typing the following: cd C:Program Files (x86)MyPhoneExplorerDLLadb.exe and then adb.exe version If the version displayed is 1.0.31 or later then you should be fine. 

2b) If an earlier version is present on your PC then download this file, unzip the files and copy them over the files in this folder: c:Program Files (x86)MyPhoneExplorerDLL
3) Now you need to put your phone into Developer mode, then also turn on �USB debugging� mode. This is a pretty well hidden �feature� in the Android OS:
3a) Using the Settings menu, then "More" tab, and then Software information.
Then look for "About device" at the bottom. Tap it.
Then tap the build number seven times. Youll get a little prompt saying youre about to unlock the developer settings. Hit that button one final time -- seven! -- and theyre unlocked.
{Thanks to this article for helping me find it: http://www.androidcentral.com/how-get-developer-settings-galaxy-s4 }
That tapping also UnHid another menu option �Developer options�
3b) Now to turn on the USB debugging option: in Settings->More->�Developer options� tick �USB debugging�
4) Now plug in the USB cable and startup MPE.
then File->Settings and �connect via USB� 
then File->Connect to connect via USB� hopefully, the connection is successful and you can use your PC to control your Samsung S4 Android phone.
Let me know if it works for you!
If it doesn�t then here�s a more complex, but more complete set of checks for you: http://www.androidsim.net/2009/08/how-to-1-how-to-install-usb-driver-on.html

Sunday, December 31, 2017
How To Make Galaxy S4 Look Like Galaxy S5
How To Make Galaxy S4 Look Like Galaxy S5
How to convert Samsung galaxy s4 into An S5
 |
| By Following Our tutorial you will be able to Get the blend of s5 in your s4 |
How To Make Galaxy S4 Look Like S5 - guide
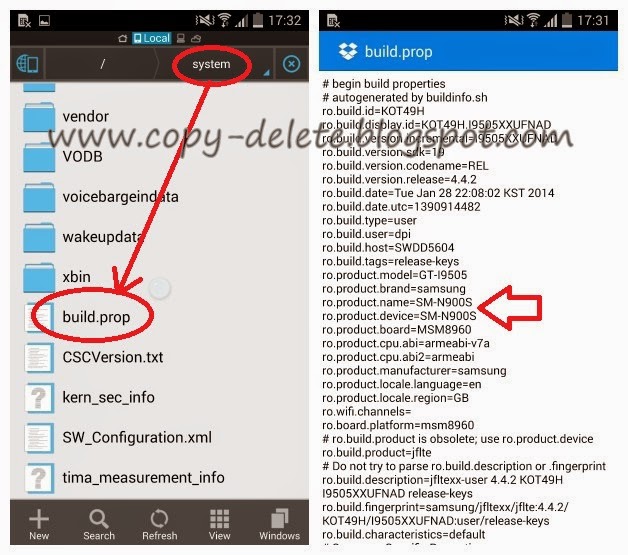 |
| How to enter in build.prop and change ro.product.name and ro.product.device |
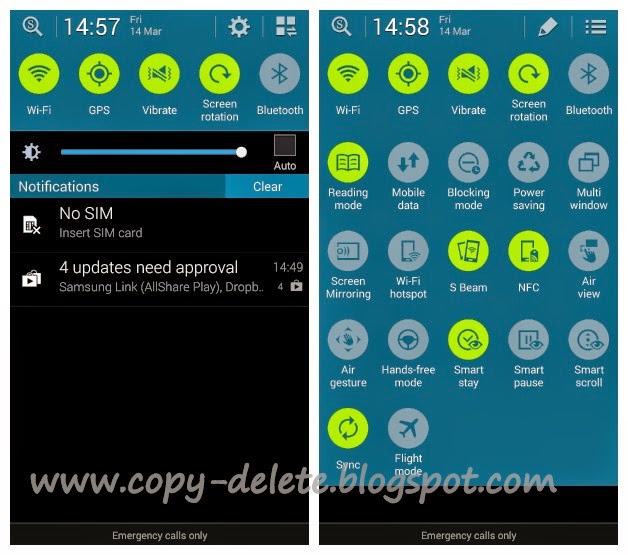 |
| After changing device name you will get new s5 icons on your galaxy s4 |
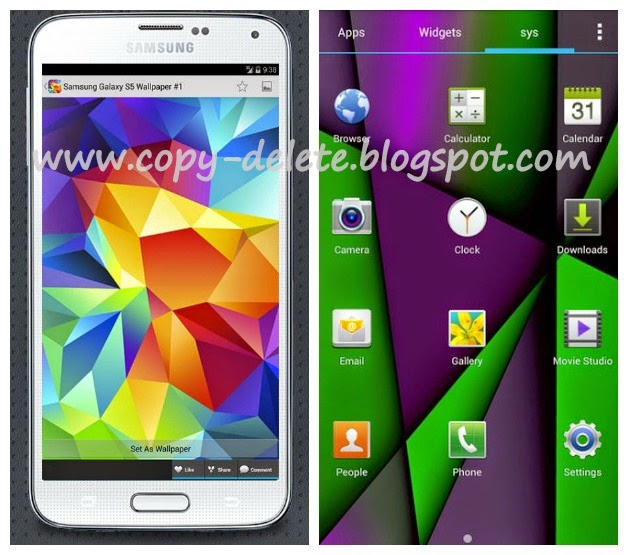 |
| A look of Galaxy S4 After using galaxy S5 wallpaper |
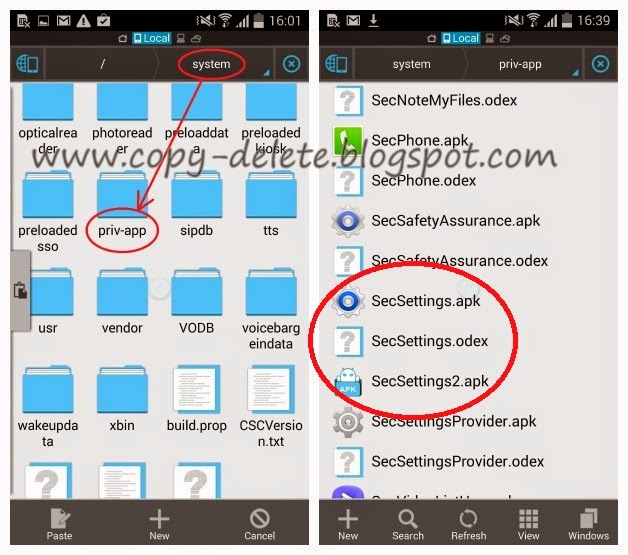 |
| place the apk in system/priv-app folder and rename it like the already present secsettings.apk |
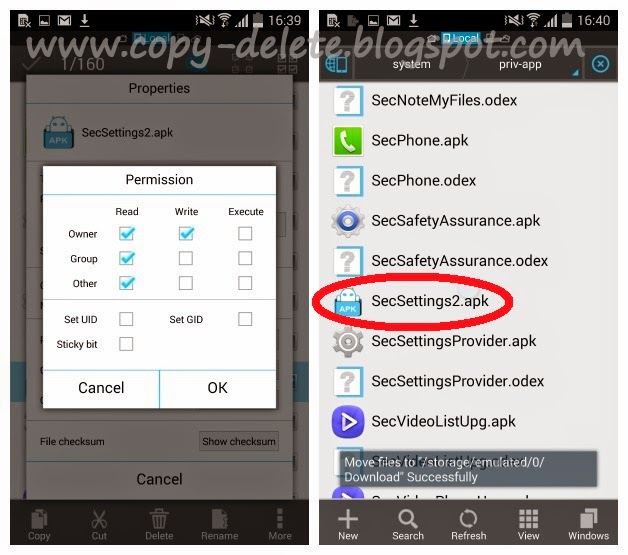 |
| Set the new apks permissions shown in left , Now remove the original secsettings.apl and odex too |
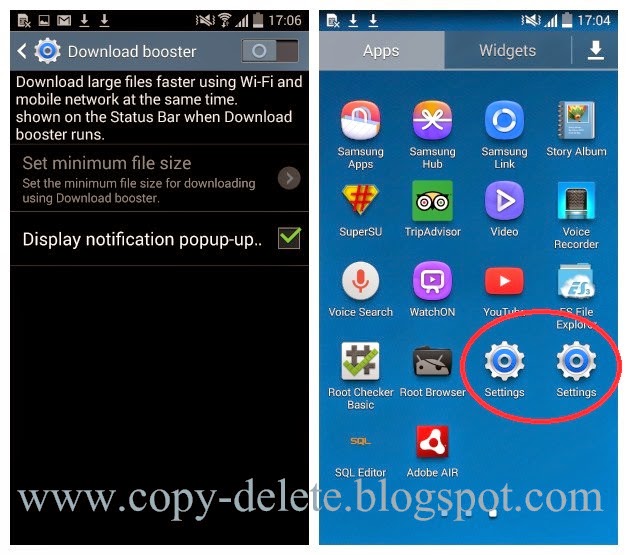 |
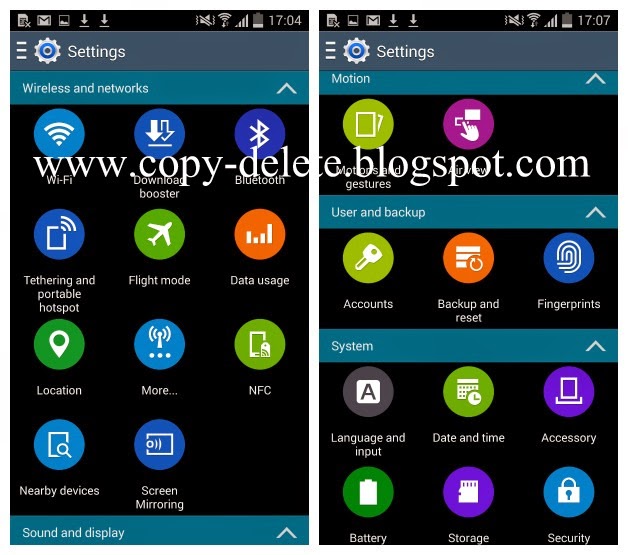
| Download booster (left) two settings menu present in app drawer |
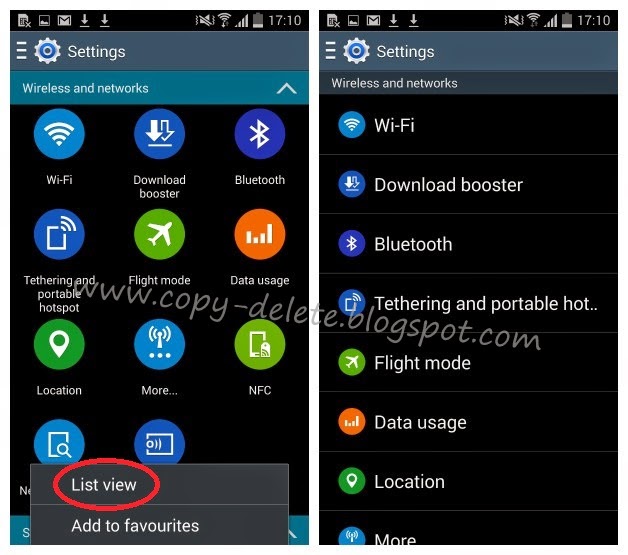 |
| incase if you dont like big circles settings icons you can switch to list view Just follow the above steps and make you samsung galaxy s4 look s5 without upgrading . Do you know any other way to transform galaxy s4 into a s5 please let us know |
How To Root Samsung Galaxy S4 Korean
How To Root Samsung Galaxy S4 Korean

Sunday, December 24, 2017
How to Install Samsung Galaxy S4 I9505 Jelly Bean Firmware I9505XXUENA1 4 3 Update Guide
How to Install Samsung Galaxy S4 I9505 Jelly Bean Firmware I9505XXUENA1 4 3 Update Guide

Must Check: Samsung Galaxy Note 3 SM-N900- How to Install N900XXUDNA6 Android 4.4.2 KitKat Firmware
Important Note:
Android 4.3 Jelly Bean I9505XXUENA1 Official Firmware Download List
Previous Firmware Build:
Samsung Galaxy Note 3 SM-N900- How to Install N900XXUDNA6 Android 4.4.2 KitKat Firmware.Samsung Galaxy S4 GT-I9500 How TO Root I9500XXUEMK8 Android 4.3 Jelly Bean Firmware
How To Root R950VXUBMK3 Android 4.3 Jelly Bean Firmware Running on US Cell Samsung Galaxy Note 2
How To Root L710VPUCMK3 Android 4.3 Jelly Bean Firmware Running on Samsung Galaxy S3
Samsung Galaxy I9205 Mega 6.3 JB Firmware How to Install I9205XXUCML8 4.2.2 Update Guide
Pre-Requisites:
- Check battery percentage, your device should have at least 60% battery power
- Turn on USB Debugging mode, go to Settings-Developer Options-USB Debugging
- Backup important data and settings to external storage- follow this guide
- Install USB driver for your device on your computer- Download Samsung USB Driver
Points to be noted:
- If you are using any Custom ROM such as- CyanogenMod, Paranoid Android, AOKP, SLIM ROMs etc, then it�ll replaced by this official Stock ROM
- Custom Recovery (CWM or TWRP Recovery) will be replaced by Stock Recovery
- After flashing official firmware, your device will no longer belongs to rooted device. However you can root your device any time after flashing the firmware.
How to Install Android 4.3 Jelly Bean Official Firmware on Galaxy S4 I9505 through Odin:

- Download Android 4.3 XXUENA1 Firmware for Galaxy S4 I9505 from the above list
- Download Odin 3.09
- Switch off your phone and boot Galaxy S4 I9505 into Download Mode by pressing and holding the Volume Down+Home+Power buttons (long press until the boot screen appear), now press Volume Up key to proceed to Download Mode.
- Extract the downloaded Odin3.07 zip file and run the Odin3 v3.07.exe file as an administrator (Right click on the .exe file and click on Run as administrator)
- Now connect your Galaxy S4 I9505 to your computer via USB cable
- In Odin3 screen, you should see a COM Port number like �0:[COM7]� at ID:COM section and �Added!� text at the message box. This means your device has been detected by Odin3.
- Make sure that, only the �Auto Reboot� and �F. Reset Time� options are checked.
- Now, extract the downloaded firmware zip file, you�ll find a firmware file with extension .tar.md5
- In Odin screen, click on PDA button and select the firmware file with .tar.md5 extension (The firmware file look something like: I9505XXDLJ5_I9505ODDDLI7_INU.tar.md5)
- Now, click on the Start button to begin the installation process, wait few moments.
- Once completed, you would see �PASS!� message in ID:COM port having green background
- Your phone should automatically reboot after completion
- You can now disconnect your phone from computer
- Finish
Sunday, December 17, 2017
How To Update Samsung SCH R970 Galaxy S4 U S Cellular Firmware Manually
How To Update Samsung SCH R970 Galaxy S4 U S Cellular Firmware Manually
The first step you should start with is making a backup of your phones data, Read the guide ( How To Take A Backup Of Your Samsung Mobile Phones Data Using Samsung Kies) to make the backup by yourself.
You will need some free programs and files for the update and you can get them all below:
- USB Drivers for your R970 GS4 model.
- Odin Flasher.
After downloading the above files extract any zipped one, Then install the USB drivers on the computer that will be used for performing the update and restart it after that.
Tools:
- A stable computer with Windows OS installed.
Samsung R970 GS4 Firmware Update Instructions:
- Turn your phone off.
R970VXUAMDL_R970USCAMDL_R970VXUAMDL_HOME.tar.md5
Press and hold Volume Down key + Home key, Then press Power key, When you see the warning message on screen release all keys and press Volume Up key to be into Download Mode.
- Plug the USB cable into your phone and computer too.
Thursday, December 14, 2017
How To Hard Reset Samsung I9500 Galaxy S4 Using Its Hardware Keys
How To Hard Reset Samsung I9500 Galaxy S4 Using Its Hardware Keys
What to do before performing the hard reset?
Samsung I9500 Galaxy S4 Hard Reset Steps:
- Take out your phones battery, SIM-card and memory card too.
Notice: The hard reset operation will delete anything that are saved in your phones internal memory, So make a backup of your data in case you can access them.
How to root Samsung Galaxy S4 Cricket SCH R970C
How to root Samsung Galaxy S4 Cricket SCH R970C


Tuesday, December 12, 2017
How to Root Samsung Galaxy S4 GT I9500 and Install CWM Recovery
How to Root Samsung Galaxy S4 GT I9500 and Install CWM Recovery

How to Unlock New Security Samsung Galaxy S4 I9505 4 3 Guide
How to Unlock New Security Samsung Galaxy S4 I9505 4 3 Guide
Samsung Galaxy S4 I Feel This Problem 1st & I Share How To Working By Me 100% Tested
Its My Log Info No Working :)
Selected model: I9505
Selected port: COM50 Z3X BOX Serial Port
Selected port speed: 115200
Reading phone info...
Build: M9615A-CEFWTAZM-4.0.17121
Reading security... error access denied
Done with Samsung Tool v.16.8
I9505 modem patch unlock ok but no 3g signal 2g only.
Then Itry This Tutorial Set Is Working Fine
Select correct phone uart settings in phone
Use Micro UART c3303K cable
Then Direct unlock or Read Code
and post result
Flash the file with Odin
*#9090# DM OVER UART
*#0808# DM+MODEM+ADB
no need to downgrade ihave many set to unlock 1000000000000000 ok
just root this file
If You Have Any Doubt Please Comment Me I Share my Experience With You Tnxx.
Monday, December 4, 2017
How to Root Samsung Galaxy S4
How to Root Samsung Galaxy S4
Ive previously covered a way of doing it for the AT&T version of the Samsung Galaxy S4 that has the MF3 firmware on it, but you needed an SD card reader, unzipping software, a terminal emulator, and more. Definitely not an easy task for a first-time rooter.
However, thanks to the crafty developers at Kingo App, root can be attained with just one click now, and not just for the GS4, but for almost any Android phone on the market.
Read & Heed, Before You Proceed
Youll need to have the following components ready:- Your Samsung Galaxy S4
- Micro USB cable
- A Windows PC
If you have the Verizon Galaxy S4 with ME7 firmware, or AT&T Galaxy S4 with MF3 firmware, unfortunately your bootloader is locked, so you wont be able to install a custom recovery at all. Attempting to install a recovery like ClockworkMod or TWRP will likely turn those GS4 variants into nothing more than shiny, expensive paperweights.
Even if your Galaxy S4s bootloader is locked, you can still attain root with this method.
Step 1: Enable USB Debugging
Youll need to have Developer options enabled, which you can easily do by following Faisals softModder guide. You can then access Developer options by going to your GS4s Settings -> More, and itll be the second from the bottom. Tap on it, then make sure USB debugging is checked.

Step 2: Download & Install Kingo Root on Your PC
This one-click rooting method is provided by Kingo. You can grab the PC software from their download page. The download should start within a few seconds of opening the page on your computer. If you have another device to root, Kingo probably supports it too (just make sure to check out their list of compatible devices for reference).Once youve downloaded the file, open it up and run the installer, then open up the program.

Step 3: Connect Your GS4 to the PC
Connect your Galaxy S4 to your computer with the micro-USB cable. Kingo Root will detect it and start installing the devices drivers (if necessary).


Step 4: Get Ready to Root!
You should now be at this screen in Kingo:

Step 5: Verify Root with Root Checker
Download joeykrims very popular Root Checker app from Google Play, which verifies whether your device has root or not.


Youre Rooted! Now What?
With root privileges on your device, you can now install apps and mods that require root access. One of the most popular modifications to install is the Xposed framework. Its quite simple to install, and once its on your phone, you can add all sorts of mods and customizations.If you have any questions, or had any trouble with this rooting method, feel free to ask for help in the discussion section below.
Sunday, December 3, 2017
How to install android lollipop on Samsung Galaxy S4 Mini GT I9190 and GT I9195
How to install android lollipop on Samsung Galaxy S4 Mini GT I9190 and GT I9195

How to install android lollipop on Samsung Galaxy S4 Mini GT I9190 and GT I9195
WARNING! Unofficial ROMs for the Samsung Galaxy S4 Mini.
(GT-I9190 and GT-I9195 variants only!)
CyanogenMod is a free, community built, aftermarket firmware distribution of Android 5.0 (Lollipop), which is designed to increase performance and reliability over stock Android for your device.
* Your warranty is now void.
*
* We are not responsible for bricked devices, dead SD cards,
* thermonuclear war, or you getting fired because the alarm app failed. Please
* do some research if you have any concerns about features included in this ROM
* before flashing it! YOU are choosing to make these modifications, and if
* you point the finger at us for messing up your device, we will laugh at you.
*
CyanogenMod is based on the Android Open Source Project with extra contributions from many people within the Android community. It can be used without any need to have any Google application installed. You will need to provide your own Google Applications package (gapps). CyanogenMod does still include various hardware-specific code, which is also slowly being open-sourced anyway.
All the source code for CyanogenMod is available in the CyanogenMod Github repo. And if you would like to contribute to CyanogenMod, please visit our Gerrit Code Review. Your changelog is whatever was merged into gerrit.
Downloads
GT-I9190
GT-I9195
GAPPS (PA GAPPS)
PA GAPPS DIFF
Installation
3-button-combo = "Volume Up" + "Home" + "Power"
- First time flashing CM12 to your Galaxy S4 Mini (or coming from TouchWiz/Stock Based ROMs)?
Root your device and install a Custom Recovery (CWM, TWRP, Philz Touch)
Reboot into Recovery using 3-button-combo
Do a Nandroid Backup!
WIPE (wipe data/factory reset + wipe cache partition + format /system partition)
Install the ROM from internal/external sdcard using a Custom Recovery (CWM, TWRP, Philz Touch)
Optionally install Google Apps
Done! You can now reboot the phone to enjoy the rom
- Upgrading from Official CM10.2/CM11?
Reboot into Recovery using 3-button-combo
Do a Nandroid Backup!
WIPE (wipe data/factory reset + wipe cache partition + format /system partition)
Install the ROM from internal/external sdcard using your Custom Recovery (CWM, TWRP, Philz Touch)
Optionally install Google Apps
Done! You can now reboot the phone to enjoy the rom
- Upgrading from another build of CM12?
Reboot into Recovery using 3-button-combo
Install the ROM from internal/external sdcard using your Custom Recovery (CWM, TWRP, Philz Touch)
Optionally install Google Apps
WIPE Dalvik/ART Cache (wipe cache partition + wipe dalvik cache)
Done! You can now reboot the phone to enjoy the rom
GOTO DOWNLOAD PAGE CLICK HERE
Saturday, December 2, 2017
How to Install Samsung Galaxy S4 E300K 4 3 Jelly Bean Firmware E300KKKUENA2 Firmware Update Guide
How to Install Samsung Galaxy S4 E300K 4 3 Jelly Bean Firmware E300KKKUENA2 Firmware Update Guide

Important Note:
Android 4.3 Jelly Bean E300KKKUENA2 Official Firmware Download List
Previous Firmware Build:
Samsung Galaxy Note 3 SM-N900- How to Install N900XXUDNA6 Android 4.4.2 KitKat Firmware.Samsung Galaxy S4 GT-I9500 How TO Root I9500XXUEMK8 Android 4.3 Jelly Bean Firmware
How To Root R950VXUBMK3 Android 4.3 Jelly Bean Firmware Running on US Cell Samsung Galaxy Note 2
How To Root L710VPUCMK3 Android 4.3 Jelly Bean Firmware Running on Samsung Galaxy S3
Samsung Galaxy I9205 Mega 6.3 JB Firmware How to Install I9205XXUCML8 4.2.2 Update Guide
Pre-Requisites:
- Check battery percentage, your device should have at least 60% battery power
- Turn on USB Debugging mode, go to Settings-Developer Options-USB Debugging
- Backup important data and settings to external storage- follow this guide
- Install USB driver for your device on your computer- Download Samsung USB Driver
Points to be noted:
- If you are using any Custom ROM such as- CyanogenMod, Paranoid Android, AOKP, SLIM ROMs etc, then it�ll replaced by this official Stock ROM
- Custom Recovery (CWM or TWRP Recovery) will be replaced by Stock Recovery
- After flashing official firmware, your device will no longer belongs to rooted device. However you can root your device any time after flashing the firmware.
How to Install Android 4.3 Jelly Bean Official Firmware on Galaxy S4 E300K through Odin:
- Download Android 4.3 KKUENA2 Firmware for Galaxy S4 E300K from the above list
- Download Odin 3.09
- Switch off your phone and boot Galaxy S4 E300K into Download Mode by pressing and holding the Volume Down+Home+Power buttons (long press until the boot screen appear), now press Volume Up key to proceed to Download Mode.
- Extract the downloaded Odin3.07 zip file and run the Odin3 v3.07.exe file as an administrator (Right click on the .exe file and click on Run as administrator)
- Now connect your Galaxy S4 E300K to your computer via USB cable
- In Odin3 screen, you should see a COM Port number like �0:[COM7]� at ID:COM section and �Added!� text at the message box. This means your device has been detected by Odin3.
- Make sure that, only the �Auto Reboot� and �F. Reset Time� options are checked.
- Now, extract the downloaded firmware zip file, you�ll find a firmware file with extension .tar.md5
- In Odin screen, click on PDA button and select the firmware file with .tar.md5 extension (The firmware file look something like: E300KXXDLJ5_E300KODDDLI7_INU.tar.md5)
- Now, click on the Start button to begin the installation process, wait few moments.
- Once completed, you would see �PASS!� message in ID:COM port having green background
- Your phone should automatically reboot after completion
- You can now disconnect your phone from computer
- Finish
How to root Samsung Galaxy S4 C Spire SCH R970X
How to root Samsung Galaxy S4 C Spire SCH R970X