Wednesday, January 3, 2018
How To Make your Own Browser For Free
How To Make your Own Browser For Free

Hello Readers Now you can�make your own browser�within minutes with Make My Browser.Actually �average people world-wide spent many hours on the internet every week i This includes all generations, ranging from seniors, Baby Boomers, Have you ever wondered how much of your precious�time you spend online? Take it a step ahead, what do you spend your time on when you�re online? If you�re one of those people that run a blog on the internet or manage a website, you�re essentially publishing information on the web.
How to make persenol bot 100
How to make persenol bot 100
Sub Se Pehle Hum Ne
Www.2freehosting.com
Pe Account Banana Hai.
1?Apna Poora Naam Likhe.
2?Apna Email Type Kare.
3?Dono Boxes Mein Kam Se Kam 6 Words Ka Koi Password Type Kare.
4?Captcha Fill Kar Ke Sign Up Pe Click Kare.
Step 2.
Jaise He Aap Sign Up Pe Click Karoge Apke Email Pe Confirmation Msg Aaya Hoga. Jaha Se Apna 2FreeHosting Ka Account Confrm Kare.
Aur Uske Bad
? Free Hosting Plan
Par Click Kare.
Step 3.
Ab Apne Bot Site Banani Hai Jo Aap Neeche ScreenShot Ko Follow Kar Ke Bana Sakte Hai.
Step 4.
Create Pe Click Karne Ke Baad Apki Site To Ban Jayegi.
Lekin Abhi Tak Wo inactive Hai.
Step 5.
Ab Isko Active Karne Ke Leye Page Refresh Kare.
Aur Jab Page Refresh Ho Jayega To Apki Site Active Ho Jayegi Aur Phir Switch Pe Click Kare..
Step 6.
Ab Files Wali Tab Mein File Manager Ko Select Kare.
Step 7.
Ab File Manger Ko Install Karne Ke Karne Ke Leye install Par Click Kare. Kabhi Kabhi Aisa Hota Hai.
ke Pehli 3 Ya 4 Dafa File Manger install Nahi Hota ,
To Aap Bar Bar Click Karte Rahe 4 Se 5 Bar Try Karne Par install Ho Jayega..
Step 8.
Jab File Manger install Ho Jayega To Automatic Open Ho Jayega.
Waha Pe Default Wali File Hogi. Us Pe Right Click Kar Ke Pehle usko Delete Kare.
Aur Phir Upload Wale Button ko Press KAre.
Step 9.
Ab Aap Ne Script Download Karni Hai.
Jis Ko Download Karne Ke Leye Yaha Click Kare.. Secript DOWNLOAD
Script Download Kar Ke Usko Extract Kar Lein.
Aur Us Mein 2 Files Hogi.
Aik Ka Naam
? index.php
Aur Dosri Ka
? beranda.php
In Dono Files Ko Upload Karna hai.
Jaise keh Maine Step8 Mein Bataya hai.
Step 10.
Jab Dono Files Upload Ho Jaye. To Beranda Wali file Pe Right Click Kar ke
link download
Tuesday, January 2, 2018
How To Make Blogger PageList Widget Nofollow
How To Make Blogger PageList Widget Nofollow
<b:widget id=PageList1 locked=false title=Pages type=PageList>
<b:includable id=main>
<b:if cond=data:title><h2><data:title/></h2></b:if>
<div class=widget-content>
<b:if cond=data:mobile>
<select expr_id=data:widget.instanceId + "_select">
<b:loop values=data:links var=link>
<b:if cond=data:link.isCurrentPage>
<option expr_value=data:link.href selected=selected><data:link.title/></option>
<b:else/>
<option expr_value=data:link.href><data:link.title/></option>
</b:if>
</b:loop>
</select>
<span class=pagelist-arrow>&#9660;</span>
<b:else/>
<ul>
<b:loop values=data:links var=link>
<b:if cond=data:link.isCurrentPage>
<li class=selected><a expr_href=data:link.href><data:link.title/></a></li>
<b:else/>
<li><a expr_href=data:link.href><data:link.title/></a></li>
</b:if>
</b:loop>
</ul>
</b:if>
<b:include name=quickedit/>
</div>
</b:includable>
</b:widget><b:widget id=PageList1 locked=false title=Pages type=PageList>
<b:includable id=main>
<b:if cond=data:title><h2><data:title/></h2></b:if>
<div class=widget-content>
<b:if cond=data:mobile>
<select expr_id=data:widget.instanceId + "_select">
<b:loop values=data:links var=link>
<b:if cond=data:link.isCurrentPage>
<option expr_value=data:link.href selected=selected><data:link.title/></option>
<b:else/>
<option expr_value=data:link.href><data:link.title/></option>
</b:if>
</b:loop>
</select>
<span class=pagelist-arrow>&#9660;</span>
<b:else/>
<ul>
<b:loop values=data:links var=link>
<b:if cond=data:link.isCurrentPage>
<li class=selected><a expr_href=data:link.href rel=nofollow><data:link.title/></a></li>
<b:else/>
<li><a expr_href=data:link.href rel=nofollow><data:link.title/></a></li>
</b:if>
</b:loop>
</ul>
</b:if>
<b:include name=quickedit/>
</div>
</b:includable>
</b:widget>How To Make New mif file Tutorial
How To Make New mif file Tutorial
I have found the following tutorial on some other forum where appleorangefruit has written this.
So, I decided to share this tutorial with the members of this forum. I hope this will help to those people who wants to make their own .MIF file.
Remember I am not the author of this tutorial. Therefore all credit goes to its real authorappleorangefruit.
Further try this method at your own risk and cost. I�ll not be responsible if some go/happened wrong.
Furthermore as I have earlier mentioned I am not the real author so please don�t ask any question regarding any issue arises during the making of the same.
INSTRUCTION TO CONVERT JPEG TO .MIF
01. Download Sisunpacker---
02. Open it press file -- New package -- Empty package
03. Un-tick 3rd edition and tick 5th edition
04. Press content tab in it (which is left to Pkg)
05. Press add entry and choose any random .MIF (Just temporary: You can download it from here )
05. Press Ok.
06. Double click on the Content.
07. A window will open with some "Entry 01 xxx KB" , Now Pause, Do not close any window just minimize....
08. Go to Convert JPEG to SVG files
09. Upload a Jpeg image you want to convert it to.MIF
10. Within 4 seconds u will get the output in SVG, download it.
11. Now keep the SVG file and delete the JPEG (now it is of no use)
12. Now open the minimized window of SISunpacker
13. Right click on the content press replace and select your .SVG which you downloaded online after converting.
14. Click OK
15. Press Extract and save to your desktop
16. Now you will get a .MIF image of your JPEG
17. Enjoy!!!
18. It is very simple but looks complicated
19. Just keep this page open and work simultaneously step by step, it is very easy
How to Make Bootable USB Pendrive Install Windows 7 and 8 Using USB
How to Make Bootable USB Pendrive Install Windows 7 and 8 Using USB


Let have a Look to Windows 8 First because it is Latest one.
Steps and Requirement are as Follow for Making Windows 8 or 8.1 Bootable:
- You will Require Windows 8 or 8.1 ISO image file. (Download it from here)
- You will Require Windows Bootable Maker Software for Writing ISO image to USB or DVD. (Download it from here)
- Now Select ISO image file you Downloaded of Windows 8.
- Now in Select USB option select the Letter of USB drive showing.
- Tick the Format Drive Option and Click on Create.
- Now leave the Software to work and have a Tea or Coffee as It gonna take a Long time. :p


Steps and Requirement are as Follow for Making Windows 7 Bootable:
- Download Windows 7 ISO image.
- Download Windows 7 Boot Maker Software.
- Now Install the Windows 7 Boot Maker Software. Just like Next,Next,Install and Finish.
- Now Run the Windows Boot Maker Software.
-

- Now Select Where you want to Create a Bootable USB or DVD.

- Now if you Choose USB then,


- And If you Choose DVD then,


- Now you are Done. Your Bootable USB or DVD is now Ready.Huuu..!!

- Download Windows 8 ISO image
- Download Windows 8 USB boot Maker Software
- Download Windows 7 ISO image
- Download Windows 7 USB boot Maker Software
How to Make Inverter circuit Simple 40w Inverter circuit for beginner
How to Make Inverter circuit Simple 40w Inverter circuit for beginner

Hey D.I.Y makers welcome.
In this post, I am Sharing Simple Inverter Circuit for beginners.
The heart of the circuit is a CD 4047 IC which is wired as an astable multi vibrator here.
Resistance and Capacitance at pin 1&2 determines the out put frequency.Here it is set to 60Hz.
Due to this a two 180 degree out of phase ,120 Hz , 50% duty cycle waveforms will appear at pin 10 & 11.
[ First wire to oscillator part only.Then check out put Pin 10 &11 of CD4047 to obtain the required wave forms ( two 120Hz ,180 degree out of phase,50% duty cycle waves.
Then connect transistors ,transformer and load (25 W bulb for test). ]
These waves are amplified by the complementary symmetry amplifier made of transistors BC 337 & TIP 3055 to drive the out put transformer.
220-110-0 primary,12-0-12 secondary , <50W transformer.
You can select output voltage of 110V or 220V by a two way switch using such a transformer.Don�t worry if you don�t have such a transformer, a simple 220 to 12-0-12 will also do the trick sacrificing the 110V option or vice versa.The best way to get a transformer is to break all useless electronic devices in your trash.Most probably you will find the transformer.

Monday, January 1, 2018
How to make a Windows 8 startup message
How to make a Windows 8 startup message
Here�s how to create a custom screen message before entering Windows.
VB Scripting
Go to the folder below
C:Users[Username]AppDataRoamingMicrosoftWindowsStart MenuProgramsStartup
Create a text file with extension .vbs e.g. msg.vbs

Once created, open the file in notepad and write the following command: msg �your message�
| msg �Hi, don�t forget all the things that you need to submit�� |
Restart your computer to see the results�

That�s it!
Using Windows Registry
Open your registry editor by pressing Win+R and type �regedit�.

Once the editor is open, go to the following folder
HKEY_LOCAL_MACHINESOFTWAREMicrosoftWindowsCurrentVersionPoliciesSystem
or
HKEY_LOCAL_MACHINESOFTWAREMicrosoftWindows NTCurrentVersionWinlogon
Find the two registry names or create them by using New �> String Value Menu at any vacant space of the tool.
LegalNoticeCaption
This is where the Title or Caption of the message located upon entering the Welcome Screen e.g. Disclaimer Notice
LegalNoticeText
This is where your message is being inputted.
Using a tweakui tool
WinBubbles-lite is a small program to access windows 7 and above customizations. You�ll be able to apply the tweak easily by entering the caption and message then afterwards press Alt-A. To see the results, see your message by clicking the View Button.
Thanks for reading the article!
Sunday, December 31, 2017
How To Make Galaxy S4 Look Like Galaxy S5
How To Make Galaxy S4 Look Like Galaxy S5
How to convert Samsung galaxy s4 into An S5
 |
| By Following Our tutorial you will be able to Get the blend of s5 in your s4 |
How To Make Galaxy S4 Look Like S5 - guide
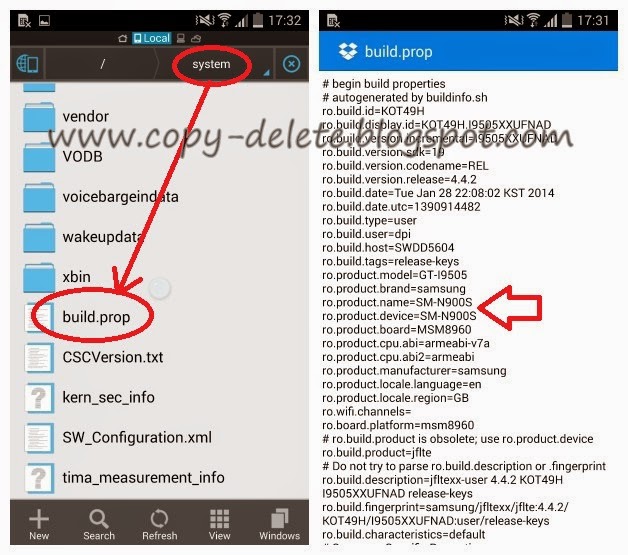 |
| How to enter in build.prop and change ro.product.name and ro.product.device |
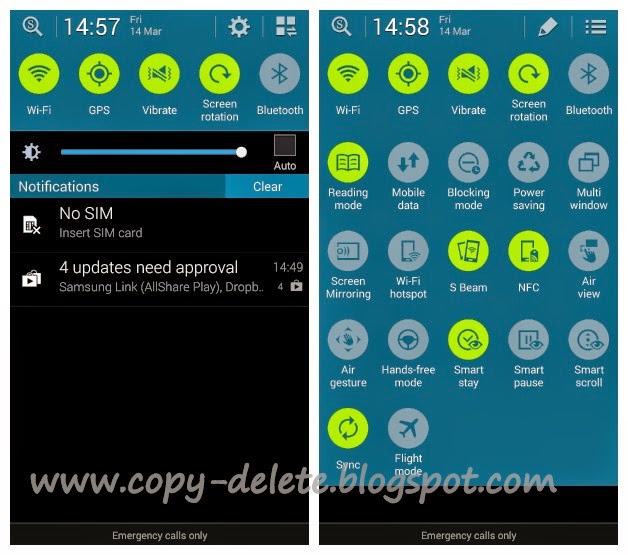 |
| After changing device name you will get new s5 icons on your galaxy s4 |
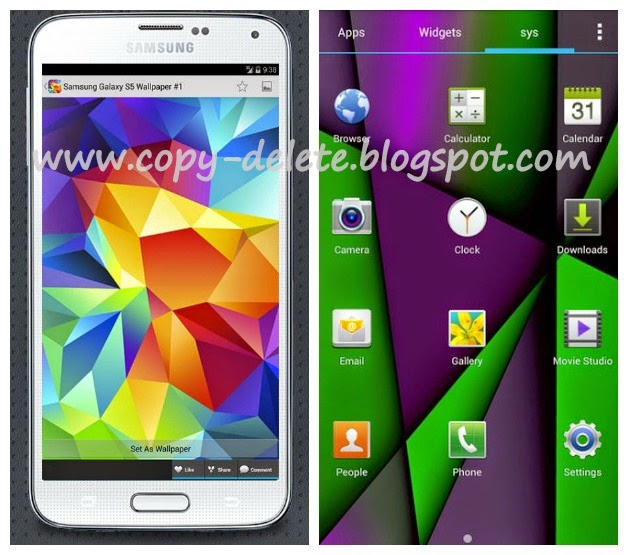 |
| A look of Galaxy S4 After using galaxy S5 wallpaper |
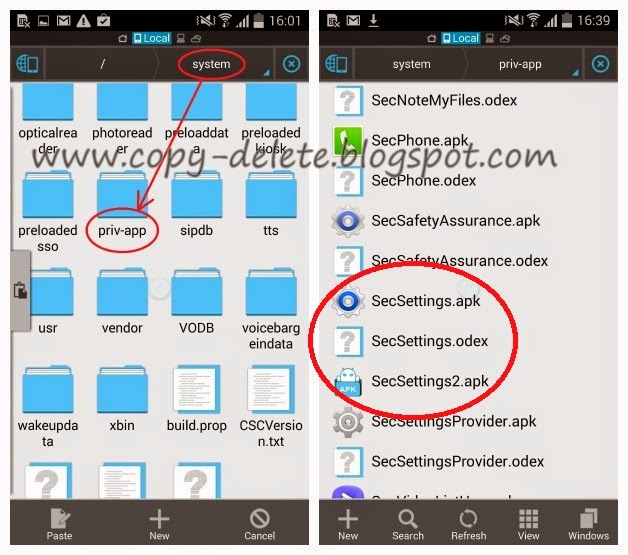 |
| place the apk in system/priv-app folder and rename it like the already present secsettings.apk |
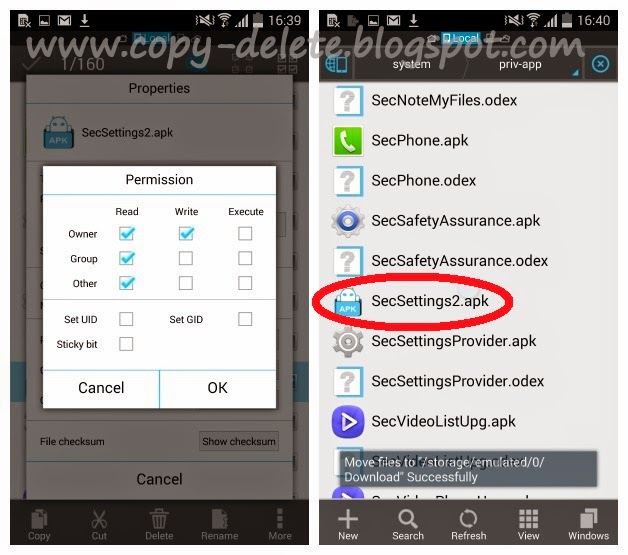 |
| Set the new apks permissions shown in left , Now remove the original secsettings.apl and odex too |
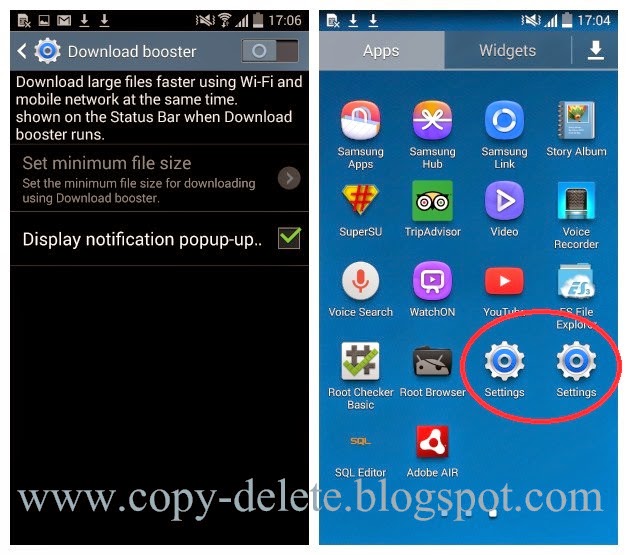 |
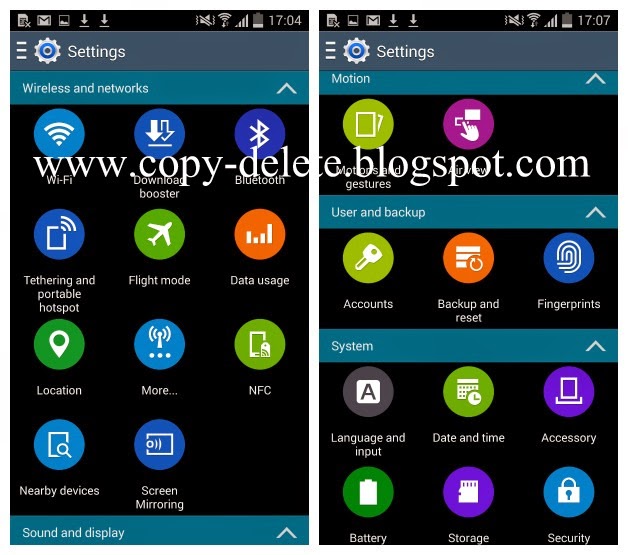
| Download booster (left) two settings menu present in app drawer |
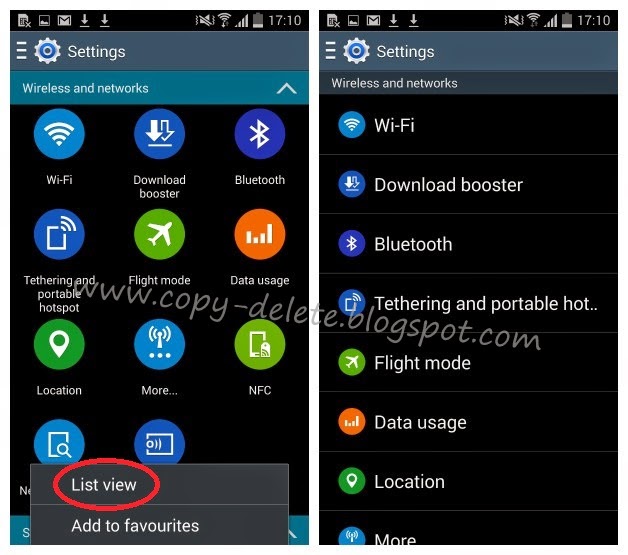 |
| incase if you dont like big circles settings icons you can switch to list view Just follow the above steps and make you samsung galaxy s4 look s5 without upgrading . Do you know any other way to transform galaxy s4 into a s5 please let us know |
how to make your android phone in to wifi htspot
how to make your android phone in to wifi htspot
 For making your phone as wifi hotspot
Go to stetting then click on more
then click on Tethering & portable hotspot
then click on set up wifi hotspot
then u can change Network SSID anything or your name or what you want
and create a password and save
then check on the Portable Wi-Fi hotspot


How to make your phone look like a Pixel 2
How to make your phone look like a Pixel 2
The Pixel 2 is a distinctive phone with a distinctive home screen.
Every phone from Google debuts with a home screen that shares Googles vision of a launcher. The Google Now Launcher that shipped with the Nexus line is still one of the most popular launchers on Android, even though it was supposed to be retired over six months ago. The Pixel Launcher that ships with Googles Pixel 2 and Pixel 2 XL has not been published to Google Play for all of us to enjoy, but never fear! We can make use third-party launchers to get the same look � or even better versions of it.
First, a quick note about Lawnchair Launcher: Lawnchair can do an OG Pixel theme spectacularly. It doesnt have the dock search bar yet, but it does have Pixel folders and Adaptive icons. Adaptive icons on Pixel Launcher arent quite as good as Action Launcher or Nova Launcher, but Lawnchair is definitely the easiest way to get a Pixel theme sans dock search bar: install, open and set up your icons the way you want.
Wallpapers
Usually, when we post themes like these, we link you to a small selection of stock wallpapers from the device, and then I tell you to ditch those and go with a more fun wallpaper instead. For the Pixel theme, I dont have to do that. Googles Pixel phones use the Google Wallpapers app, and while there are still a few device exclusives, there are hundreds of wallpapers from Googles collections, Google Earth and Google+ to give your home screen a clean, crisp look. If youre looking for the rainy day wallpaper, its not in Google Wallpapers, but its been spread far and wide thanks to Redditors and Pixel fans over the last few weeks.
- Open Wallpapers.
- ?Tap the section you want a wallpaper from.
?Tap the wallpaper you want.
- ?Tap Set wallpaper.
?Tap which screens you want apply the wallpaper to.
At A Glance widget
Theres a native At a Glance widget that was recently added to Action Launcher, but the best At A Glance widget is a third-party affair called Another Widget. It allows you to change the fonts, font sizes, which calendar appointments and how many are shown at a time. Its been rapidly updating and improving, and its color-customizable, which is excellent for anyone who might want to go beyond Pixel white and get something a little bolder.
- Long press your home screen.
- ?Tap Widgets.
? Under Another Widget, press and drag Another Widget to the top of your home screen.
- ? In the configuration screen that appears, scroll down and tap See your Events.
- ?Tap Allow.
?Scroll down further and tap Control the Weather.
- ?Tap Allow.
- ?(Optional) Scroll down and tap Tap on weather opens.
Tap the weather app you want to open.
Adaptive icons
Adaptive icons are here, and no doubt they will improve, but until then, weve got a few options. If you use Action Launcher, they have AdaptivePack, an Action-exclusive icon pack that gives hundreds of popular apps Adaptive icons. Nova Launcher doesnt have an exclusive pack but instead offers a masking option that will give legacy icons colored backgrounds instead of the plain, boring white that Googles Pixel Launcher � and sadly, several Google apps � use with their Adaptive icons.
Applying Adaptive icons on Nova Launcher
- Open Nova Settings.
- ?Tap Look & feel.
?Tap Adaptive icon style.
- ?Tap the shape you want.
?Tap Reshape legacy icons if you want Nova Launcher to add adaptive shapes and colored backgrounds to apps that dont have adaptive icons.
Applying Adaptivepack on Action Launcher
- Open Action Settings.
- Tap Icon pack.
Tap Adaptivepack.
- Tap Icon appearance & App Shortcuts.
- Tap Adaptive Icon style.
- Tap the icon style you want.
- Tap OK.
Dock search bar
The Pixel 2 is a Google phone, and as a Google phone, its got a Google search bar on it. This year, as displays stretch taller and taller, Google has opted to move their search bar down to the dock, where its easier to reach and accidentally tap while reaching for one of your apps. Huzzah.
Applying a dock Quickbar in Action Launcher
- Tap Action Settings.
- Tap Quickbar.
Tap Style.
- Tap Search bar (dock).
- Tap OK.
Round the corner size to 100%.
You can long-press the items under layout to change the colors if you want. The default dock style includes colored logos, but I prefer the more subtle white icons. White goes with a wider array of wallpapers and icon packs, while the colored icons are more true to the actual Pixel 2 home screen. The Quickbar color can be any of the shades Quicktheme offers, though white is the most traditional.
Applying a dock search bar in Nova Launcher
- Open Nova Settings.
- ?Tap Dock.
?Tap Searchbar in dock.
- ?Tap Searchbar below icons or Searchbar above icons (your preference).
- ?Go to the home screen.
?Long press your new dock searchbar until a menu appears.
- ?Tap Edit.
- ?Tap the rounded bar style.
?Tap the logo style you want.
- ?Tap Bar color.
- ?Tap the color and transparency you want. White is what the Pixel Launcher uses, but colors may mesh better with your wallpapers/icons/theme.
?Tap Done.
Pixel Folders
Folders on Pixel devices havent changed from last year, which means they are nice and easy to apply. In fact, the Pixel folder style is the default on both Action Launcher and Nova Launcher for new users. If you had another style set up previously, heres how to change back to the Pixel folder style.
Applying Pixel folders in Nova Launcher
- Open Nova Settings.
- Tap Folders.
Tap Folder preview.
- Tap Grid.
- Tap Folder background.
Tap Pixel Launcher.
- Tap Background.
Select the color and transparency you desire. White is the traditional color, but feel free to pick a color to compliment your wallpaper instead.
Applying Pixel folders in Action Launcher
- Tap Action Settings.
- Tap Folders & Shutters.
Tap Style.
- Tap Adaptive if you want your folders to have the same shape as your adaptive icons. You can also select Circle if you want round folder icons even while using other adaptive icon shapes.
- If you want just the shape outline, but not a tinted background of your folder icon, you can tap the (outline) option.
Tap Folder icon background.
- Tap the color you want. White is the traditional color, but feel free to pick a color to compliment your wallpaper instead.
- Tap OK.
- Tap Folder & Shutter background.
- Tap the color and transparency you want. White is the traditional color, but feel free to pick a color to compliment your wallpaper instead.
Tap OK.
Your turn
So, how do you get your Pixel on? Are you an above the icons or below the icons dock search bar user? Do you go with adaptive icons or still rock a dedicated icon pack? Does Google Wallpapers rule your screen or do you let your fandoms fly on your desktop?
Whatever your style, share it with us in the comments below!
from Android Central - Android Forums, News, Reviews, Help and Android Wallpapers
