Thursday, January 4, 2018
How to set font style for Amnotes surface texture symbols
How to set font style for Amnotes surface texture symbols
In the Options dialog on the AM:Standard tab (the AMOPTIONS command) double-click on the standard (e.g. "DIN") on the top of the tree (on the right). In the "Standard Properties" dialog then check the option "Link to Dimension Style", click on the radio button "Apply to Leaders Only" and in the list of predefined text styles select the required style (font).
For a one-time change of the font you can also directly set the text style ACISOTS.

Tuesday, January 2, 2018
How To Set Free Live Cool Themes For Android
How To Set Free Live Cool Themes For Android
Do you download free live themes for android? But don�t know to set those cool themes for android? Read our tutorial to set your free live themes as wallpaper.
Downloading themes app for android is the only way to customize your smartphone. You can download free themes android phone very easily. But this will be useless, if you don�t know how to set your downloaded free live themes.
By the by if you don�t know to download free live themes for android, read our collection of awesome free cool themes for android. And choose your best live themes for android and just click on the download link. When download is completed, you can instantly install it from Google Play Store.
Setting free live theme for android is most easy work to do. After reading this article, you think, that�s all I have to do to set theme apps for android! Amazing!
 |
| Steps to set live wallpaper |
 |
| Final steps for wallpaper set up on android |
Now follow my guide step by step to set your downloaded free themes for android phone.
- Unlock your android phone and tap on the menu button. The button you find on your left most side.
- Now you will see a pop-up menu containing various options such as Theme, Wallpaper, etc.
- If you want to change your themes at first you need to download free themes app for android, but we�re to change our live wallpaper. So tap on the Wallpaper option.
- You will find another pop-up menu containing some options as before. Now tap on the Live Wallpaper option.
- This will lead you to a list of android live wallpaper. Tap one of them to see the live theme.
- If you like one, just click on the Set Wallpaper option. Now navigate to the default screen by tapping Back button or Home Button. Your live wallpaper is now activated.
Thursday, December 28, 2017
How to set Videos and animations as your desktop background
How to set Videos and animations as your desktop background

Download and Run the DreamScene Activator as Administrator. In case you get an unhandled exception error, simply click on Continue.
Next, click Enable DreamScene.
The Explorer will now restart and DreamScene will be enabled.
After the explorer has restarted, the user will be able to use DreamScene.
This program supports .mpg & .wmv video formats.
right click on a video and Set as desktop background(Set as DreamScene). By right clicking on the desktop you can pause or play DreamScene!!
Need Help For Download
Monday, December 25, 2017
How To Set Live Wallpaper in micromax bolt A47
How To Set Live Wallpaper in micromax bolt A47
Live Wallpaper Support for Micromax Bolt A47

be categorized as smartphone . Crawling Through web and forums i found 1 Question commonly asked by many People
** I am not able to set live wallpaper on MICROMAX BOLT A47
** How to set live wallpaper on micromax Bolt A47
** How To use Live wallpaper on micromax Bolt A47
Dont miss :- How To Install Whatsapp On Java Devices
So if you are a Bolt A47 User and want to set live wallpaper on your micromax Bolt A47 Then you are at right Place we will give you a solution on How to set live wallpaper On micromax Bolt a47
What are Live wallpapers ?
Live wallpapers are those Images / Wallpaper That are animated .
Live wallpapers basically respond when we touch them .
Have a look at :- How To Increase Touch Screen Sensitivity Of Android Smartphone Without Rooting
How To Set Live wallpaper On micromax Bolt A47 - Guide
Step By Step Guide :-
** First of all root your Micromax Bolt A47
** Charge it upto 60 %
** Download This 2 Mb Package
Download Live wallpaper Fixer For Bolt A47 HERE
** Extract the Zip you will get 2 Files After Extracting
Livewallpapers.apk
Livewallpaperspicker.apk
** Save them to a new folder
** Now Go to System >app and paste them
** Or you can use System app installer . apk
** Reboot your Bolt A47 and enjoy live wallpaper
You may also like :-
What To Do if smartphone fell in water - Fix Wet smartphone
Hurrey ! you have sucesfully Set Livewallpaper in your micromax Bolt a47
More related terms :-
How to set live wallpaper on micromax Bolt A47
I am not able to set live wallpaper on MICROMAX BOLT A47
How To use Live wallpaper on micromax Bolt A47
Livewallpaper Software for micromax Bolt A47
Sunday, December 24, 2017
How to Set Full Size Profile Picture on Whatsapp Without Crop for sock rom go to rompure com
How to Set Full Size Profile Picture on Whatsapp Without Crop for sock rom go to rompure com
READ ALSO
? HOW TO SAVE YOUR WHATSAPP STATUS PICTURES AND VIDEOS TO GALLERY
How to Set Full Size Profile Picture on Whatsapp Without Crop
Squaredroid is an Android app that allows you upload full size photos on Whatsapp, facebook, instagram, twitter and other social media without cropping.

2. Launch SquareDroid and tap the "Square Profile Photo" button. Next, you scroll through your gallery to choose a picture you wish to use as your WhatsApp profile picture


4. Next, youll notice some image editing tools such as rotate, scale, crop, save etc. You may wish to edit the image to suite your taste. Notice the floating color palette icon, this helps to change the image border type.
Once youre done simply save the image by clicking the Save button, then select save format and tap Save Photo.

It will automatically fit in the Whatsapp crop size and Click Done to set as your Whatsapp profile photo.

You can now upload anybody your photo as your Whatsapp profile photo without cropping thanks to Squaredroid.
If you any app similar to squaredroid that can make you square your photo, feel free to notify us using the comments.
Wednesday, December 20, 2017
Saturday, December 16, 2017
How to set up Nokia Messaging e mail account on my Nokia N97 or N97 mini device
How to set up Nokia Messaging e mail account on my Nokia N97 or N97 mini device
You can set up your e-mail account by using the e-mail setup wizard in your device. The wizard allows you to set up the following types of e-mail accounts:
- POP / IMAP internet mail account for direct access to e-mail server. With this e-mail account you need to manually update your mailbox or retrieve the messages at defined times.
- Nokia Messaging mail account. This is Nokia consumer service where you can automatically synchronize your mailbox ("push" service) with popular internet based e-mail services (e.g. Yahoo! Mail, Google Mail, Windows Live Hotmail, Ovi Mail) as well as with POP / IMAP servers.
- Mail for Exchange mail account. With this e-mail type you get access to Microsoft Exchange corporate e-mail
This article describes how to set up the Nokia Messaging e-mail account (case 2 above). The mailbox will be added in Menu > Applications > Email.
Note that the Nokia Messaging service may not be available in all countries and operator networks.
Start the e-mail setup wizard. You can find the wizard in the following ways:
- Select Set up e-mail if shown on your home screen.
- Select Menu > Applications > Sett. wizard > E-mail setup (or Menu > Applications > E-mail setup).
- Select Menu > Messaging > Options > Settings > E-mail > Mailboxes > Options > New mailbox.
When the setup wizard starts, select the following (note that the questions may vary depending on the Nokia Messaging version in your device):
- Select Start.
- Select OK if prompted to install Nokia Email client.
- Select Yes when prompted to allow the application to use the network to send or receive data. The setup wizard will need to access the network in order to complete your configuration. Depending on your operator contract, this may involve some data transfer charges. Wait for the wizard to establish a network connection.
- Select Start when prompted to start the E-mail setup
- If prompted to select the E-mail service, select your service provider from the list (Ovi Mail, Yahoo! Mail, Gmail, Windows Live Hotmail etc.).
- Enter your E-mail address and select OK.
- Enter your E-mail password and select OK.
- If prompted to add the email address to your Nokia Messaging account, allow Nokia Messaging account to be activated or the email address to be added to your account (Yes! Activate my Nokia Messaging account or Add to my Nokia Messaging account)
After this, the mailbox will be created and can be accessed by selecting Menu > Applications > Email. If you want to add the mailbox to the home screen, long press an empty space on home screen, select Add content and then E-mail widget. If you have several mailboxes configured, the desired mailbox can be selected in the widget settings (long press the E-mail widget and select Settings). One mailbox at a time can be viewed on the home screen.
The mailbox settings can be modified later on by selecting Menu > Applications > Email > Options > Tools > Settings.
Thursday, December 14, 2017
How To Set Whatsapp Profile Picture Without Cropping
How To Set Whatsapp Profile Picture Without Cropping
How To Set Profile Picture On WhatsApp Without Cropping

How to install Whatsapp on Java Devices

How To Use Two Whatsapp account in One Android Phone Without rooting
How To Set Whatsapp Profile Picture Without cropping - Method

Now save the photo by tapping the save / floppy disc icon on the top.

Hope Our guide on How To Set Whatsapp Profile Picture Without Cropping Helped You .
Monday, December 11, 2017
How to Set High Score On Unity C Script
How to Set High Score On Unity C Script

Highscore is the main part of the game, so in this tutorial we gonna to see how to set and reterive highscore with diffent scenes and differne scripts with very easiest method.
Advertisements
by using this methos you can store not only highscore also we can store string,float,int variable values permanently
there is no variable decalration or values assignment required,
so lets gets started. first we need a game scene to set high score.

{
if(currentscore > PlayerPrefs.GetInt("highscore");
PlayerPrefs.SetInt("highscore", currentscore);
}
From this code, i am checking current score by highscore, if current score is greater than high score then set new score as a high score..

To Assing High Score
PlayerPrefs.SetInt("highscore", currentscore);
highscore is an string like a varibale to store high score.
current score is an int variable
To Get High Score
int a = PlayerPrefs.GetInt("highscore");
Advertisements
we can use this methods for store string,int,float datatype values, also we can use/get values from any script we want..
To Download this project Click download below.

Saturday, December 9, 2017
How to set up layout to make plotting easier
How to set up layout to make plotting easier


Friday, December 8, 2017
How to Set Virtual Location on Unjailbroken iPhone
How to Set Virtual Location on Unjailbroken iPhone
iOS10 has been released but no official tool supports jailbreaking iOS10 at present. Can we set virtual location on our unjailbroken iPhone? Please keep on reading and find the solution.
In principle, we could modify the map data of backup data to add an option to set virtual location. This solution applies to iOS7 to iOS10. The virtual location is fixed without changing with space and the simulative location applies any App. If you want to restore, you could reboot your device.
Operations
1. Download the latest 3uTools and properly connect your iPhone to your PC. Click iDevice?Backup/Restore?Backup iDevice.

2. After backup, click "Backup/Restore"?"Backup Management", and click the backup data before. Click "View Now".

3. On �Backup Viewer�, click Apps and roll down to find �AppDomain-com.apple.Maps�.

4. Click Library?Preferences, and you can see �com.apple.Maps.plist� file and open it.

5. As below, roll down to the bottom, copy and paste the below codes before the codes </dict> and </plist>;
<key>__internal__PlaceCardLocationSimulation</key>
<true/>
Confirm with alignment and click �Save�.

6. Then we need to restore the backups to the device. Click Backup/Restore?Restore Data, and choose the revised data, click �Restore Now�. Just wait patiently.

7. Now we open iPhone default Maps and input a random location, we could see �Simulate Location� at the bottom of the screen which means the location is virtual now.
 iOS10 has been released but no official tool supports jailbreaking iOS10 at present. Can we set virtual location on our unjailbroken iPhone? Please keep on reading and find the solution.
In principle, we could modify the map data of backup data to add an option to set virtual location. This solution applies to iOS7 to iOS10. The virtual location is fixed without changing with space and the simulative location applies any App. If you want to restore, you could reboot your device.
Operations
1. Download the latest 3uTools and properly connect your iPhone to your PC. Click iDevice?Backup/Restore?Backup iDevice.
Wednesday, December 6, 2017
How to set LAPTOP NOTE BOOK as WIFI hotspot using any Network
How to set LAPTOP NOTE BOOK as WIFI hotspot using any Network
Click Here to download
- A laptop pc
- Internet connectivity via dongle or some other sources
- Connectify software
- Install the software
- Open up the software (you must make sure the Internet connection is turned on - using any medium)
- Enter a hot spot name and set a password of your wish.
- Click on start hotspot
Sunday, December 3, 2017
How To Set Up WhatsApp Desktop App For Windows PC
How To Set Up WhatsApp Desktop App For Windows PC

WhatsApp Desktop App Launched For OS X And Windows
You can now install WhatsApp desktop app for OX X running version 10.9 or higher and Windows 8 or higher. The native desktop app will be completely synced with your smartphone, stating that you will be able to see all your past conversation stacked perfectly and up-to-date. The syncing process will be the same for all mobile platforms, so it does not matter if you�re running WhatsApp on your Android or iOS.If you want to install the WhatsApp app on your desktop follow the step by step instructions given below.
Step 1: The first thing that you have to do is download the WhatsApp desktop app. You can do this by clicking here.
Step 2: Now install the app on your desktop. Once done, launch the app and a QR code will be displayed.

Step 3: Scan the QR code from the WhatsApp app with your smartphone running iOS or Android. Once you scan the QR code, you will see all your conversations synced to the desktop app.
We came to know about the WhatsApp desktop app in the start of May. For what it seems, it didn�t took long for the company to officially unveil the app.
Saturday, December 2, 2017
How to set up a server for Minecraft Game
How to set up a server for Minecraft Game
Friday, December 1, 2017
How to Set and Install Live Wallpaper on Android new
How to Set and Install Live Wallpaper on Android new

Installing Live Wallpaper
- Open Google Play on your device�s home screen.
- Scroll to the left on the top menu until you see �Categories,� then select it.
- Scroll down the list until you see �Live Wallpapers,� then select it.
- Browse through the selection of live wallpapers available. You can select �Top Paid,� �Top Free,� and �Top Grossing� on the top menu to view the most popular wallpaper in each category. Once you find the live wallpaper that you want to install on your device, select it.
- Select �Install� to install the live wallpaper.
Setting Your New Live Wallpaper
- Go into the �Settings� menu of your device.
- Select �Display.�
- Select �Wallpaper.�
- Select either �Home Screen� or �Home and Lock Screens.�
- Select �Live Wallpaper,� then choose the live wallpaper you installed from Google Play moments ago.
- Select �Set Wallpaper,� and you�re all set! You now have live wallpaper on your Android device.
How To Set Up WiFi Hotspot in Android
How To Set Up WiFi Hotspot in Android

Like an iPhone, Android phones too can be used to set up a WiFi Hotspot. This feature is available from Android Froyo. Suppose you have an internet pack enabled in one of your android phones and want to access the internet from another phone. That phone has no balance. Now you are stuck. So the best option will be to enable a WiFi Hotspot so that you can use a common internet connection for two or more mobiles. Doing so is very easy. Lets get started:
- Go to the Apps page on your Android phone and Click on Settings.
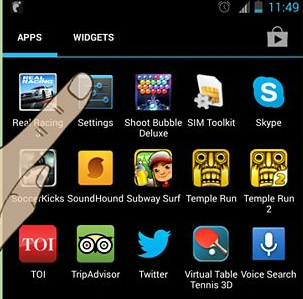
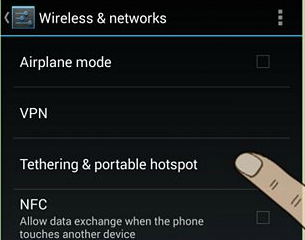
- Now click on Wireless and Networks.
- Click on Tethering and portable hotspot
- Click on Set up Wi-Fi hot spot
- Give a name to the Set up and give a strong password.
- Next enable the check-box next to Portable Wi-Fi hotspot.
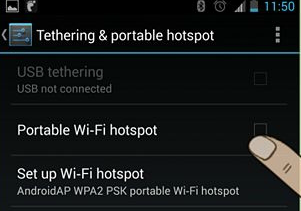
- WiFi hotspot will be created