Showing posts with label music. Show all posts
Showing posts with label music. Show all posts
Wednesday, December 27, 2017
How to Install Flash Firmware in Nokia 5800 Express Music
How to Install Flash Firmware in Nokia 5800 Express Music

The Procedure
You need these tools. So download them:
- Nokia Ovi Suite
- Navifirm
- JAF tool and Pkey (Nokia Flash Tools.rar)
- Dot Net framework (at least version 2 for WinXP user)
Install Nokia Ovi Suite & Backup Your Phone
Install Nokia Ovi Suite and back up your phone especially your contacts, message etc. In fact, just backup everything because prior to flashing your phone, we need to hard reset it and format your phone memory card to avoid any potential error later on. Hard reset will erase all your contacts, message, phone setting etc. So back them up using Nokia Ovi Suite.
Even if you don�t want to back up your phone, it is essential to install Nokia Ovi Suite for the driver purpose. Otherwise, JAF tool can�t see your mobile phone at later stage.
Return Your Phone Software to Its Original State
Format your phone memory card. You can do this using your phone or using a memory card reader. I personally prefer to format my memory card using my own phone. Go to : File Manager / E: Memory Card / Click on Options button / Memory card option / Format.
Next, hard reset your phone. You may achieve this using 2 methods: The first one is type *#7370# (the default security code is 12345) but I prefer the below method (bypass security code):
- Turn the phone off
- Press and hold 3 keys (green + red + camera) together.
- Without releasing these keys, turn the phone on.
- Keep holding these 3 keys until the screen show Nokia�s standard hand shake animation.
- Release these 3 keys. Your phone will execute hard reset process.
Okay, now your phone software is good as new.
Download Your Phone Original Firmware
Now we need to download your phone�s original firmware using NAVIFIRM. Originally, we flash our phone using Ovi Suite or PC Suite right. This suite automatically detects our phone hardware and software then downloads and installs the relevant firmware for our phone automagically. However, for this one we need to manually select and download the right firmware for our phone.
Extract and run NAVIFIRM. Mine is as shown below.

Choose your phone model correctly. As we can see here, there are 3 variant of Nokia 5800XM. The RM-356, RM-427 and RM-428. Different model number use different kind of hardware. So, do not download firmware for RM-427 or RM-428 if your phone model is RM-356. You can check your phone model by typing *#0000#. Look for Type.
�Release�s is firmware version. Ensure that the firmware you are going to flash into your phone (the one you are about to download using NAVIFIRM now) is newer (or at least has same version number) than the one that already in your phone. Downgrading firmware will definitely brick your phone. You may check with your phone firmware by typing *#0000# too. As for my case, my current phone firmware is 51.0.6. So, I have to download �releases� version 51.0.6 or later (in this case, 51.0.6 is the latest one).
Next, choose your phone variant. My Nokia 5800XM is for Malaysian market and has �red lining�. Therefore I chose�APAC1 RED MALAYSIA (0570196)�. If you are not from Malaysia, for example Indonesia and your phone has blue lining, you may want to choose �APAC1 Indonesia BLUE (0559960)� variant.
Finally for the files section. Just tick them all. And press �Download from FiRe� button. Save the files into �Your phone model number� folder. As for my case, I save them into a folder name RM-356 on my Desktop.
Download the Custom Firmware
There are so many CFWs for Nokia 5800XM out there. To say CFW A is better than CFW B and vice versa is not entirely correct. Different CFW has different goal. Some CFW is more features and function oriented thus this firmware is kinda bloated for some perspective. Some CFW is more speed and performance oriented. So this firmware may be seem too bare for somebody else. In fact, some firmware might be tweaked to the extreme where battery life is no longer a primary concern. Therefore, it is up to you to choose the right firmware for your mobile phone.http://forum.dailymobile.se/index.php?board=84.0 is a good place to start to find the right firmware for your taste.
As for this tutorial, I use Xtension^10 CFW variant 2. You may get it athttp://forum.dailymobile.se/index.php/topic,22786.0.html . I personally prefer this extension due to its performance oriented but not too minimalistic. Having 82 MB free RAMs is a very good thing too. Furthermore, Xtension^10 is based on firmware version 51.0.006. Other Xtension CFWs are based on previous version of Nokia firmware. As we can�t downgrade the phone firmware, it is really important for you to pay special attention here. Do not download CFW that is based on firmware that is older than your current phone firmware and most importantly, the CFW must be based on the firmware version that you previously download using NAVIFIRM. In other word, if you download original firmware version 51 (NAVIFIRM), do not download and use CFW that is based on version 50, 40 or older.
You may download Xtension^10 Variant-2 at http://forum.dailymobile.se/index.php?topic=22786.msg232730#msg232730 .
Mix Up Custom Firmware with Original Firmware
Custom Firmware doesn�t provide every single file that is needed for your phone. That is why we need to download original firmware using NAVIFIRM before. Same goes to Xtension^10 variant-2. It just provides Rofs2 and Rofs3 files only. So, extract the �ENGLISH ONLY Xtension (rofs2+uda).rar� and �Xtension_10v2.rofs3.rar� into a folder as below.

Then, open up the original firmware folder (the RM-356). Most likely, the files will look like the screenshot below but this is not a must. Different firmware version for different phone model may have different file names.

What we need to do now is change the CFW files name (from Extracted folder) according to your original firmware files name (from RM-356 folder). So as for my case, I need to change �General.uda.fpsx� to be �RM-356_51.0.006_026_000_U01.uda.fpsx�. Err..how do I know? Well, in RM-356 folder, there is only 1 file that end with .uda.fpsx right. In short, the files that I change is as listed below:
- General.uda.fpsx ===> RM-356_51.0.006_026_000_U01.uda.fpsx
- ENGLISHONLY.rofs2.V01 ===> RM-356_51.0.006_prd.rofs2.V22
- Wave1.Xtension^10v2.rofs3.fpsx ===> RM-356_51.0.006_C01_prd.rofs3.fpsx
The next step is, copy these three files that we already change its name into RM-356 folder (folder that contains original firmware files) and overwrite the original files. The idea is, we want to mix up original firmware�s files with custom firmware�s files. The reason is, custom firmware doesn�t provide every single file that is needed for your phone operating system. The author only supplies 2 or 3 files that he/she modifies. So it is up to us to prepare the additional files that are needed by our phone. That explain why we need to download the original firmware using NAVIFIRM previously.
So, once the 3 original files are overwrote by the custom firmware�s files (that we already change their name), our complete CFW is ready to be transferred into your Nokia 5800XM. Copy the whole folder (RM-356) into �C:Program FilesNokiaPheonixProducts� directory. Or if you are using 64 bit operating system, copy the whole (RM-356) folder into �C:Program Files (x86)Nokiaphoenixproducts�. Refer screenshot below (omit the RM356-0570196� folder, it was automatically created by JAF when I did flash my phone previously).

Please note that the folder (that store our complete CFW) in �phoenixproducts�needs to be named exactly as your phone�s model number. As for my case, my 5800XM�s model number is RM-356. That explains why I use folder nameRM-356.
And for those who are already panic because they can�t find any phoenix folder in Nokia directory�don�t be. By default, there is none. I manually create the �phoenix� folder and �product� folder.
Preparing JAF Tools
JAF Tools is the software that we will use to transfer your complete CFW into your mobile phone. So, follow the steps below to prepare it. It consist of JAF installation and copy paste 2 files (ini file and PKEY emulator) into JAF installed directory.
Extract �Nokia Flash Tools.rar� (the one you download for JAF and PKey). You will find �JAFSetup_198.62.rar� file, �OGM_JAF_PKEY_Emulator_v 5.rar� and �(.INI FILE)(jaf_nok4models).rar� file. Extract all the 3 files.
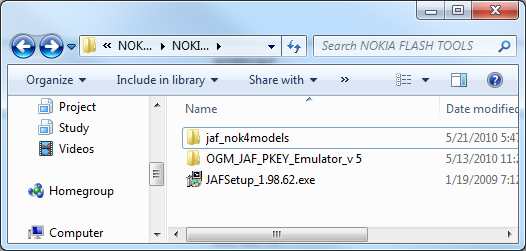
Install �JAFSetup_1.98.62.exe� at its default location.
Copy �Jaf_nok4models.ini� and �OGM_JAF_PKEY_Emulator_v 5.exe� into �C:Program FilesODEONJAF� or �C:Program Files (x86)ODEONJAF� if you are using 64 bit operating system.

Then, make a shortcut for �OGM_JAF_PKEY_Emulator_v 5.exe� emulator to your desktop for easy access later on.
Transferring Complete CFW into your 5800XM phone.
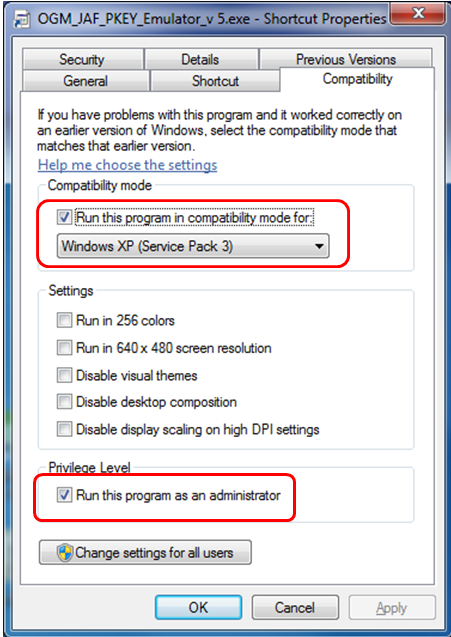
If you happen to use Windows Vista or Windows 7 (32 bit or 64bit), you have to change JAF PKey Emulator�s compatibility first. Right click on the JAF Pkey Emulator and choose properties. Click on Compatibility tab and set compatibility mode to Windows XP (Service Pack 3) and set privilege level as Run this program as an administrator as shown in the screenshot below:
Run the JAF Pkey Tool from your desktop.

Ensure the setting as in the screenshot above. Then click GO.
An error box will appear. Don�t worry, just click OK button.

Then, JAF will start. Click on BB5 tab.
Read more »


Wednesday, December 20, 2017
How to root Samsung Galaxy Music Duos S6012
How to root Samsung Galaxy Music Duos S6012
Samsung Galaxy Music DUOS is a Dual SIM Smartphone , running Android 4.0.4 with awesome Sound and sound sensors (If you upside down the device , music will stop ) . It has an Update for JellyBean and its internal Memory is Expandable up to 32 GB , well we have nothing to do with specifications , We are Here For ROOTING this Device . As a Phone like this one is a waste without Rooting (Sorry if one dont agree , its my personal Experience ) . Before Proceeding with the ROOTING Procedure , You must know what actually ROOTING is , its Advantages and Disadvantages . ROOTING is the Process of breaking the Stock firmware and getting ROOT access (Access to File System ) After Rooting you will be able to play HD games on your Device , Increase your Internal Memory , Overclock processor and much more ! Whereas the main disadvantage of ROOTING is that this would Void your Warranty .
"Sorry for Any Step Missing , as i do not OWN this Device ! If you encounter any problem , just drop your Comments , we will respond back to you withing 12 Hours (may Be extended up to 72 in rare cases)"
DISCLAIMER :- I Anurag , Author of TechDigged.com , is Not responsible for any damage to your Device , though the processes posted here are Tested by Experts and Fully Functional . Good Luck !
Things you Need :-
"Sorry for Any Step Missing , as i do not OWN this Device ! If you encounter any problem , just drop your Comments , we will respond back to you withing 12 Hours (may Be extended up to 72 in rare cases)"
DISCLAIMER :- I Anurag , Author of TechDigged.com , is Not responsible for any damage to your Device , though the processes posted here are Tested by Experts and Fully Functional . Good Luck !
Things you Need :-
- Samsung USB Drivers :- Get HERE (thats Samsung kies , if you already have do not install )
- Download Pdanet And Get Instructions From Here :- HERE
- A USB Data cable , Compatible with your Phone .
- Rooting Tool :- HERE
Procedure :-
- Enable USB Debugging In your Device (Present in Settings >Development) , dont turn it off until you are done with ROOTING. This Enables the Phones Firmware to Enable Development on your Music Duos . it is a Good practice to have it enabled even after your phone is Rooted .
- Install Drivers of your Samsung Galaxy Music Duos using Pdanet (Read the Instructions Above) . Choose Samsung After you have Installed Drivers Do not Disconnect Cable , leave it as it is !
- Download and Extract the Rooting tool [It is a Software to ROOT most Of the ICS and JB Devices] . After you have extracted , run the runme.bat file . it will ask which type you want to run (Normal Or special) , Select Normal by Entering 1 .
- let it Continue ... if The Command prompt asks for any other key press , press it accordingly . your device will reboot many times during the process do not Worry , its normal .
- After the Process is Complete , Reboot your SGMD Manually . Voila !! you will see Superuser installed in your App drawer .
EXPECTED ERRORS :-
As i Do not own the device im imagining the errors that may occur :-
As i Do not own the device im imagining the errors that may occur :-
- If your Device is Not Detected By Command prompt , You Have To Install Android SDK Which can be Downloaded from here and JDK from HERE .
- After the Above two are installed open the android SDK , select the Android SDK platform tools and the Google USB drivers (Available in Extras) , And install them ! (Note: Un-mark all other ) and then try ! If you cant understand the Above steps heres a Detailed Article about it > HERE
- If your phone Do not Get Rooted in the First try , Reboot it and try Again .
If any occur or if you Brick your Device Dont Worry , just Drop your comments we will provide you with the Stock Rom (and the method of restoring )and you Can Get your phone in the Factory State . Comment below if you face any error While Rooting . Though i tried my level best , Still i know i cant explain Good because i dont have the phone currently , As soon as i get this Device ill try to Post a better and full fledged Article .
if you want Quick Assistance Post here > https://www.facebook.com/groups/techdigged/
Have Fun :)
if you want Quick Assistance Post here > https://www.facebook.com/groups/techdigged/
Have Fun :)
Thursday, December 7, 2017
How To Root Micromax A88 Canvas Music
How To Root Micromax A88 Canvas Music
How To Root Micromax A88 Canvas Music or Rooting Micromax A88 Canvas Music is the general question from the people who are searching rooting guide for Micromax A88 Canvas Music.
Micromax A88 Canvas Music is a new released android device! It has many nice features and it is special in music, which is obvious that it is loud in music. Micromax A88 Canvas Music has got 4.5 inches capacitive touchscreen, which can boost your gaming experience. Micromax A88 Canvas Music gets with free JBL Tempo Headset . It has got 512 MB of RAM which is good for gaming, multi-tasking, and other applications which require high RAM. It has 1 GHz Dual Core processor, means 1*2x processor which will be fast for sure. Ah! this has got a special feature that other android devices dont have! it has Android 4.1 JellyBean OS and which is better than most android phones which has Android 4.0 Ice Cream Sandwitch like Micromax A110 Canvas 2. The camera is common, yes, the camera is 5 MP which is almost in all android devices like Micromax A115 Canvas 3D so we can say its mixture of Micromax A110 Canvas 2 and Micromax A115 Canvas 3D eh. It has 3G feature for fast internet surfing and for faster youtube videos streaming. It has Dual-SIM support for your 2 SIMs which are mostly 1st for calling and 2nd for internet. Oh! we forgot our main topic! that was how to root micromax a88 Canvas Music-

Downloads:
* Bin4ry Rooting Toolkit.
* Micromax A88 Canvas Music Original USB drivers.
(NOTE: Install it, Reboot and then follow this guide.)
How To Root Micromax A88 Canvas Music with Bin4ry Rooting toolkit-
1 Download Bin4ry Rooting Toolkit on your Desktop.
2 Extract it in a folder.
3 Now, connect your Micromax A88 Canvas Music to your computer and change the USB storage to Media Device.
4 Open, RunMe.bat file.

Micromax A88 Canvas Music is a new released android device! It has many nice features and it is special in music, which is obvious that it is loud in music. Micromax A88 Canvas Music has got 4.5 inches capacitive touchscreen, which can boost your gaming experience. Micromax A88 Canvas Music gets with free JBL Tempo Headset . It has got 512 MB of RAM which is good for gaming, multi-tasking, and other applications which require high RAM. It has 1 GHz Dual Core processor, means 1*2x processor which will be fast for sure. Ah! this has got a special feature that other android devices dont have! it has Android 4.1 JellyBean OS and which is better than most android phones which has Android 4.0 Ice Cream Sandwitch like Micromax A110 Canvas 2. The camera is common, yes, the camera is 5 MP which is almost in all android devices like Micromax A115 Canvas 3D so we can say its mixture of Micromax A110 Canvas 2 and Micromax A115 Canvas 3D eh. It has 3G feature for fast internet surfing and for faster youtube videos streaming. It has Dual-SIM support for your 2 SIMs which are mostly 1st for calling and 2nd for internet. Oh! we forgot our main topic! that was how to root micromax a88 Canvas Music-
Downloads:
* Bin4ry Rooting Toolkit.
* Micromax A88 Canvas Music Original USB drivers.
(NOTE: Install it, Reboot and then follow this guide.)
How To Root Micromax A88 Canvas Music with Bin4ry Rooting toolkit-
1 Download Bin4ry Rooting Toolkit on your Desktop.
2 Extract it in a folder.
3 Now, connect your Micromax A88 Canvas Music to your computer and change the USB storage to Media Device.
4 Open, RunMe.bat file.
5 Now, Press 1 to Root Micromax A88 Canvas Music, now commands will show running and let Bin4ry rooting kit Root Micromax A88 Canvas Music. It usually takes 1-2 minutes maximum.
NOTE: Your device might Reboot itself. Dont worry and dont remove USB till the Bin4ry says it is done because it can lead to bricked Micromax A88 Canvas Music.
6 When, it will say have fun! then it means that your Micromax A88 Canvas Music is rooted now!
Enjoy Rooting Micromax A88 Canvas Music and dont forget to share this with your friends.
Subscribe to:
Posts (Atom)