Showing posts with label advanced. Show all posts
Showing posts with label advanced. Show all posts
Friday, December 15, 2017
How to make Crankshaft in Autocad Advanced Tutorial
How to make Crankshaft in Autocad Advanced Tutorial
In this tutorial you will learn Tutorial how to make Crankshaft. This is on categories advanced tutorial. You can learn tutorial step by step and more easly. so let us start.

-
Step 1
open a sketch on the right plane and draw a sketch like shown

-
Step 2
open a sketch on the body. draw a 30mm radiused circle and extrude it 20mm

-
Step 3
use revolve command

-
Step 4
go to other side draw shown sketch and extrude it 20 mm

-
Step 5
open a sketch on same surface and draw shown skecth

-
Step 6
use cut extrude command and tick filp side to cut

-
Step 7
now use mirror command. your crank began to take shape

-
Step 8
use move copy body command. enter volues

-
Step 9
rotate this (4th from right side) body 60degree

-
Step 10
rotate 3th body 120 degree

-
Step 11
rotate sixth body 180 degree

-
Step 12
rotate second body 240 degree
-
Step 13
rotate 5th body 300 degree

-
Step 14
use combine command. your crank is ready for now. we will add oil canal and other parts after

Now the tutorial How to make Crankshaft in Autocad has been finished. If you need any tutorial to improve your skill in autocad please visit other tutorial on this blog. Ok thanks for coming.
By Aykut Dana
Friday, December 8, 2017
How to render in AutoCad Advanced Tutorial
How to render in AutoCad Advanced Tutorial
In thi tutorial you will learn How to render in AutoCad. This is Advanced Tutorial Categories. You can learn tutorial step by step and more easly. so let us start.
-
Step 1
Open your part in AutoCAD.

-
Step 2
Choose line tool.

-
Step 3
Make a line below your part.

-
Step 4
Change the UCS so the line can be extruded in horizontal plane.

-
Step 5
Under surfaces tab choose extrude and extrude it making the floor. Adjust it using Move gizmo.

-
Step 6
Now go to render tab. We have to adjust some of the setting before rendering. First of all full shadows.

-
Step 7
Now turn on the Sun for realistic shadows. Under material texture turn material texture on.

-
Step 8
Adjust the time of the Sun.

-
Step 9
Open material browser from render tab and apply floor tile material to the surface.

-
Step 10
Apply plastic material to the body or whatever.

-
Step 11
Adjust the model.

-
Step 12
Now click on the arrow below the render button. Choose the setting of the rendering and then click render button.

-
Step 13
The render window will open up and the rendering will start.

-
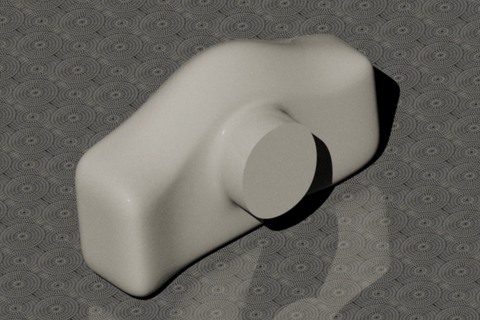
Step 14
Here is my final result. Looks Good!. If you need any tutorial to improve your skill in autocad please visit other tutorial on this blog. Ok thanks for coming.
By Sudhir Gill
Sunday, December 3, 2017
Huawei Advanced Tool v2 7 2 9 Crack Download
Huawei Advanced Tool v2 7 2 9 Crack Download
Huawei Advanced Tool v2.7.2.9 crack is ready to download using direct link. If you were already looking to download Huawei Advanced Tool v2.7.2.9 crack then this post might be helpful to you. Huawei Advanced Tool latest version has bug fixes and support more huawei models then older version. Download Huawei Advanced Tool v2.7.2.9 crack by following link posted at the end of this post.
Added to Huawei Balong-Hisi Phones*:
������������
CHC-U01 (Huawei Gplay Mini) (Permanent Direct Unlock, Permanent Imei Repair, Full Security Area Repair) W1st
CHC-U03 (Huawei Gplay Mini) (Permanent Direct Unlock, Permanent Imei Repair, Full Security Area Repair) W1st
CHC-U23 (Huawei Gplay Mini) (Permanent Direct Unlock, Permanent Imei Repair, Full Security Area Repair) W1st
Che2-L03 (CherryPlus-L03, Honor 4X) (Permanent Direct Unlock, Permanent Imei Repair, Full Security Area Repair) W1st
Che2-L11 (CherryPlus-L11, Honor 4X) (Permanent Direct Unlock, Permanent Imei Repair, Full Security Area Repair) W1st
Che2-L12 (CherryPlus-L12, Honor 4X) (Permanent Direct Unlock, Permanent Imei Repair, Full Security Area Repair) W1st
Che2-L23 (CherryPlus-L23, Honor 4X) (Permanent Direct Unlock, Permanent Imei Repair, Full Security Area Repair) W1st
Che2-TL00 (CherryPlus-TL00, Play Mobile Glory 4X standard version) (Permanent Direct Unlock, Permanent Imei Repair, Full Security Area Repair) W1st
Che2-TL00H (CherryPlus-TL00H, Play Mobile Glory 4X) (Permanent Direct Unlock, Permanent Imei Repair, Full Security Area Repair) W1st
Che2-TL00M (CherryPlus-TL00M, Glory Play 4X mobile high with customized version) (Permanent Direct Unlock, Permanent Imei Repair, Full Security Area Repair) W1st
Che2-UL00 (CherryPlus-UL00, Play Unicom Glory 4X standard) (Permanent Direct Unlock, Permanent Imei Repair, Full Security Area Repair) W1st
G735-L03 (Huawei G Play) (Permanent Direct Unlock, Permanent Imei Repair, Full Security Area Repair) W1st
**USB DEBUG ON and ROOTED, * Hisilicon/Infineon/Balong/ Method/ Manufacturer Mode:
This method is based on some special code including ZZ key software. When you type * # * # 2846579 # * # * Project Menu-> background setting-> USB ports setting-> USB ports Setting-> Manufacturer Mode phone automatically switch the port.
***Huawei Bootloader Password FREE for All zZKey customers here (5mins to few hours)
Added Support for ALL latest Qualcomm/Balongs/Hisilicon Huawei phone-tablet
zZ Huawei Advanced Tool v2.7.2.9 Crack.rar
Subscribe to:
Comments (Atom)